Managing structured data is very easy with Google Sheets. Many website owners use it to organize product lists, price tables, stock data, event schedules, comparison charts, and reports. But storing data is only one part of the work. The real challenge starts when you want to show them nicely on WordPress websites.
Because WordPress does not automatically display Google Sheets data as a styled table. You cannot just paste the Sheet link and expect a professional-looking table to appear. You have to export to a CSV file and then import it to WordPress.
The process is very simple if you have the right plugin. In this tutorial post, we’ll show you how to create a table in WordPress using Google Sheets data. Hope you’ll love it a lot. Let’s get started without wasting further time.
How This Method Works
WP Table Builder does not connect directly with Google Sheets. So, there is no automatic syncing between the two platforms. Instead, you have to move your data manually in a simple format from Google Sheets to WordPress.
The process follows a clear path: Google Sheets > Export as CSV > Import into WP Table Builder > Publish the table on your website.
First, you prepare and organize your data in Google Sheets. Then, you export the file as a CSV file. After that, you upload the CSV file into WP Table Builder. The plugin converts your data into a table. Finally, you style the table and publish it on your WordPress site.
This entire process will be displayed to you using necessary screenshots so you can understand everything.
How to Create a Table in WordPress Using Google Sheets Data
There are numerous ways online you’ll find to display data from Google Sheets to WordPress. But we’ll show you one of the easiest methods in this section.
Step 01: Prepare Your Google Sheet
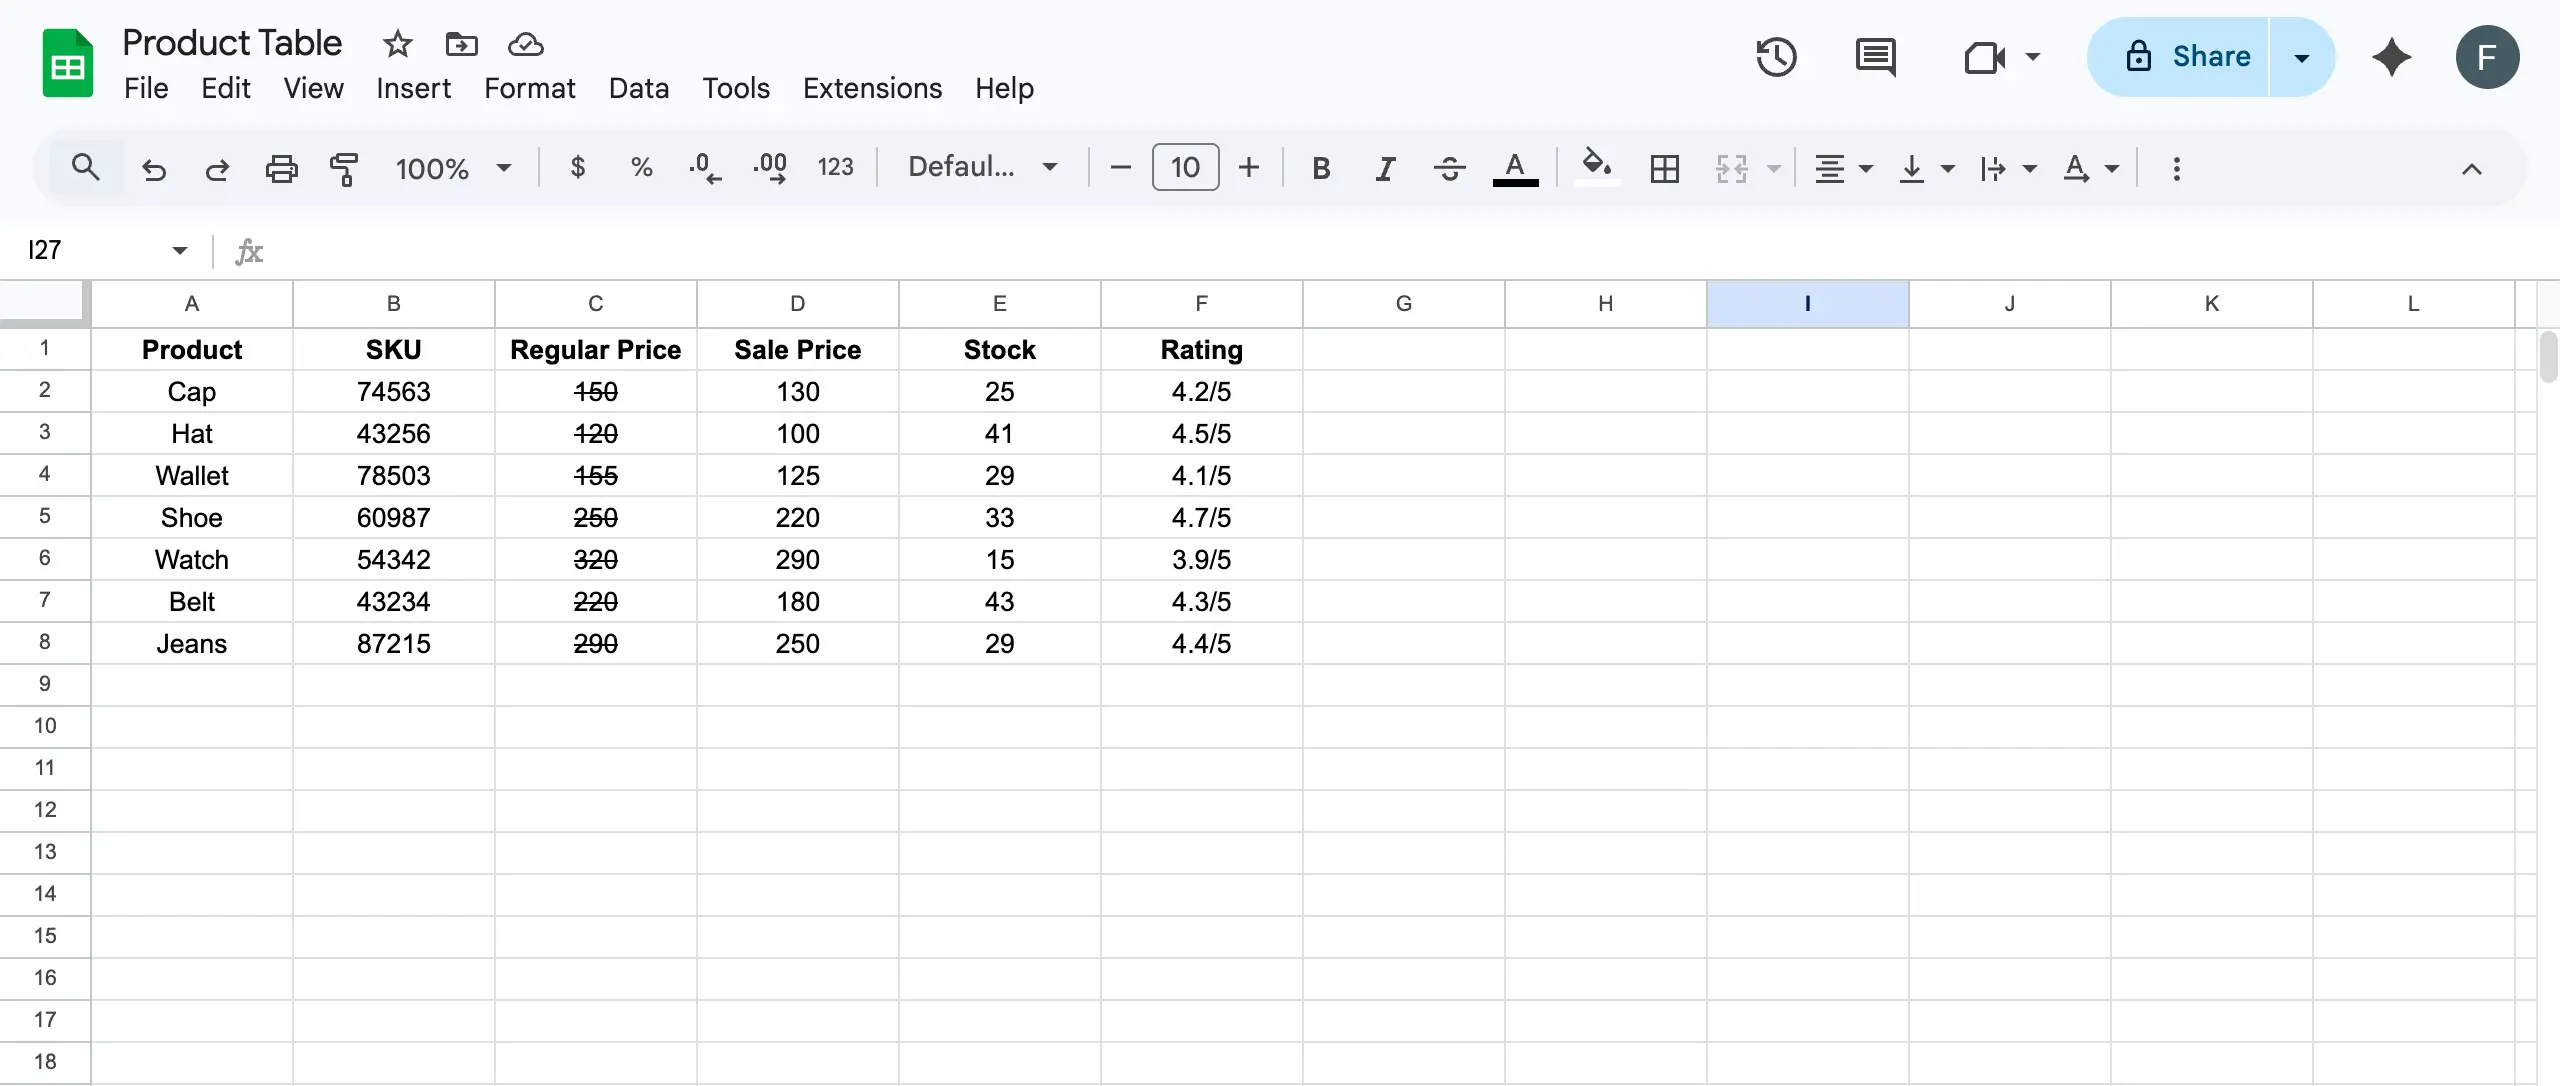
Open your Google Sheet and create a table using any type of data you want. To explain the tutorial, we have created a simple table, as you can see in the screenshot below.
Step 02: Export Google Sheets as CSV
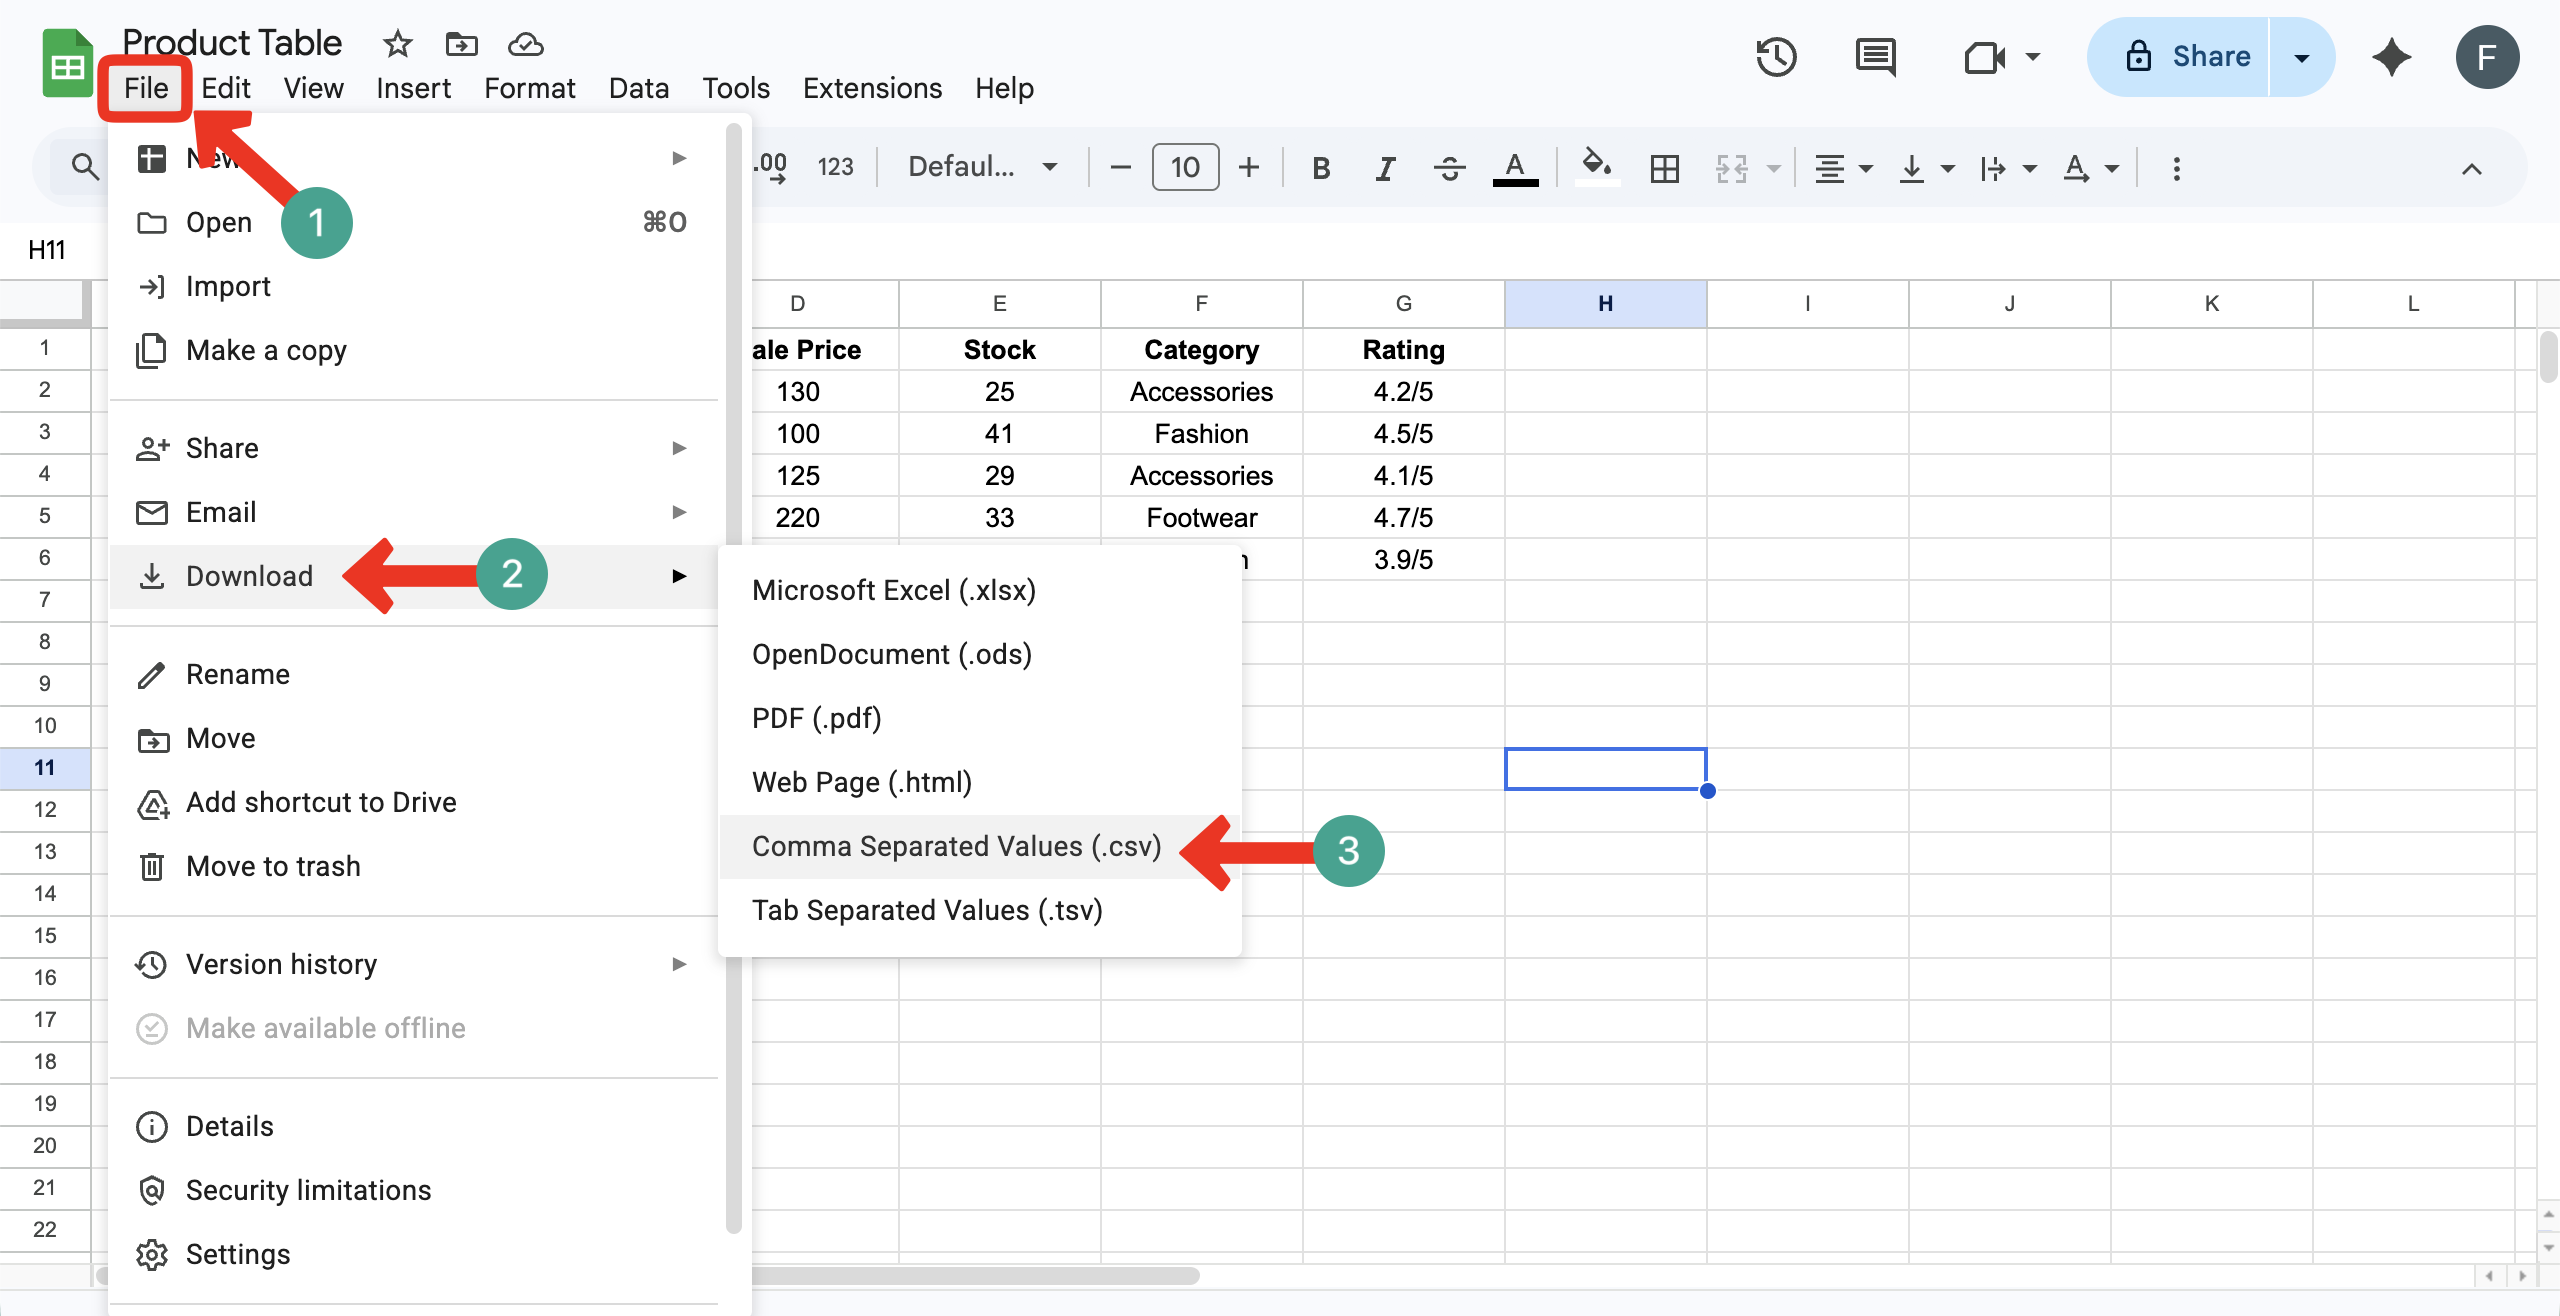
Now, you have to prepare the file in CSV format. To do this, go to File > Download > Comma Separated Values (.csv). Once this format is selected, the sheet will be downloaded as a CSV file.
Step 3: Install and Open WP Table Builder
WP Table Builder is a drag-and-drop table builder plugin. Not just a plain textual table, you can add different types of content, like images, buttons, ribbons, ratings, progress bars, and more elements to make the table more engaging.
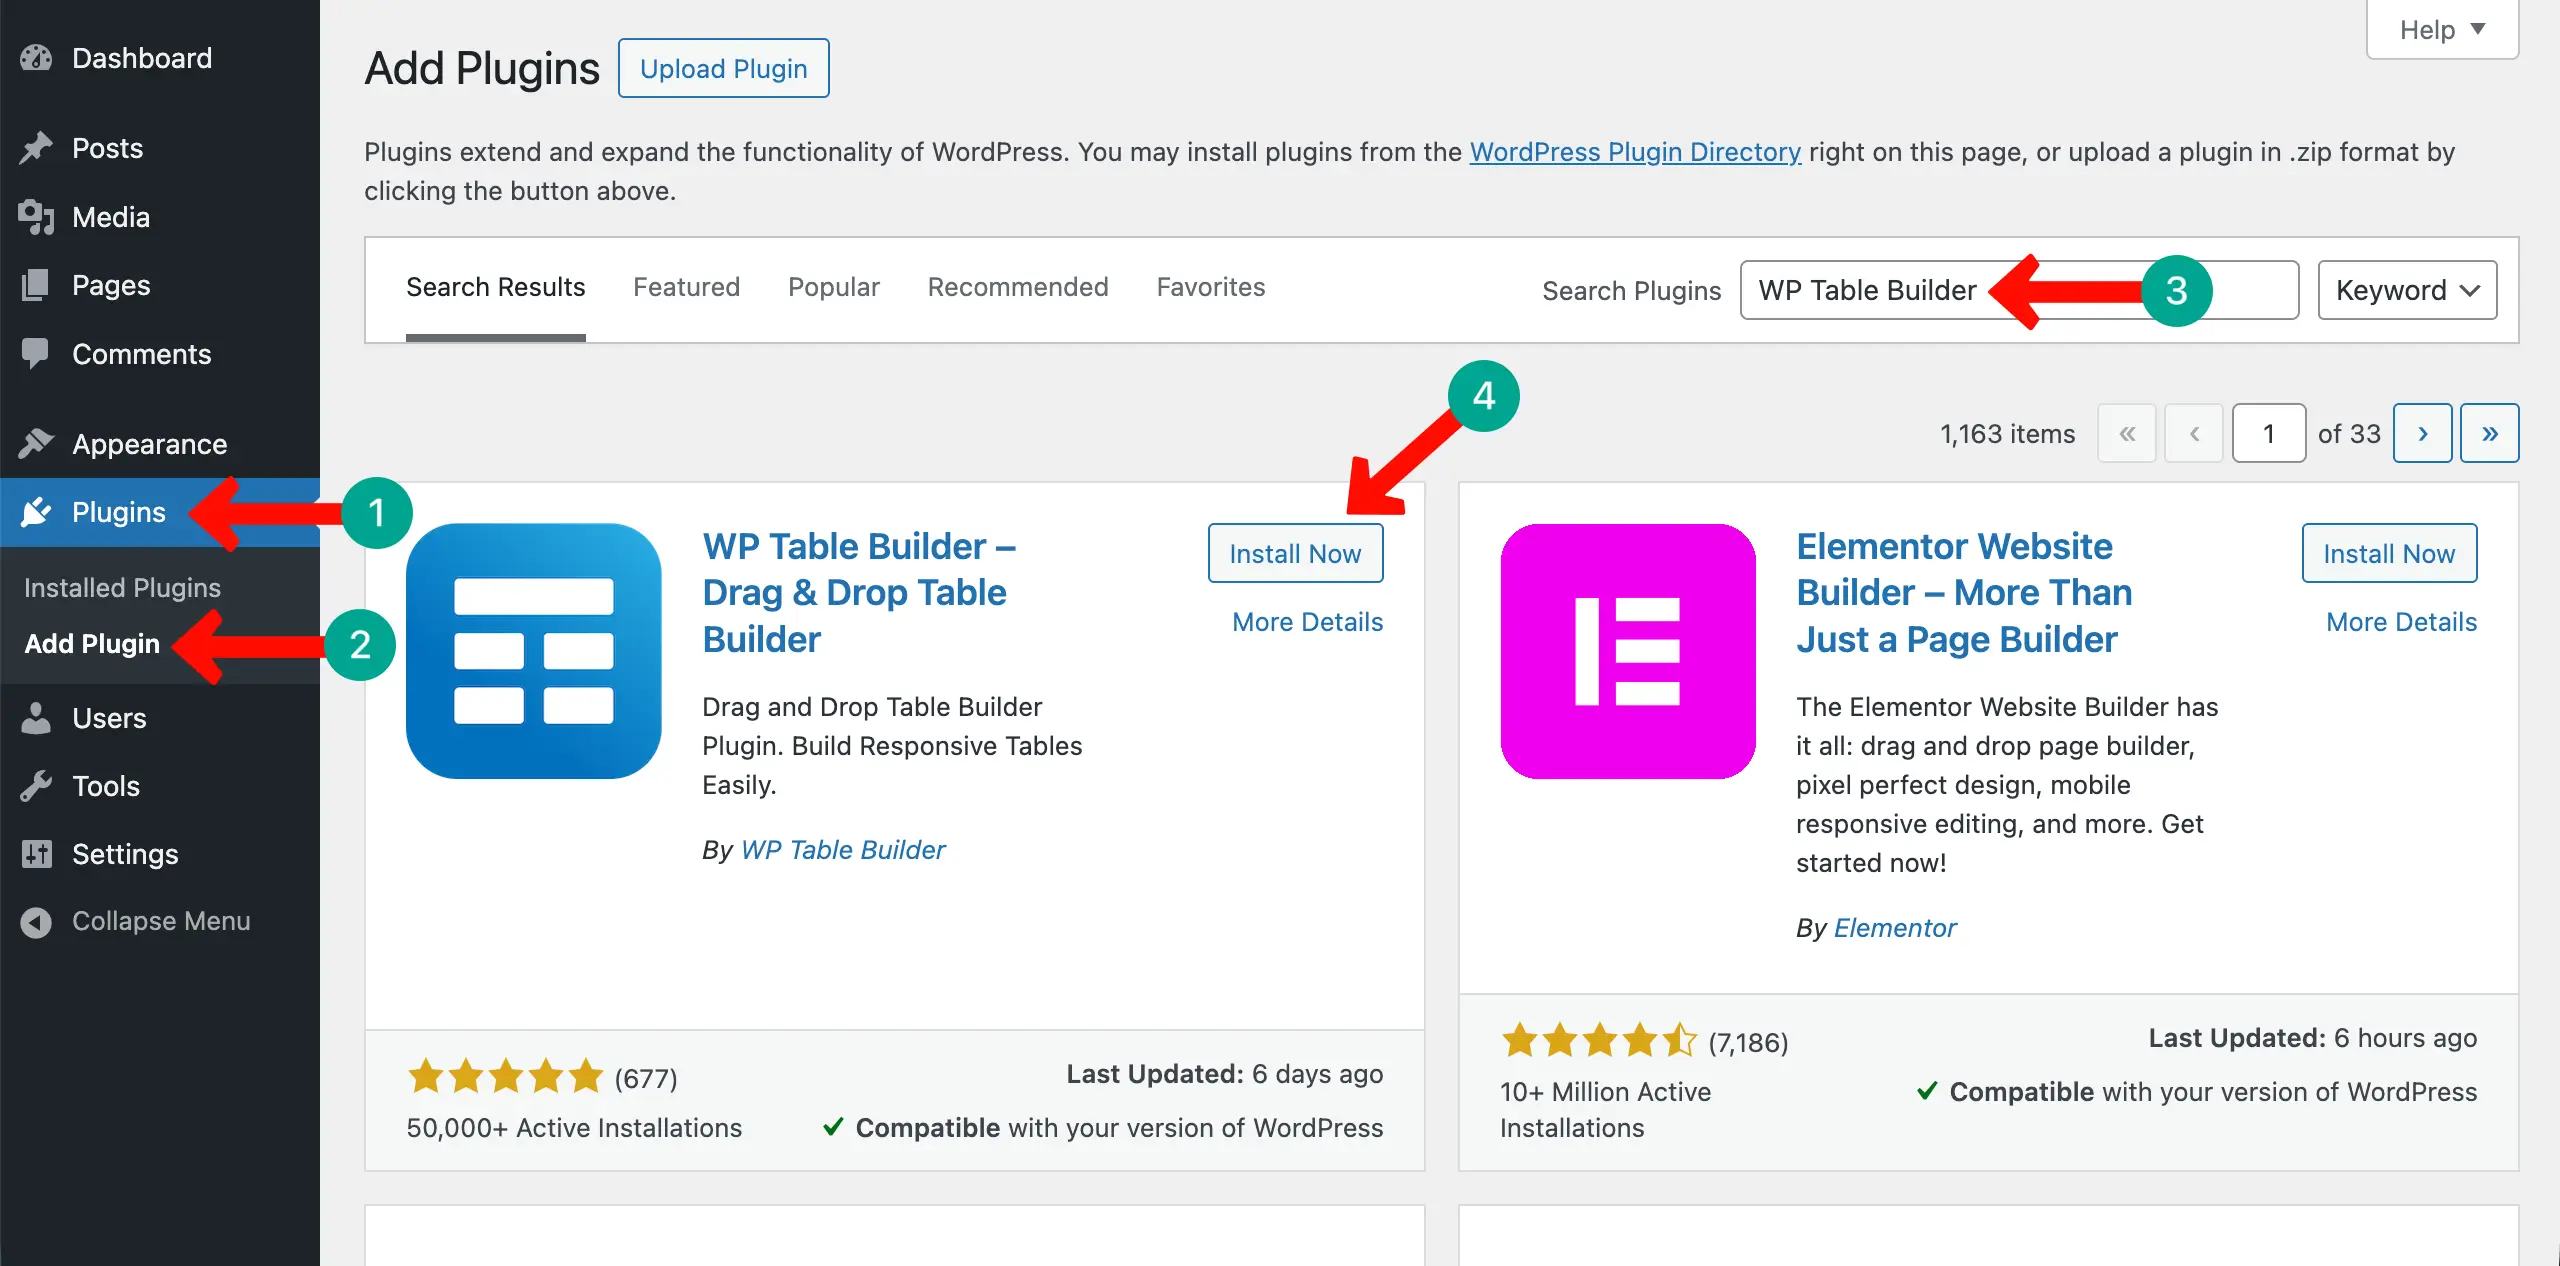
It has a built-in import option by which you can import CSV files and display them directly on your WordPress site. So, let’s first install and activate the WP Table Builder plugin on your site.
WP Table Builder has a premium version. If you ever feel the free version isn’t enough for you to create complex tables, you can use its premium version. You can get it by clicking the button attached below.
Once, at least the free version is installed, follow the steps explained below.
Step 04: Import the CSV File
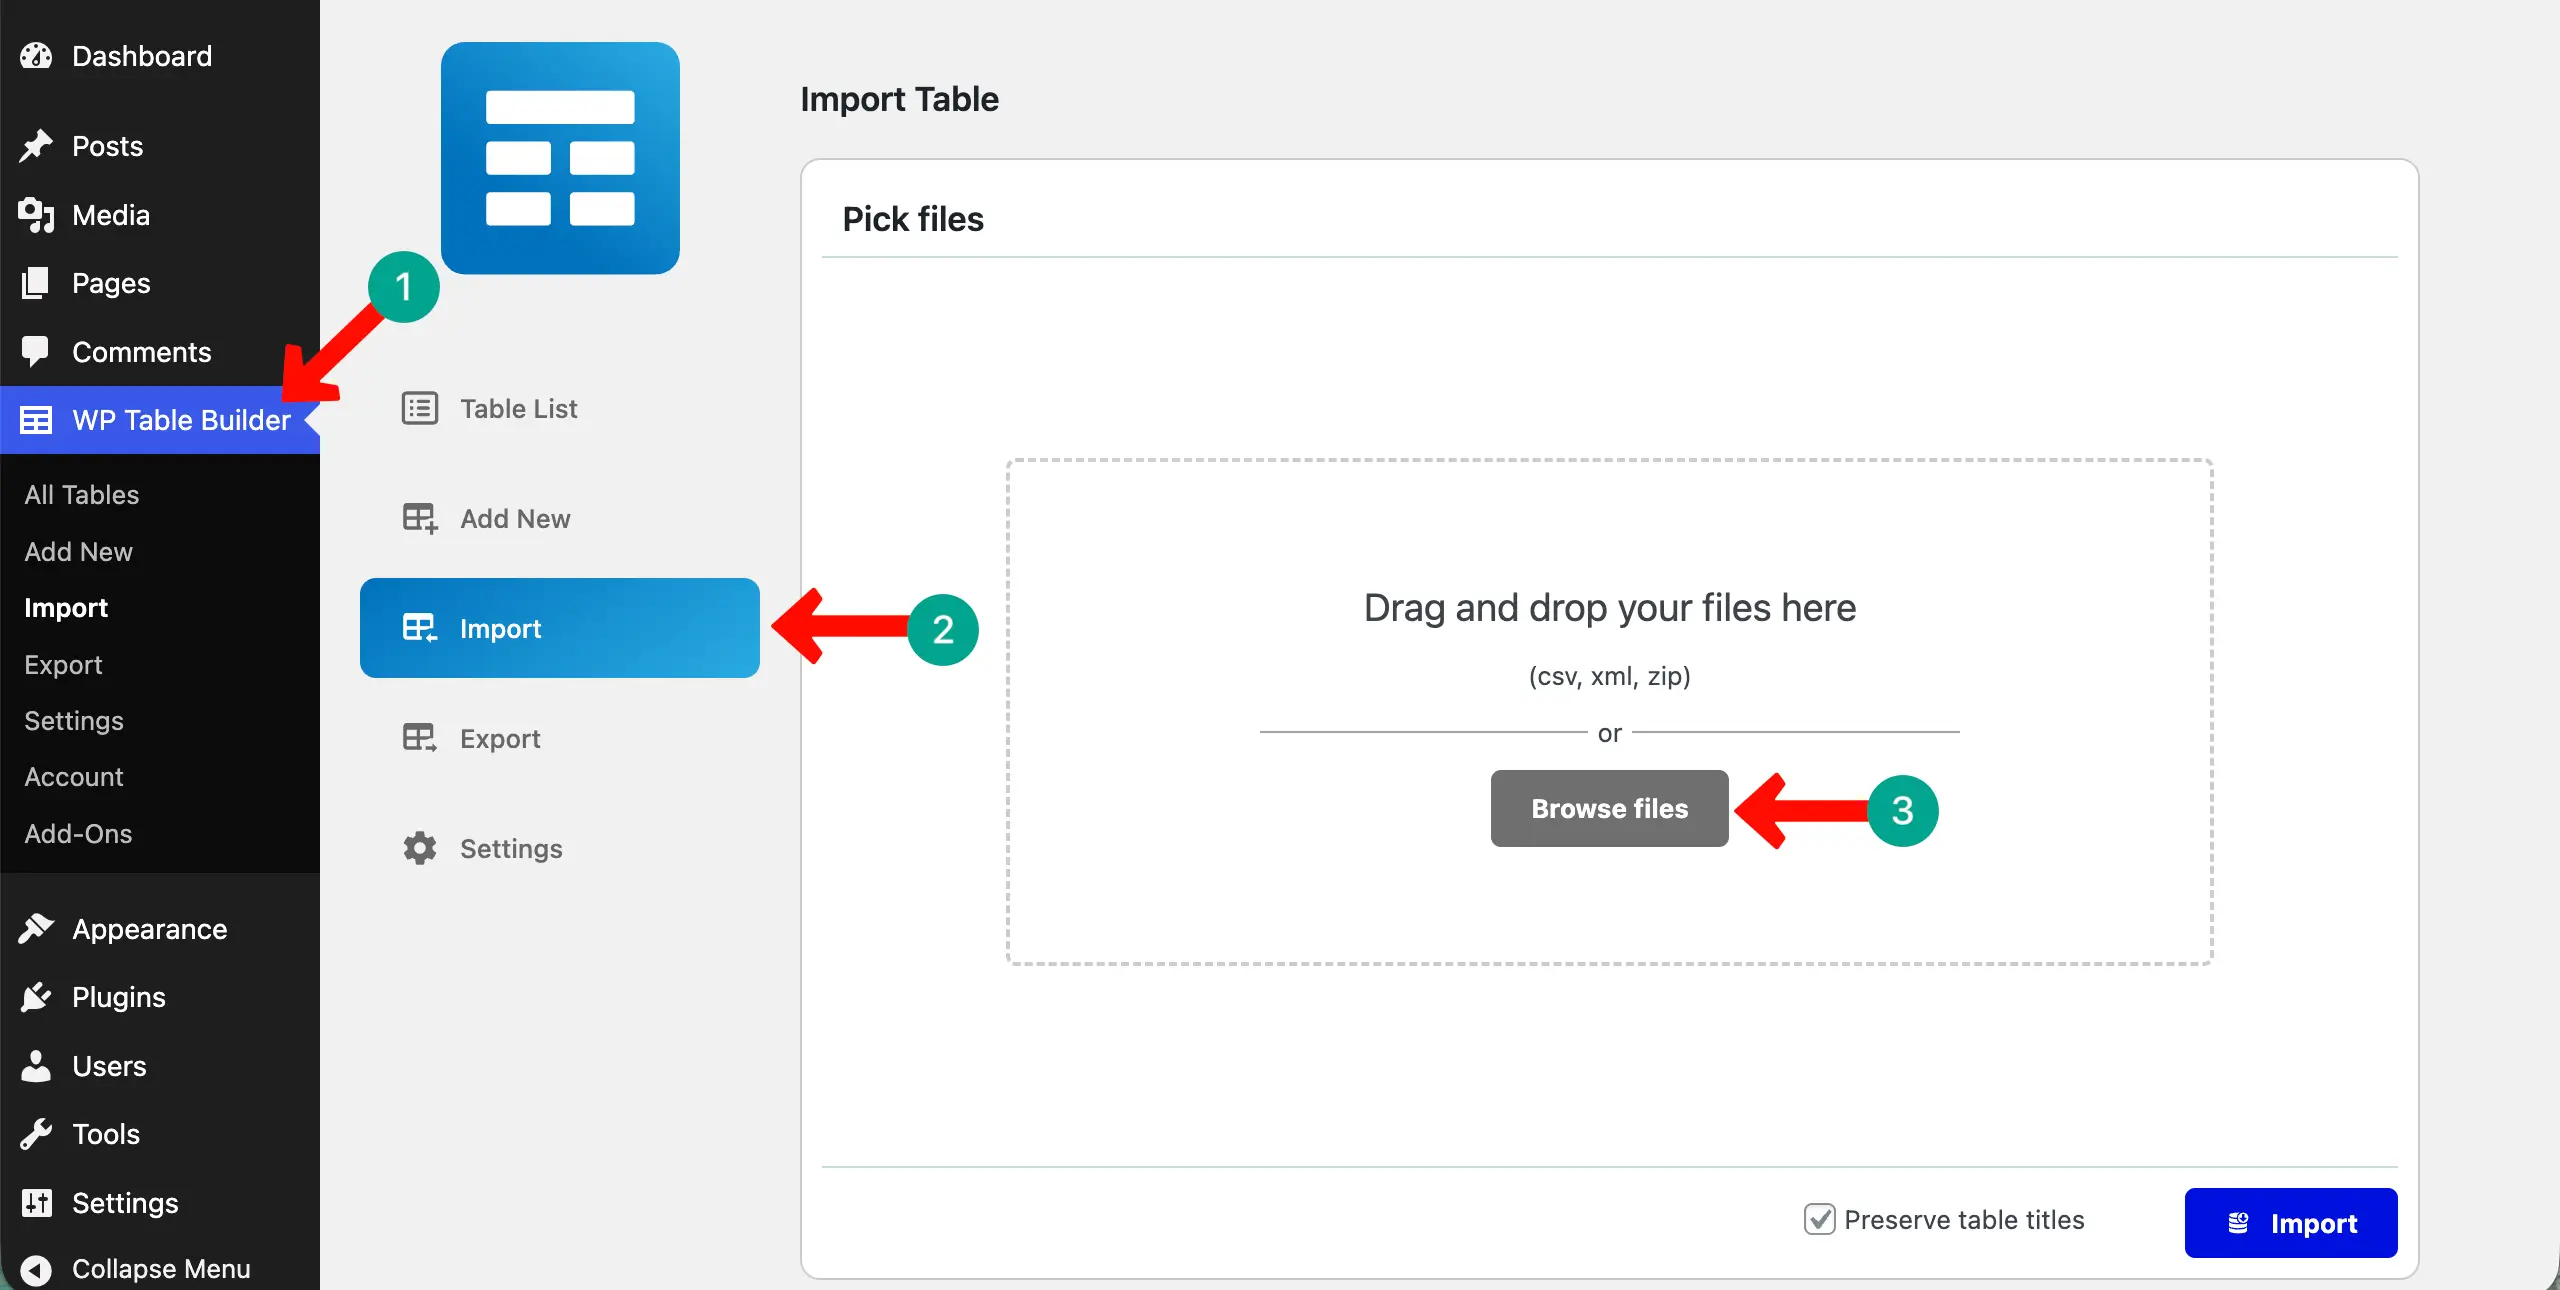
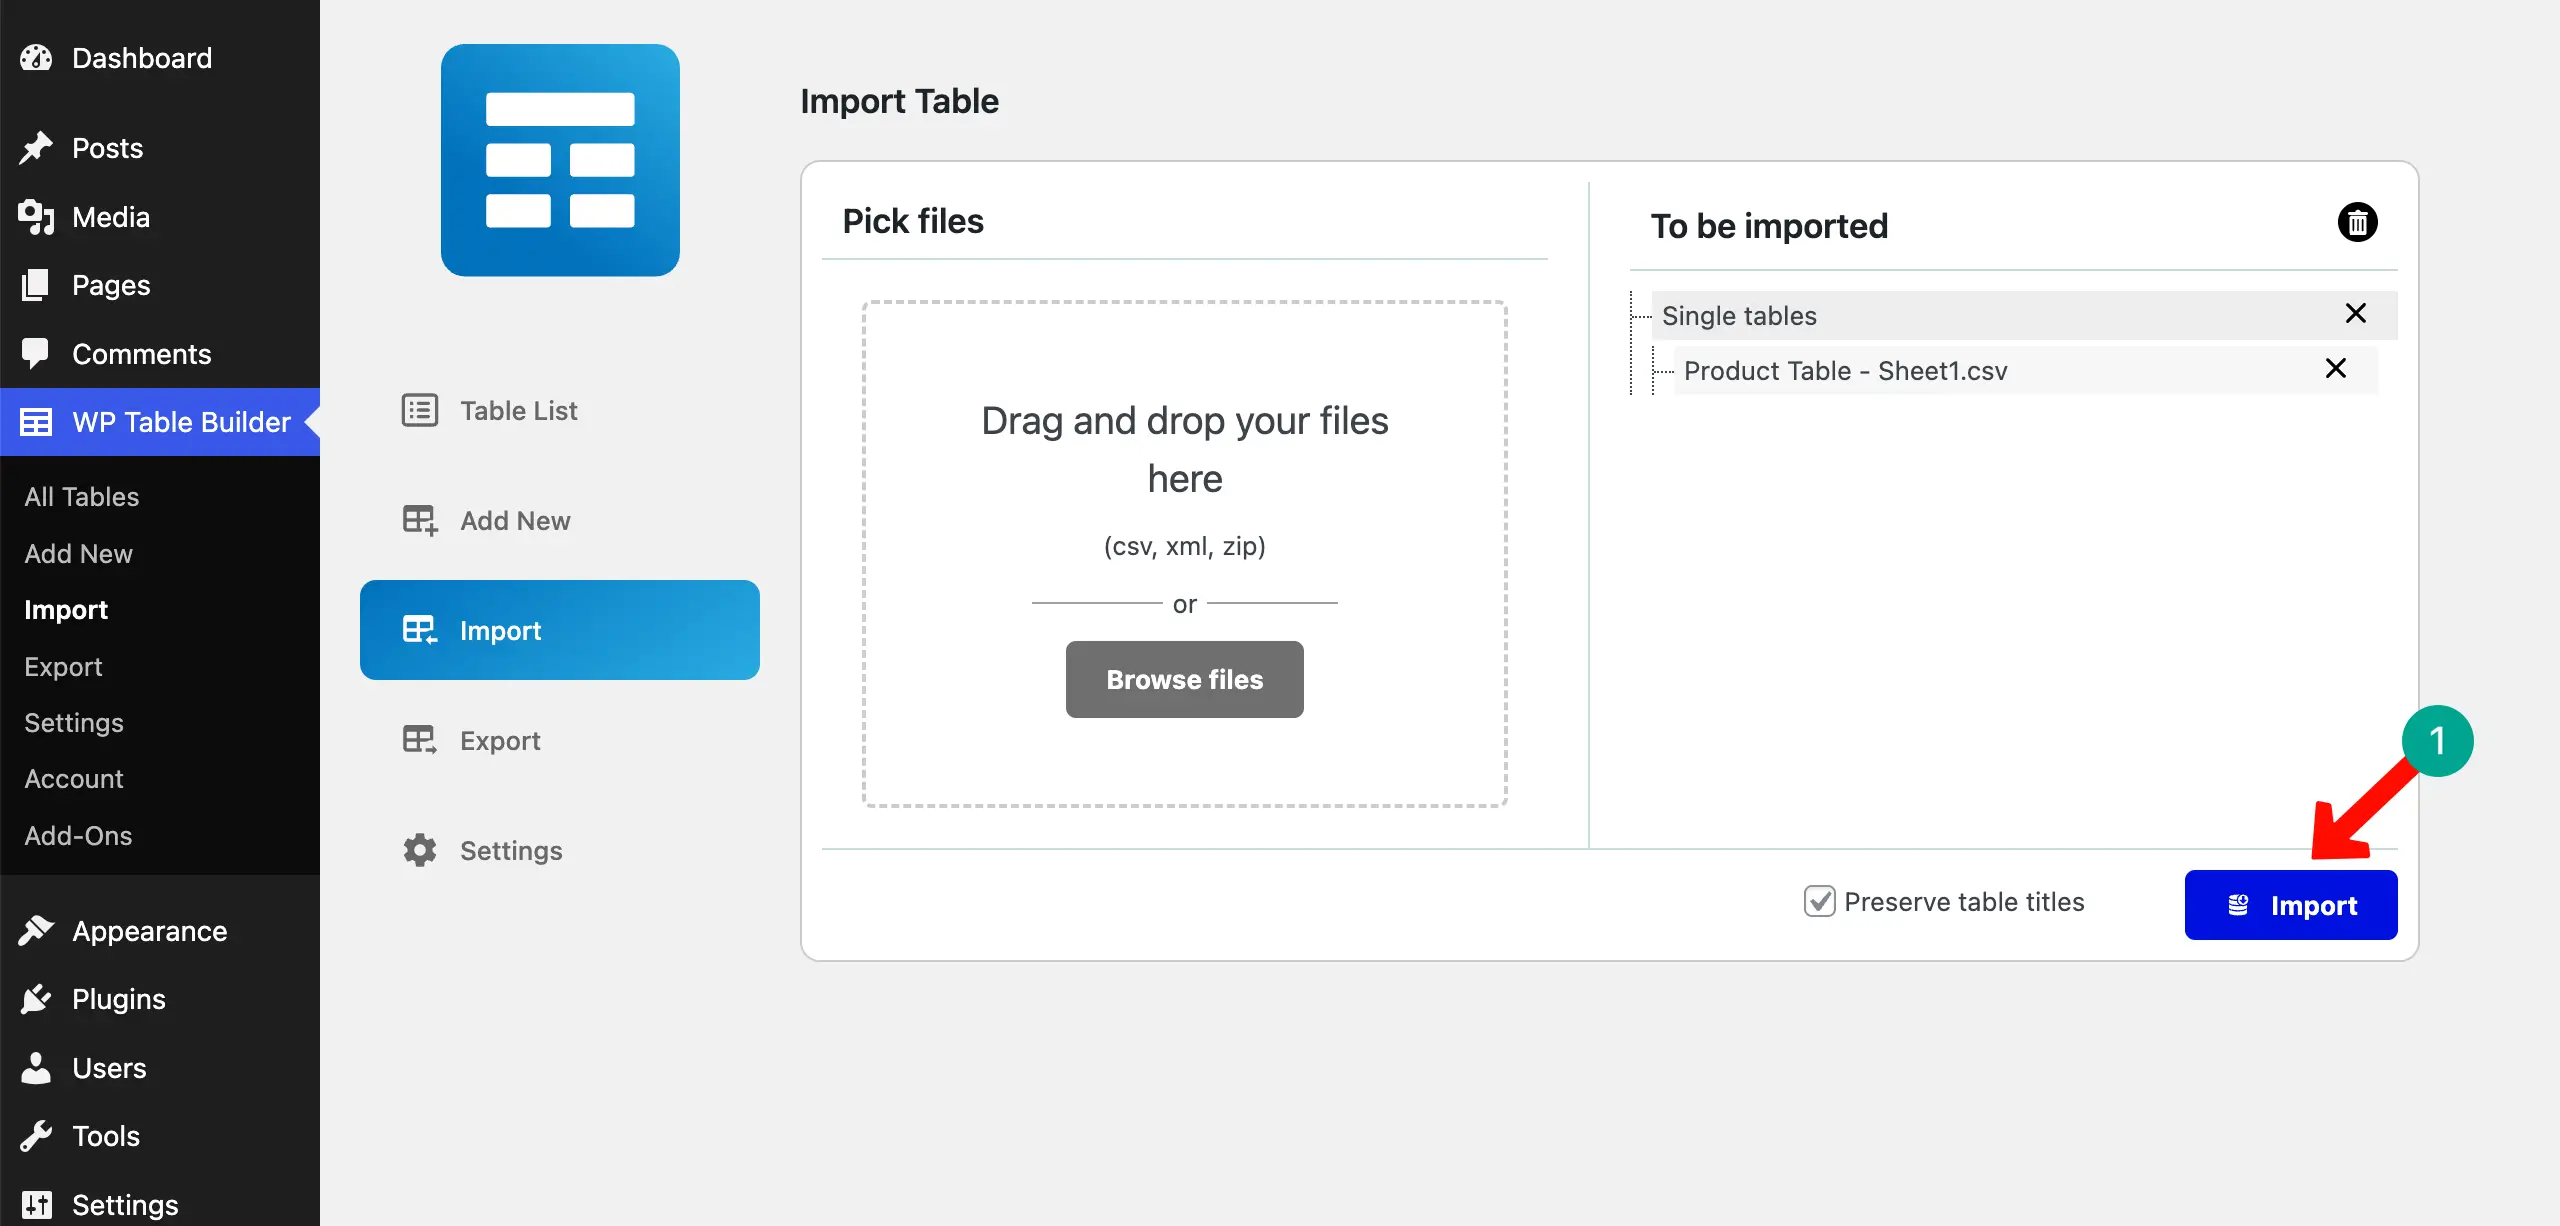
Navigate to WP Table Builder > Import. By clicking the Browse files button, choose the CSV file you want to import.
You can see that we have already selected a file. Now, to finally import this, click the Import button.
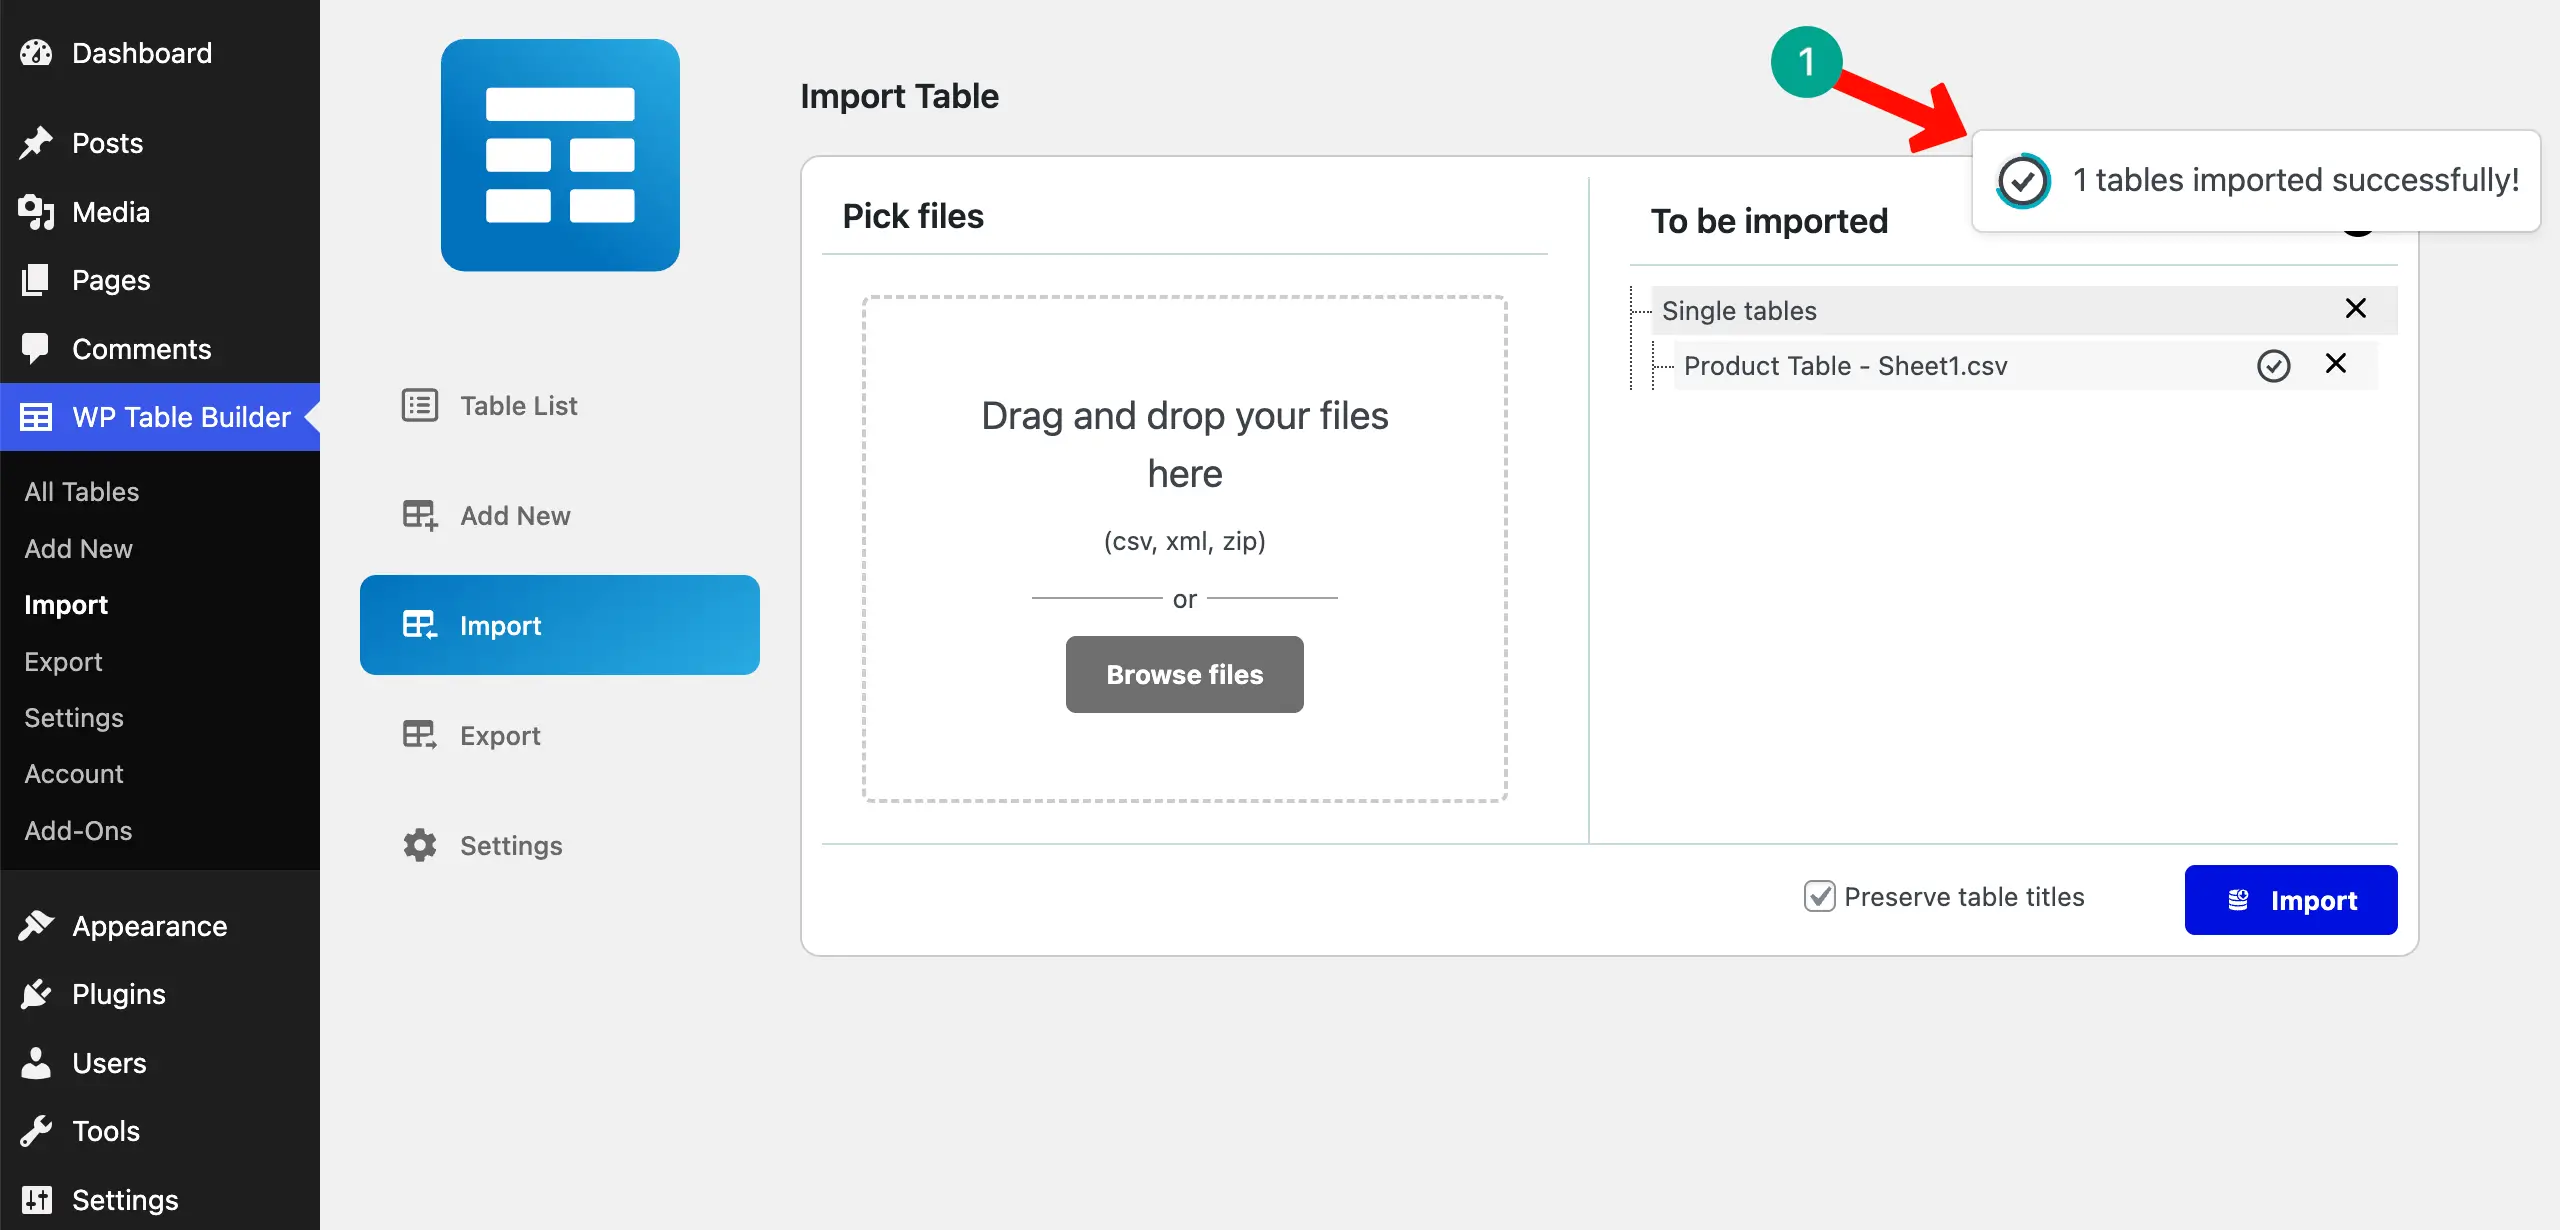
If importing is successful, you’ll see a notification like below.
Learn how to create and add a pricing table in Elementor using WP Table Builder.
Step 05: Find the Table Import Via the CSV File
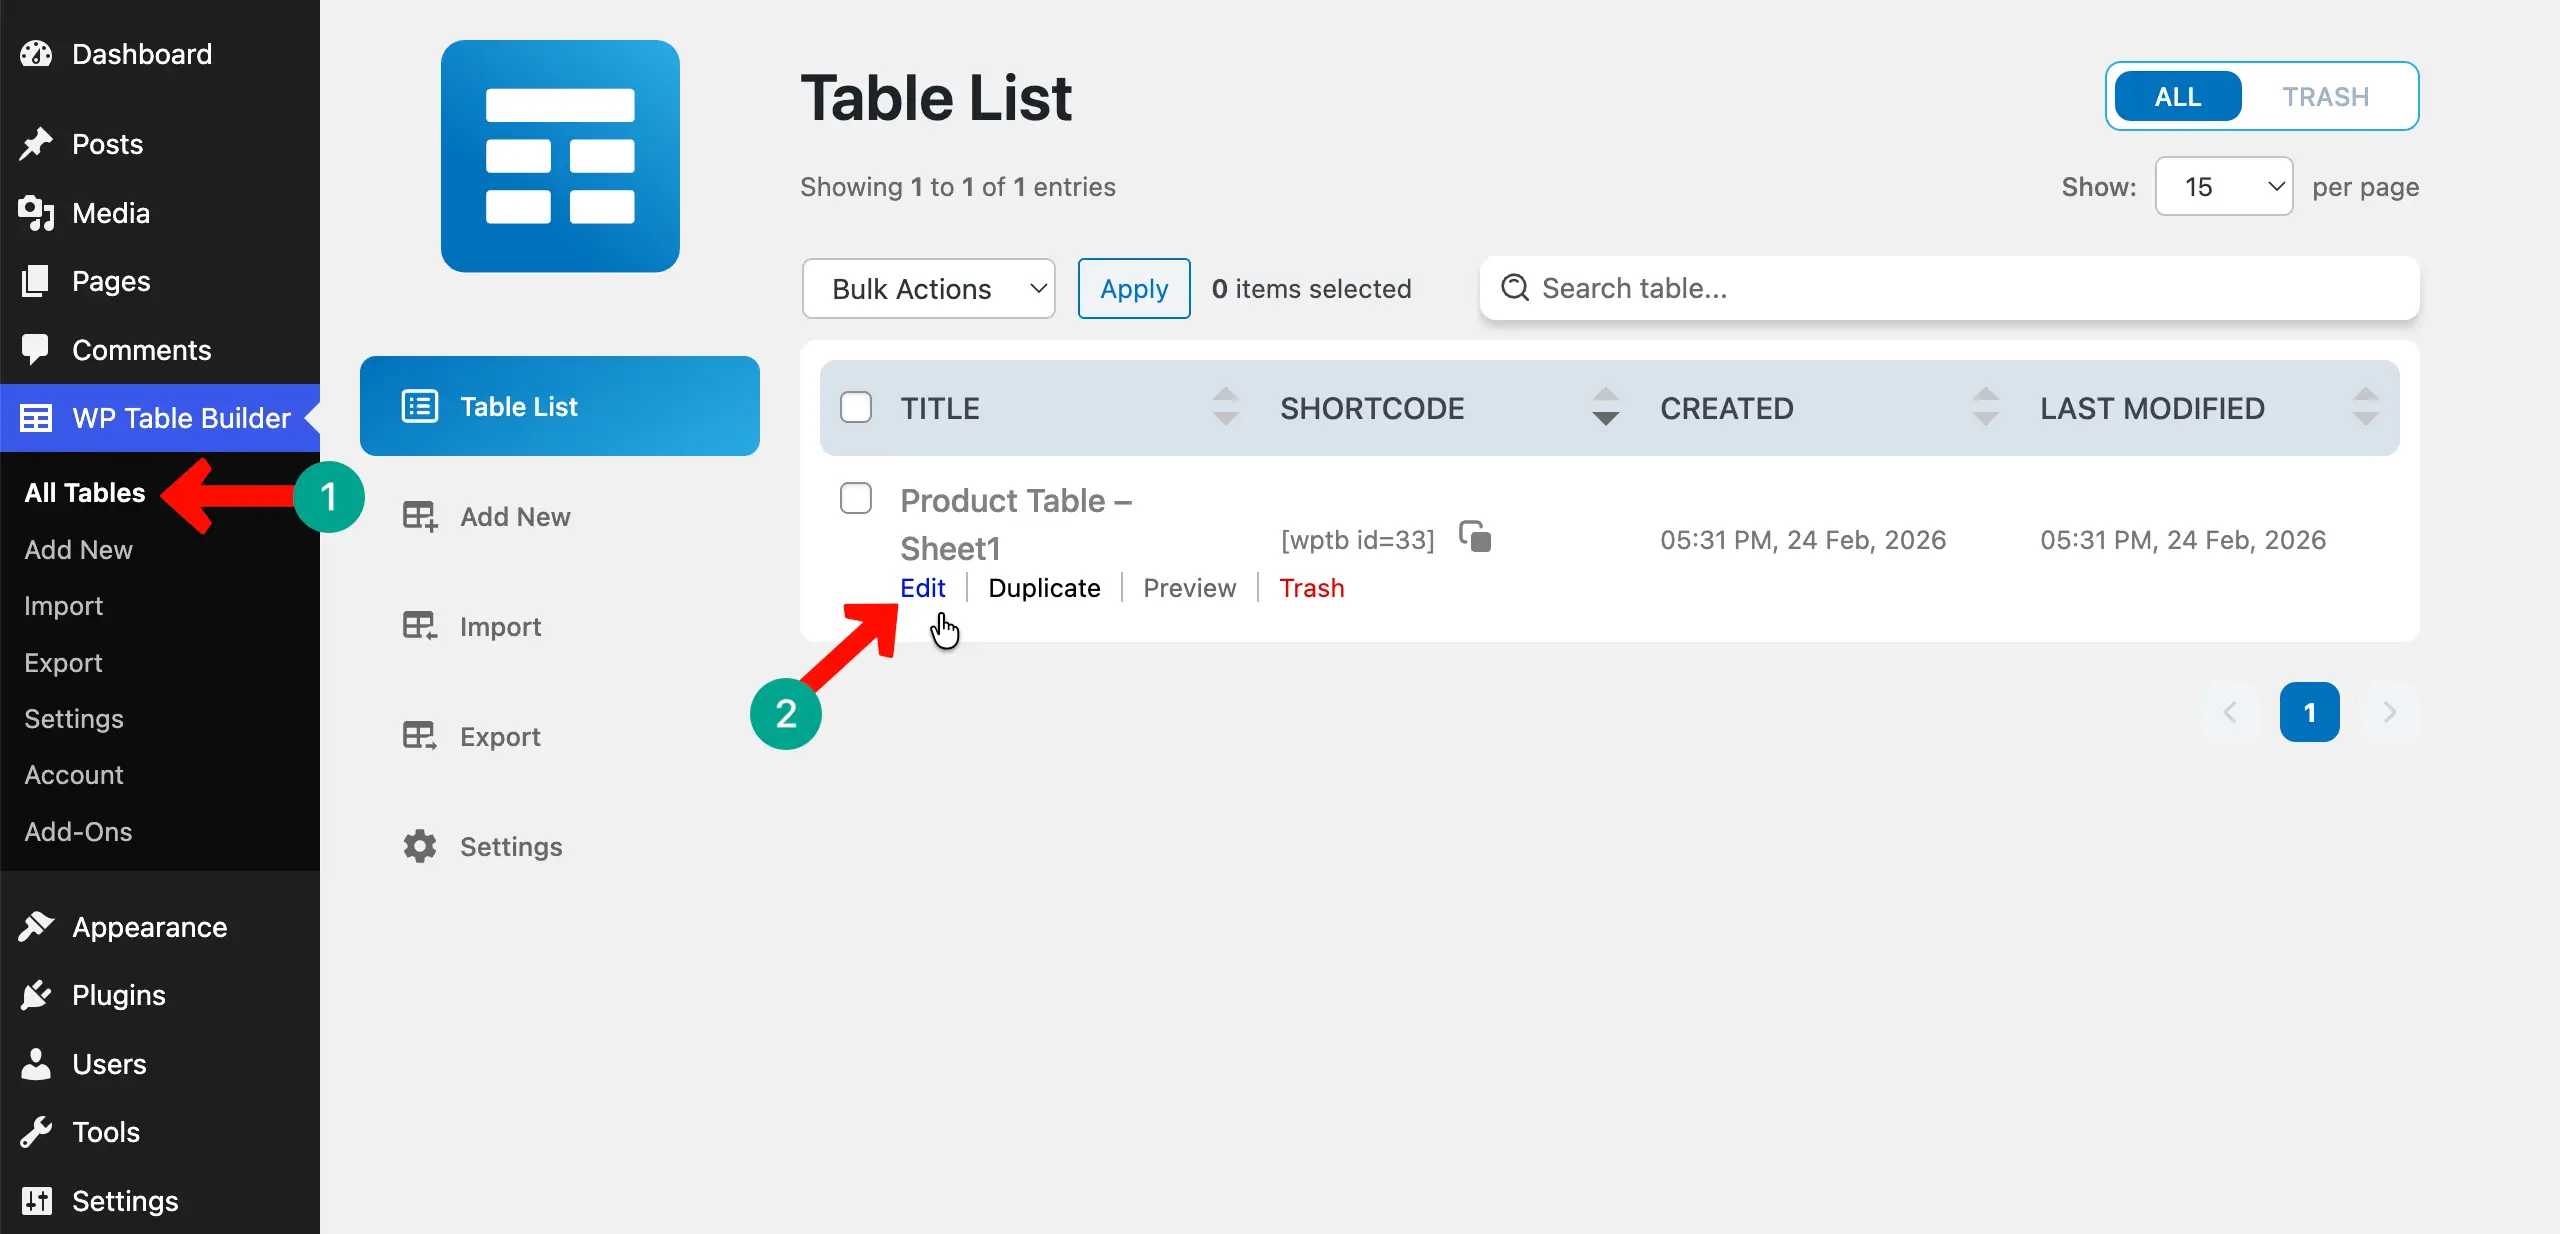
Come to the All Tables section. You’ll see the imported table here. To check this, click the Edit button.
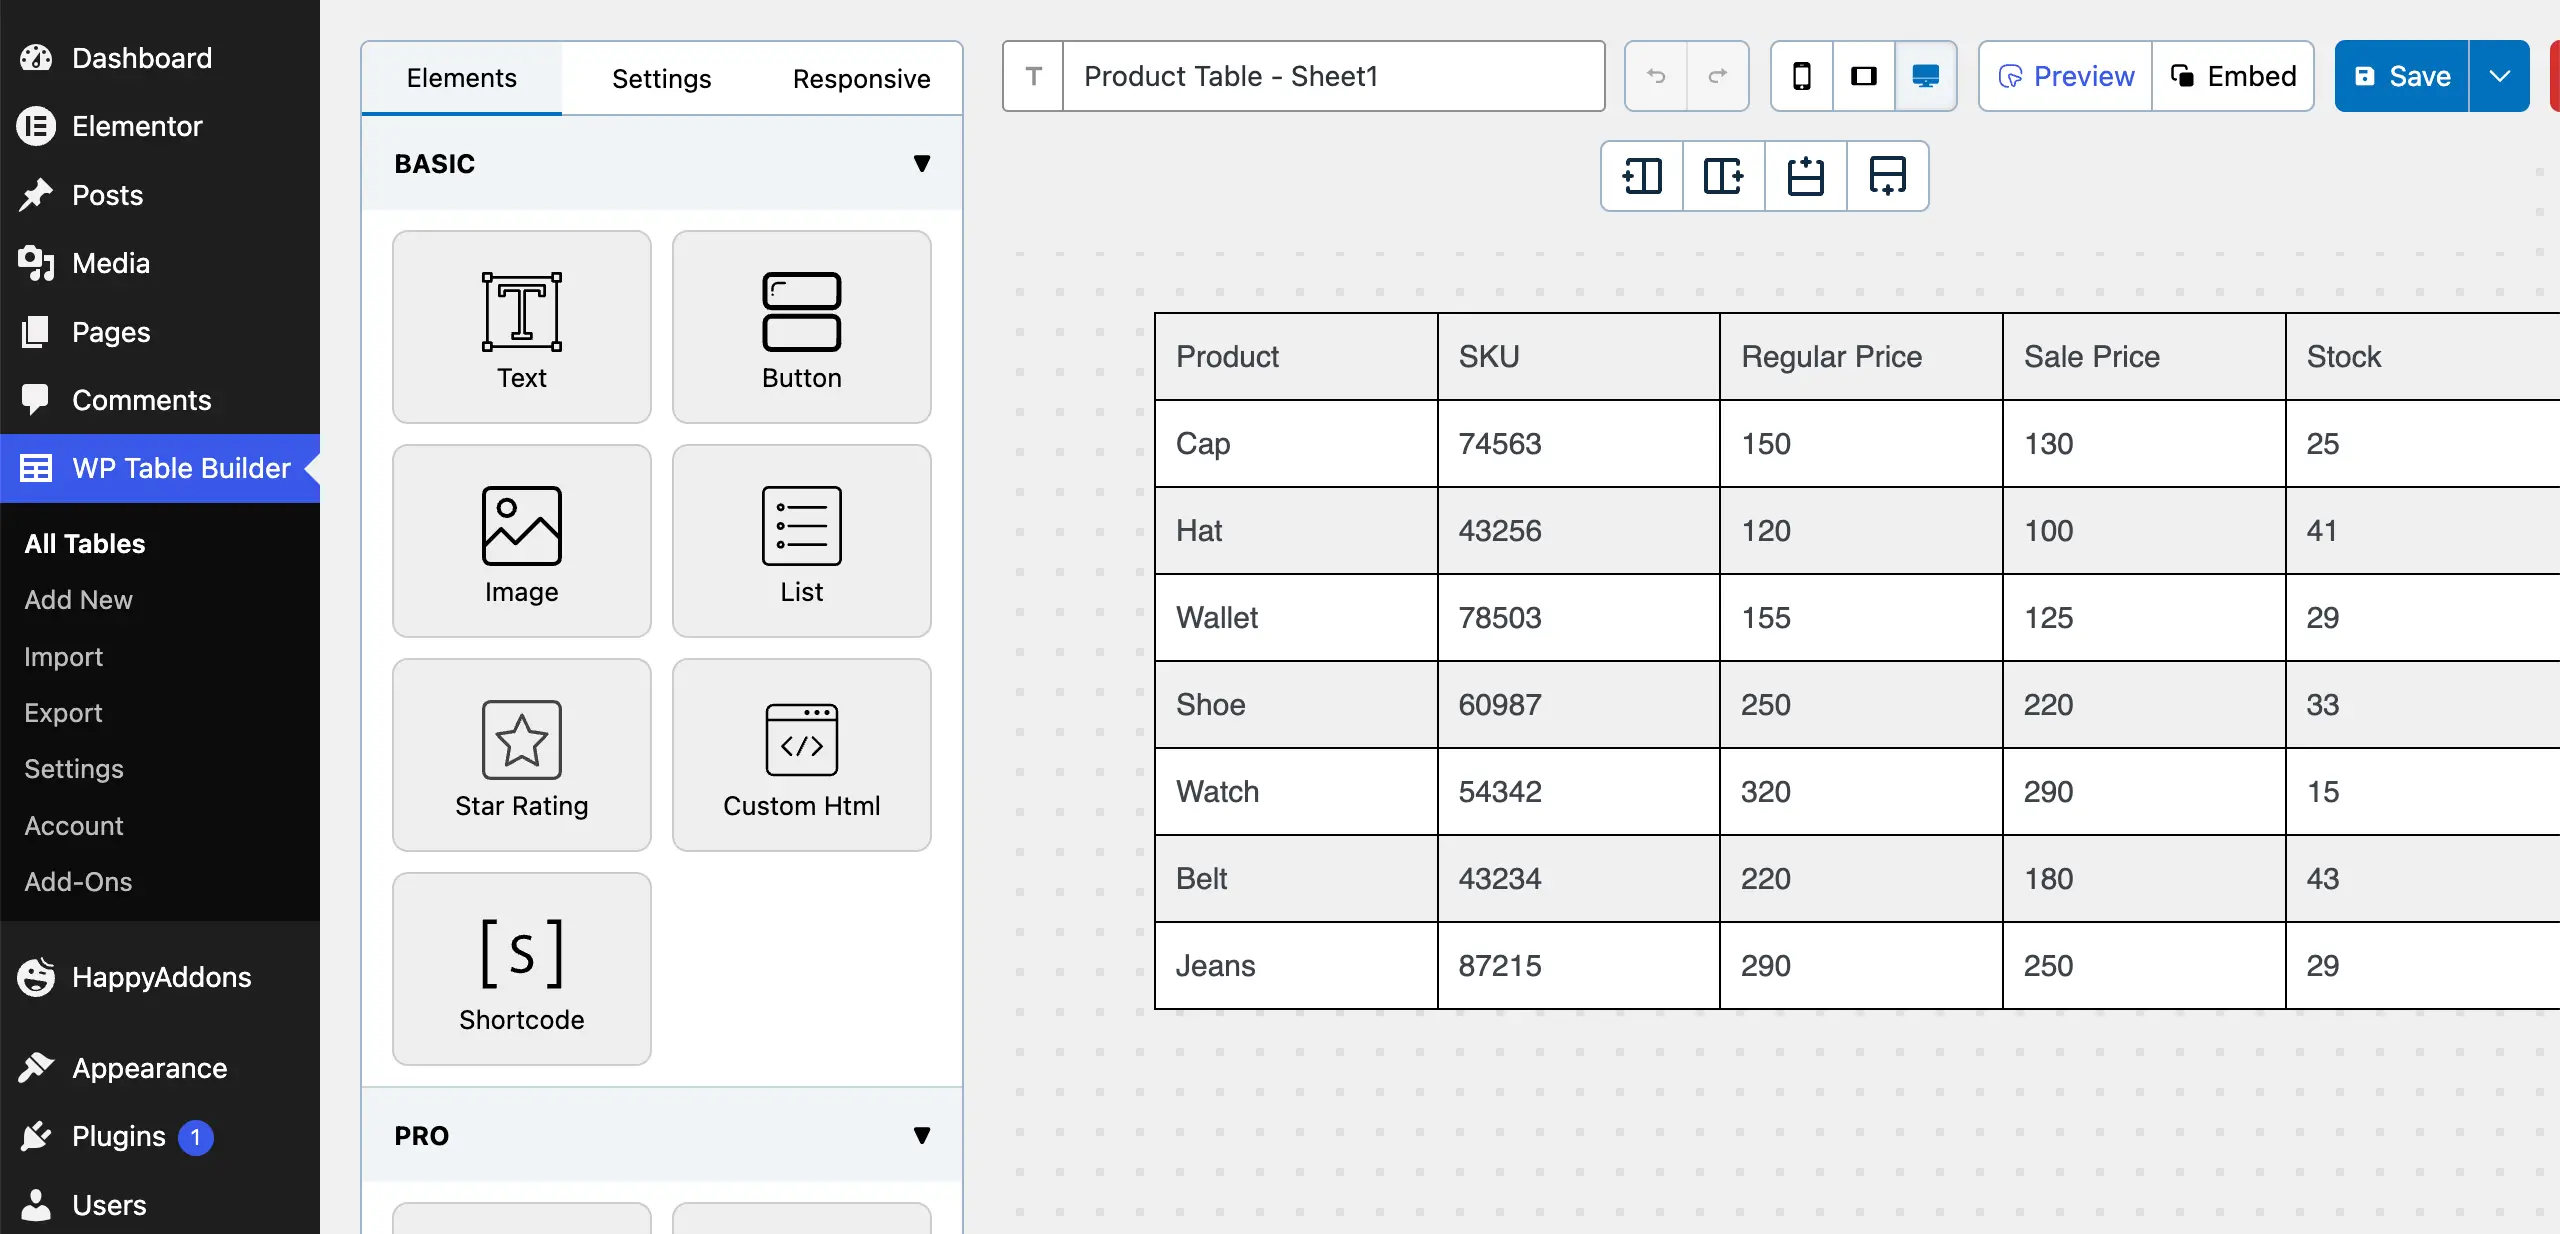
The table has been opened. Check if all the data is present here or not. We can see that all our data is accurate on it.
Step 06: Style and Enhance the Table
Now, it’s time to stylize the table to make it look visually appealing. You can change its color, alignment, and so many things.
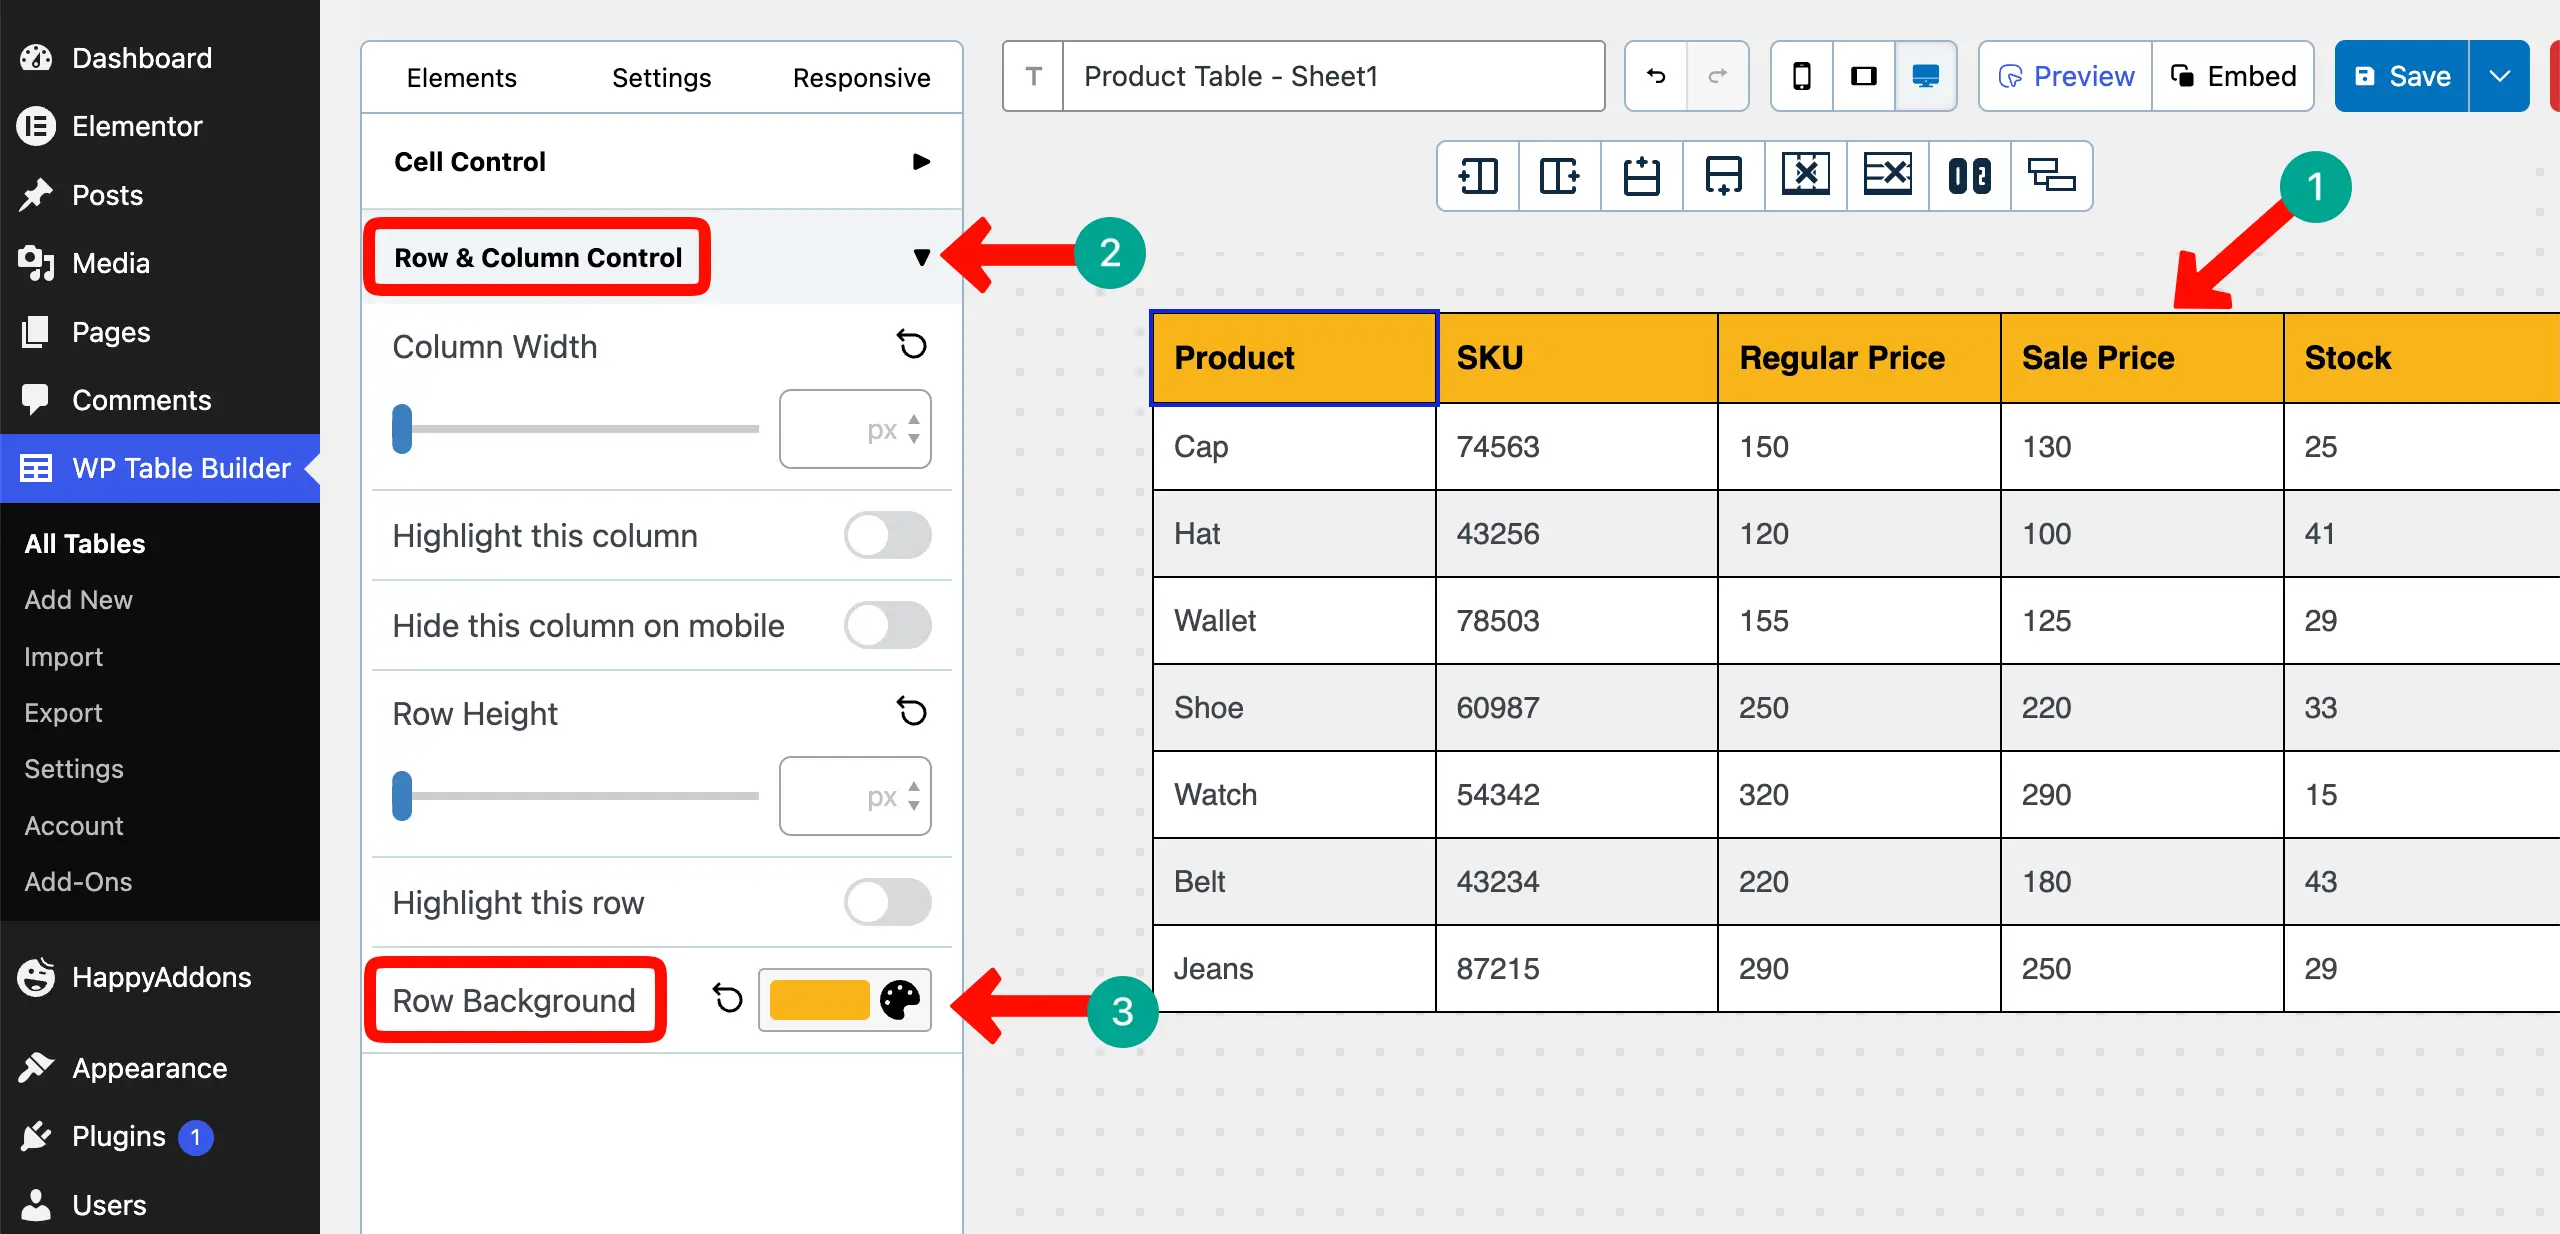
# Add a Background Color to the Header Row
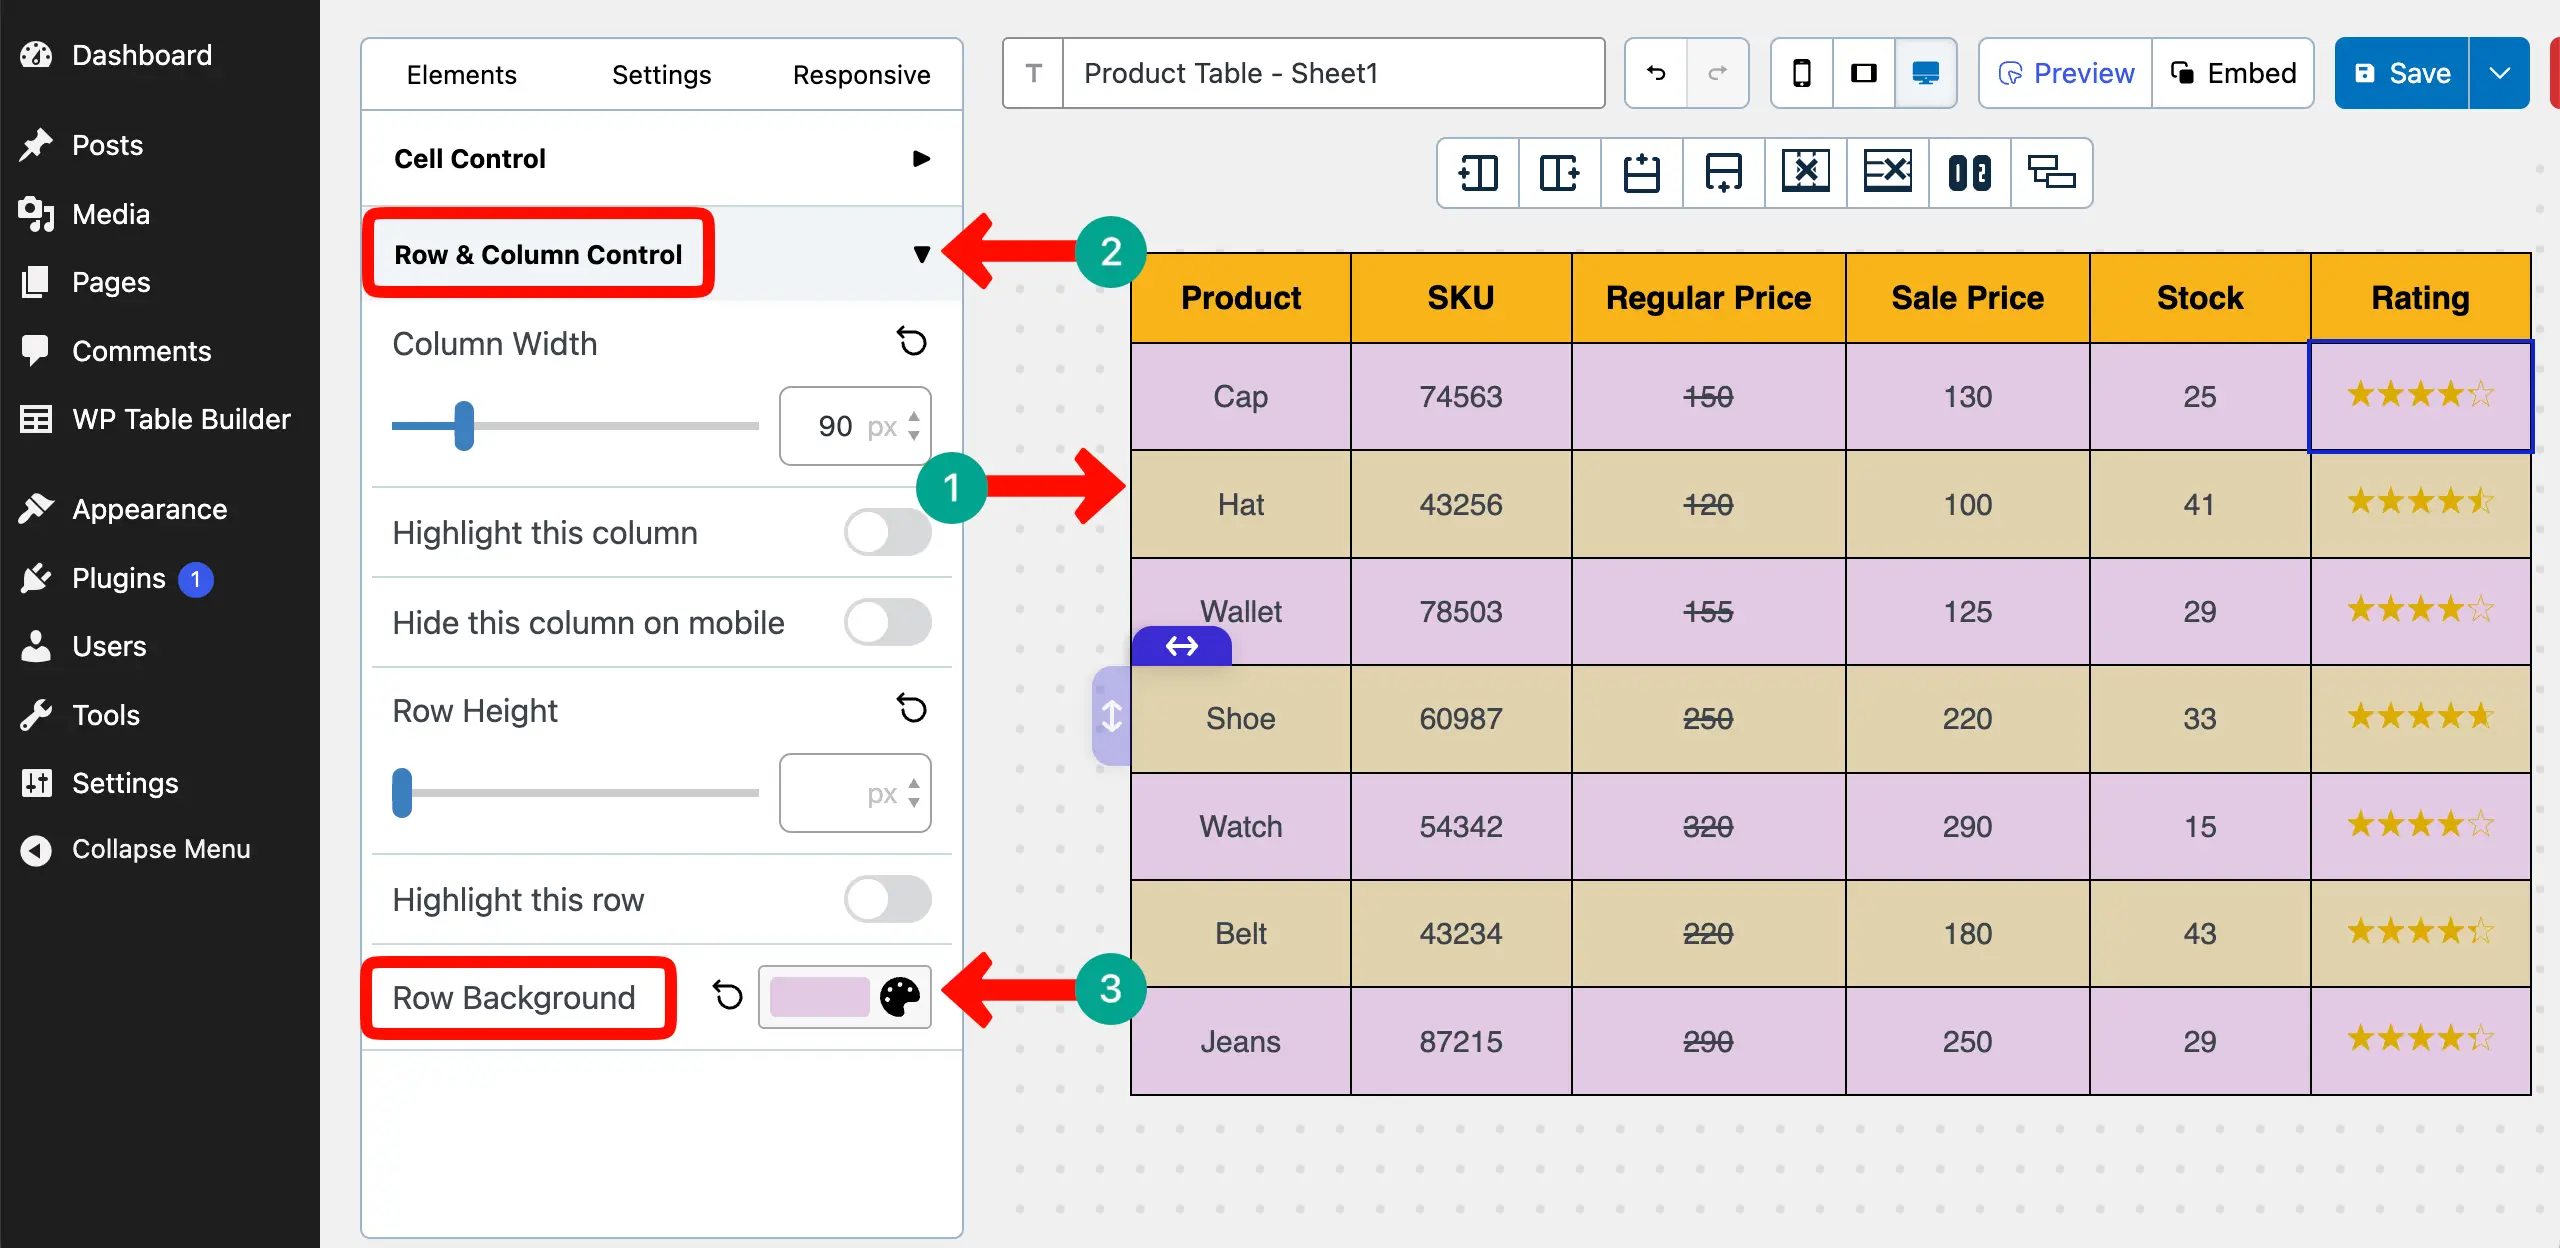
Adding a background color to the header row can make it easier for users to read the column names. Select the header row, expand the Row & Column Control section, and set a color for the Row Background.
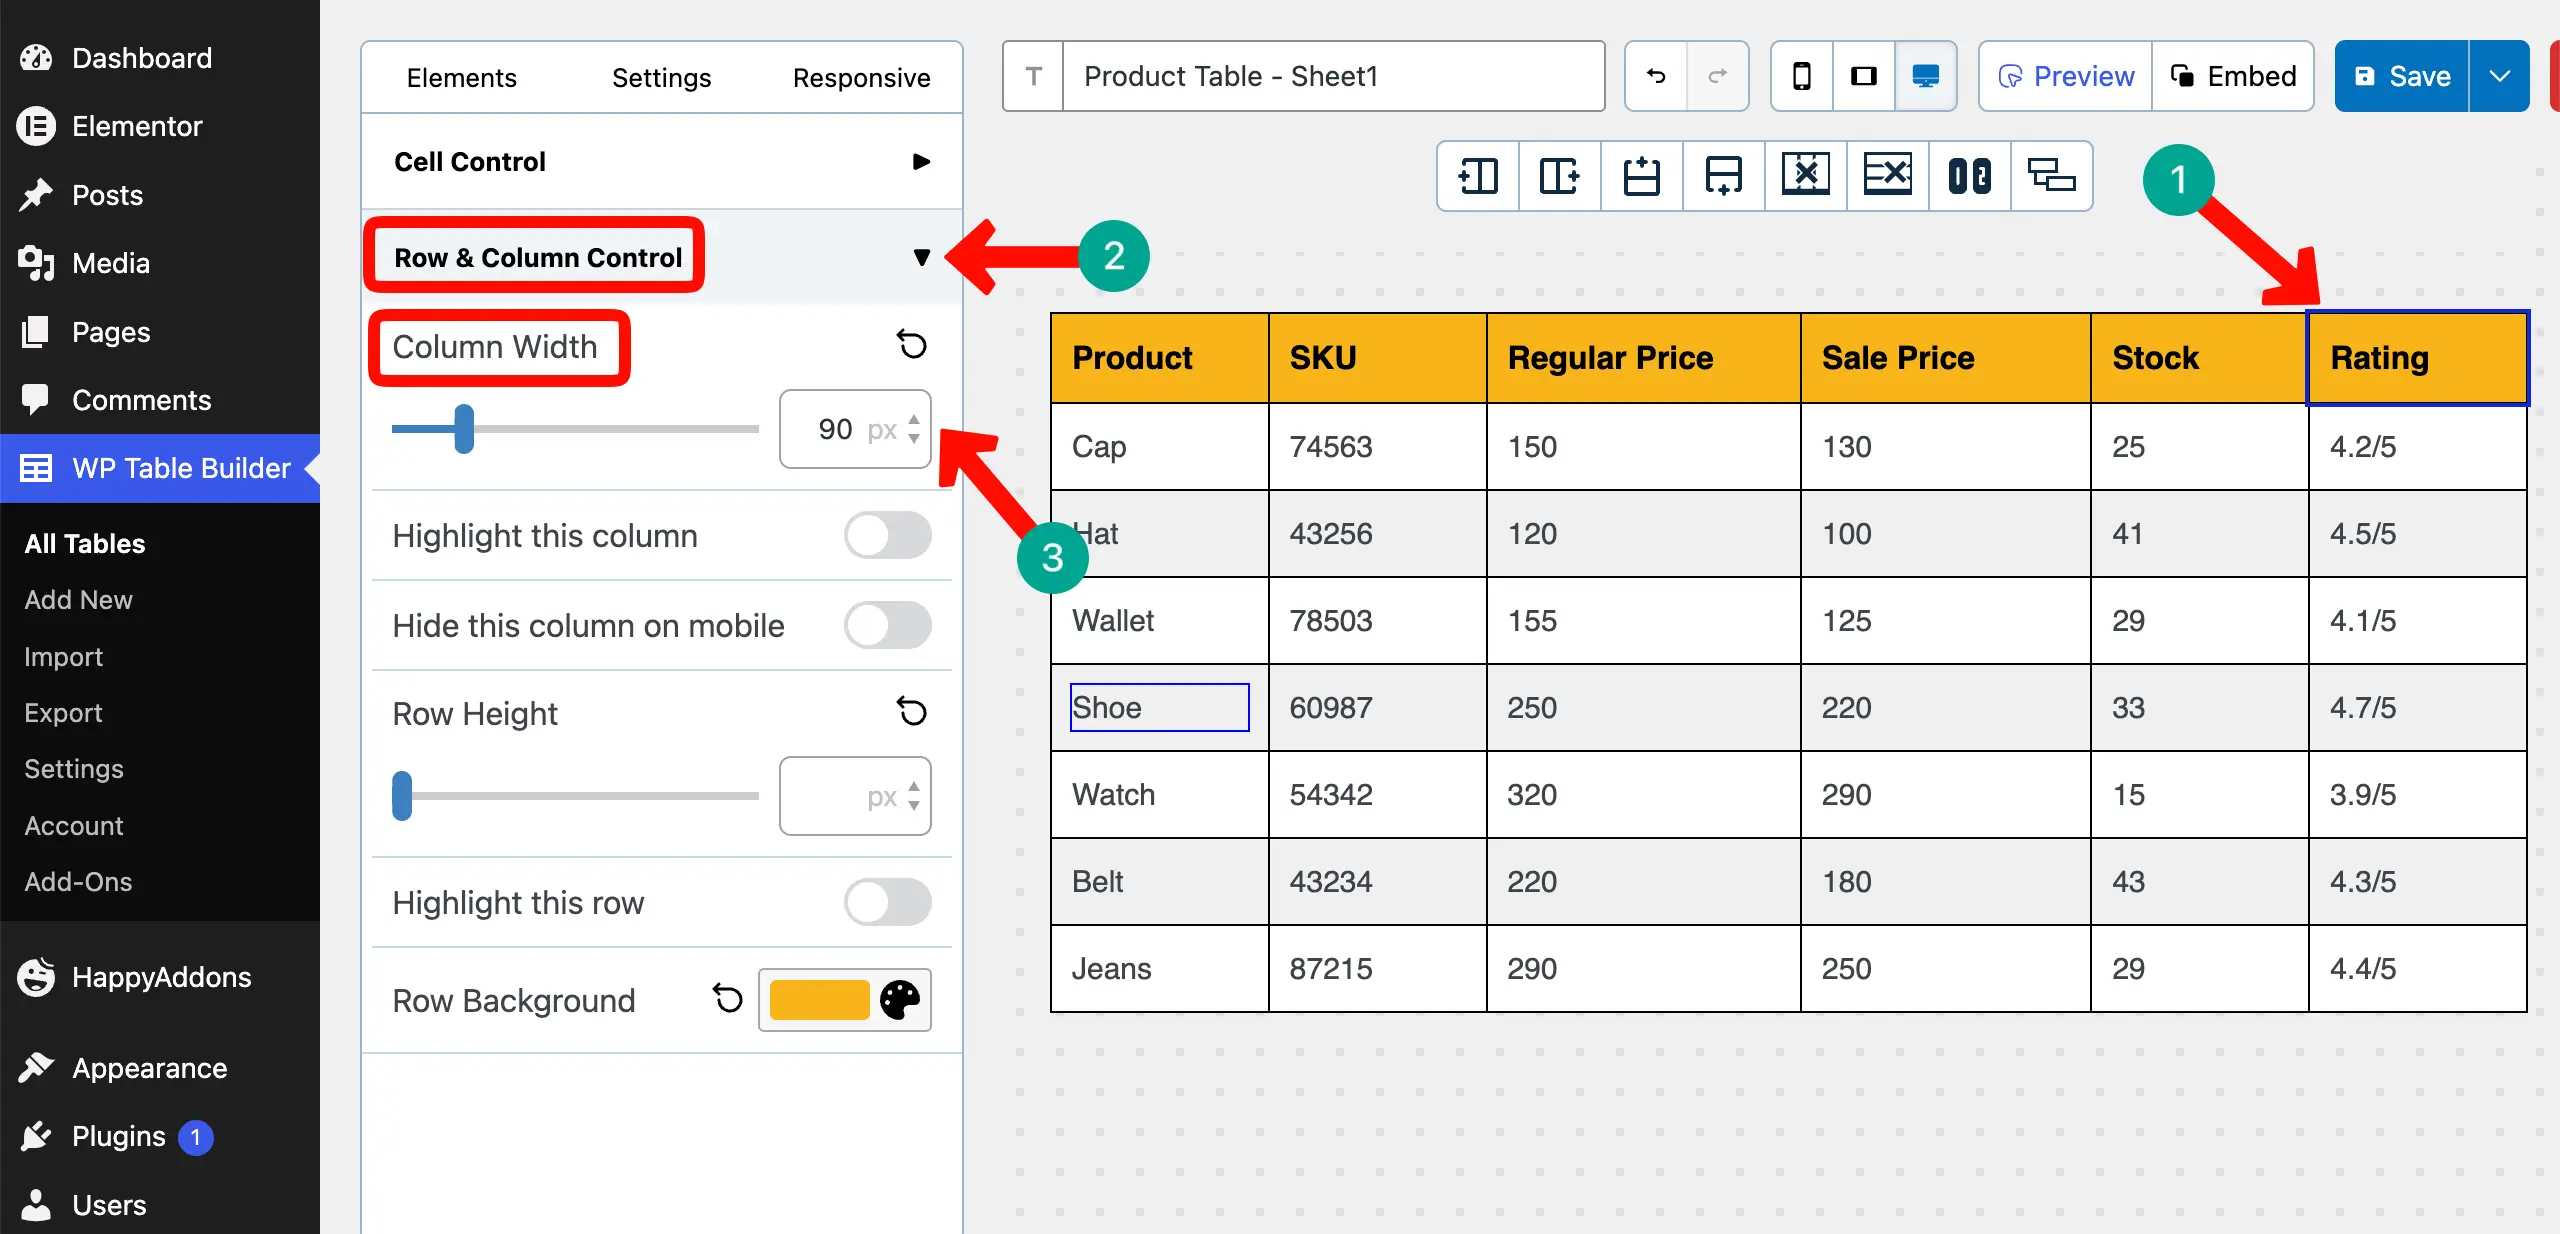
# Adjust the Column Width
Depending on the length of your content, you may want to change the width of the table columns. To do this, select a column, expand the Row & Column Control section, and change the value in Column Width.
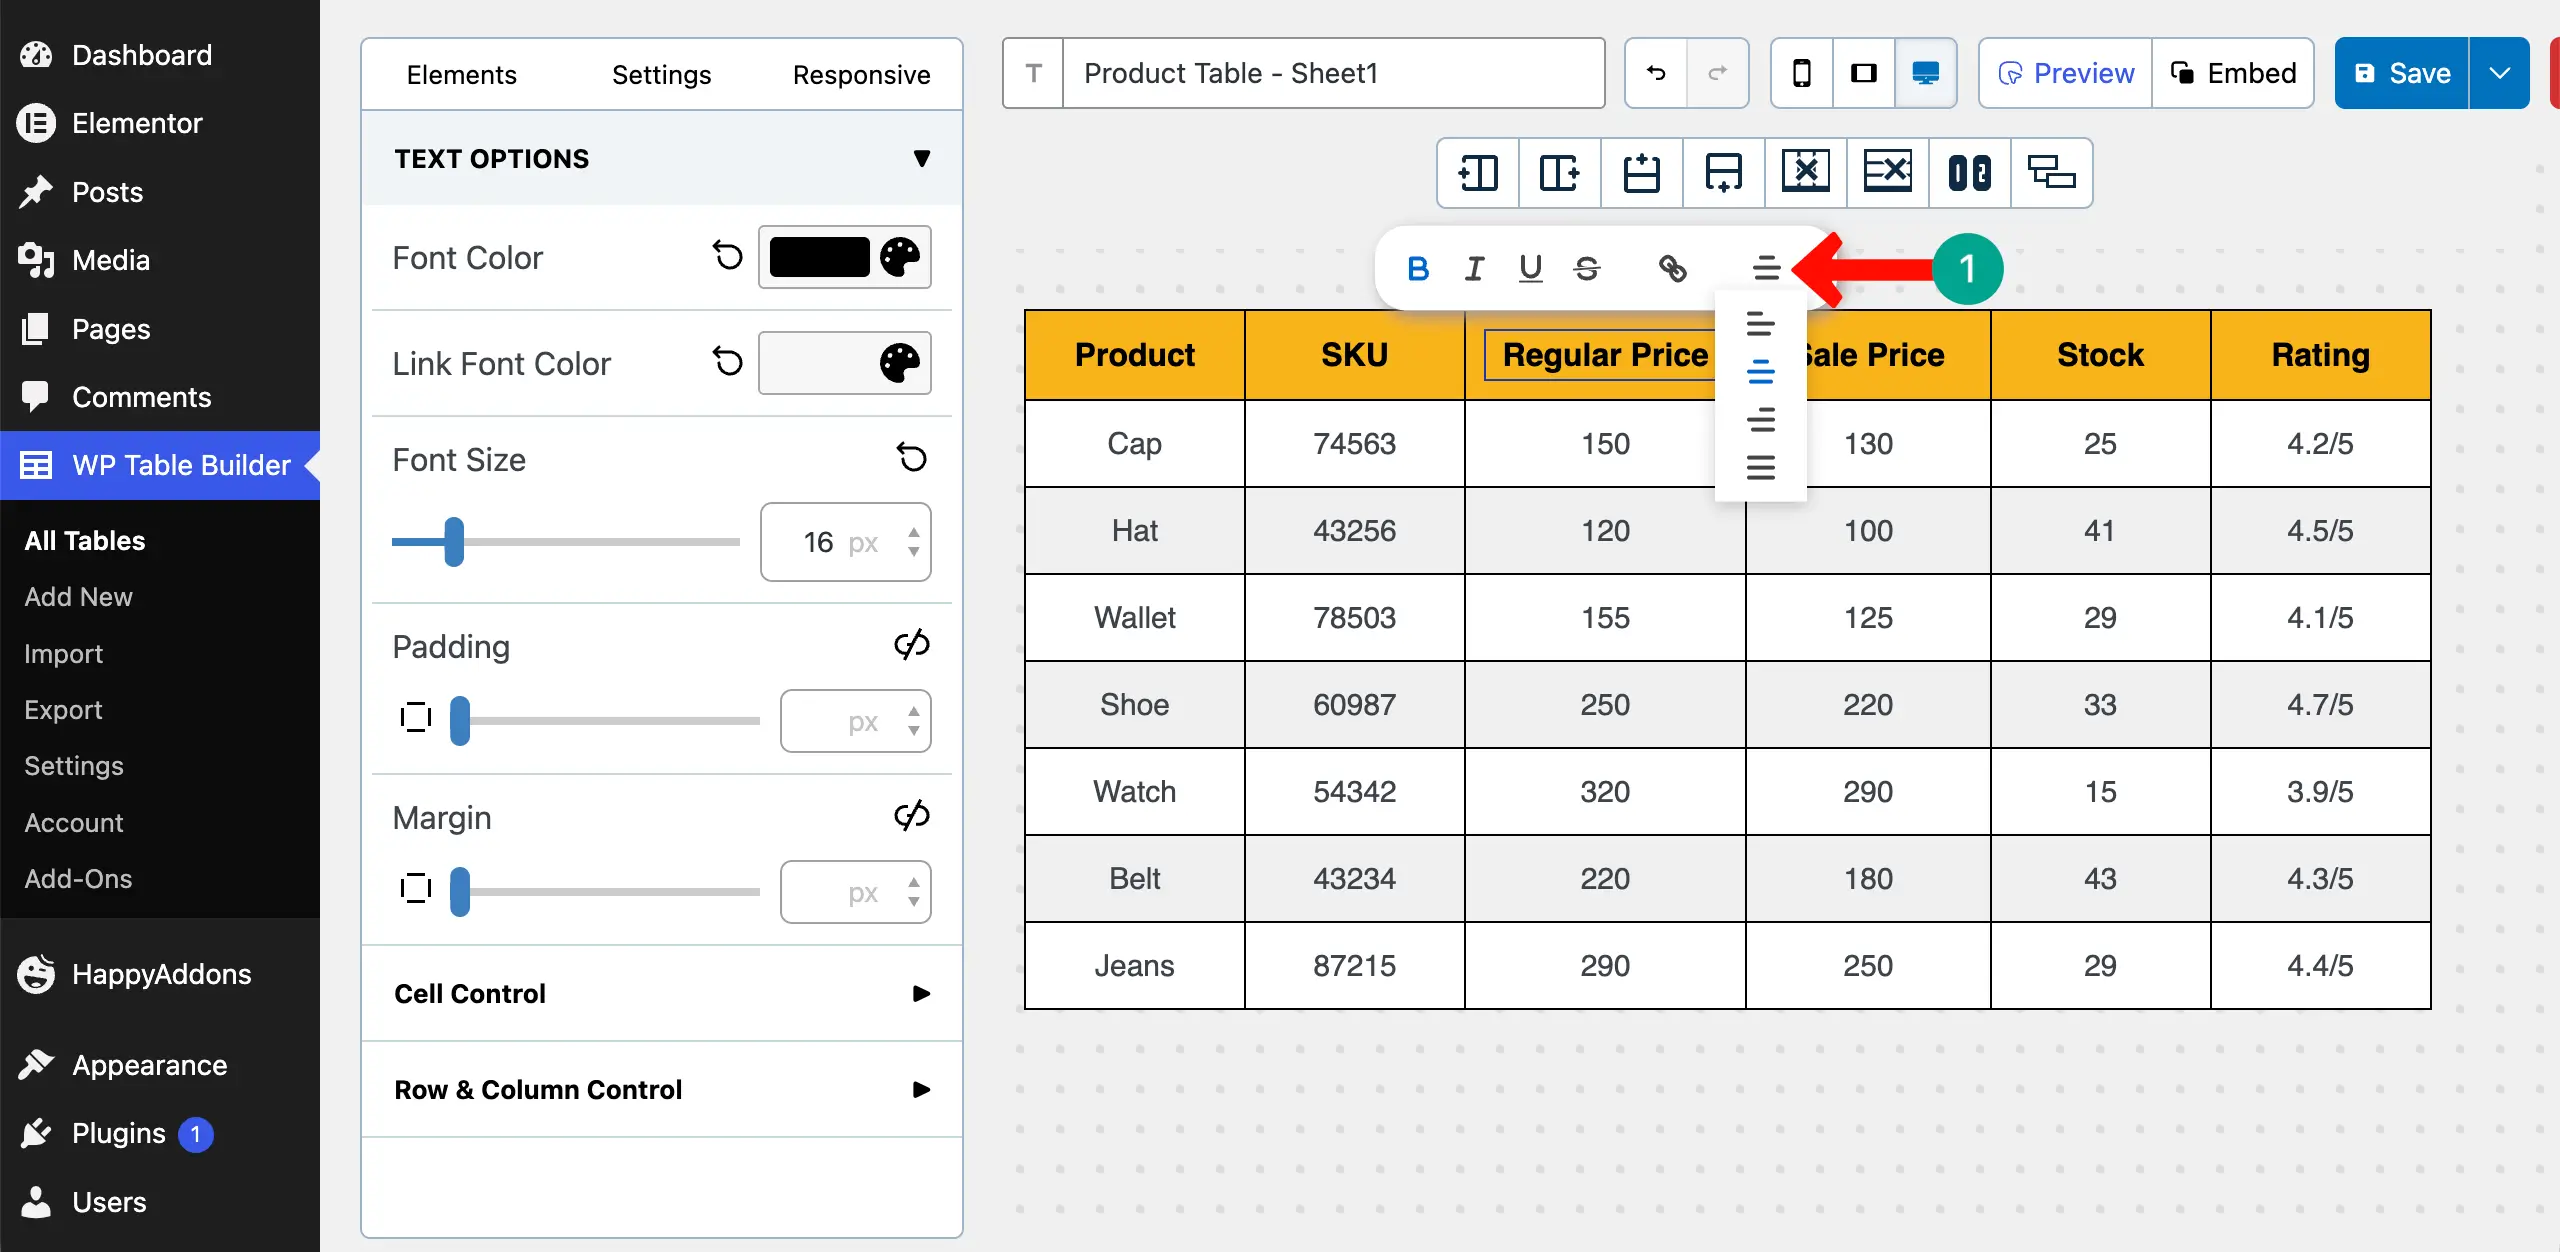
# Align Texts
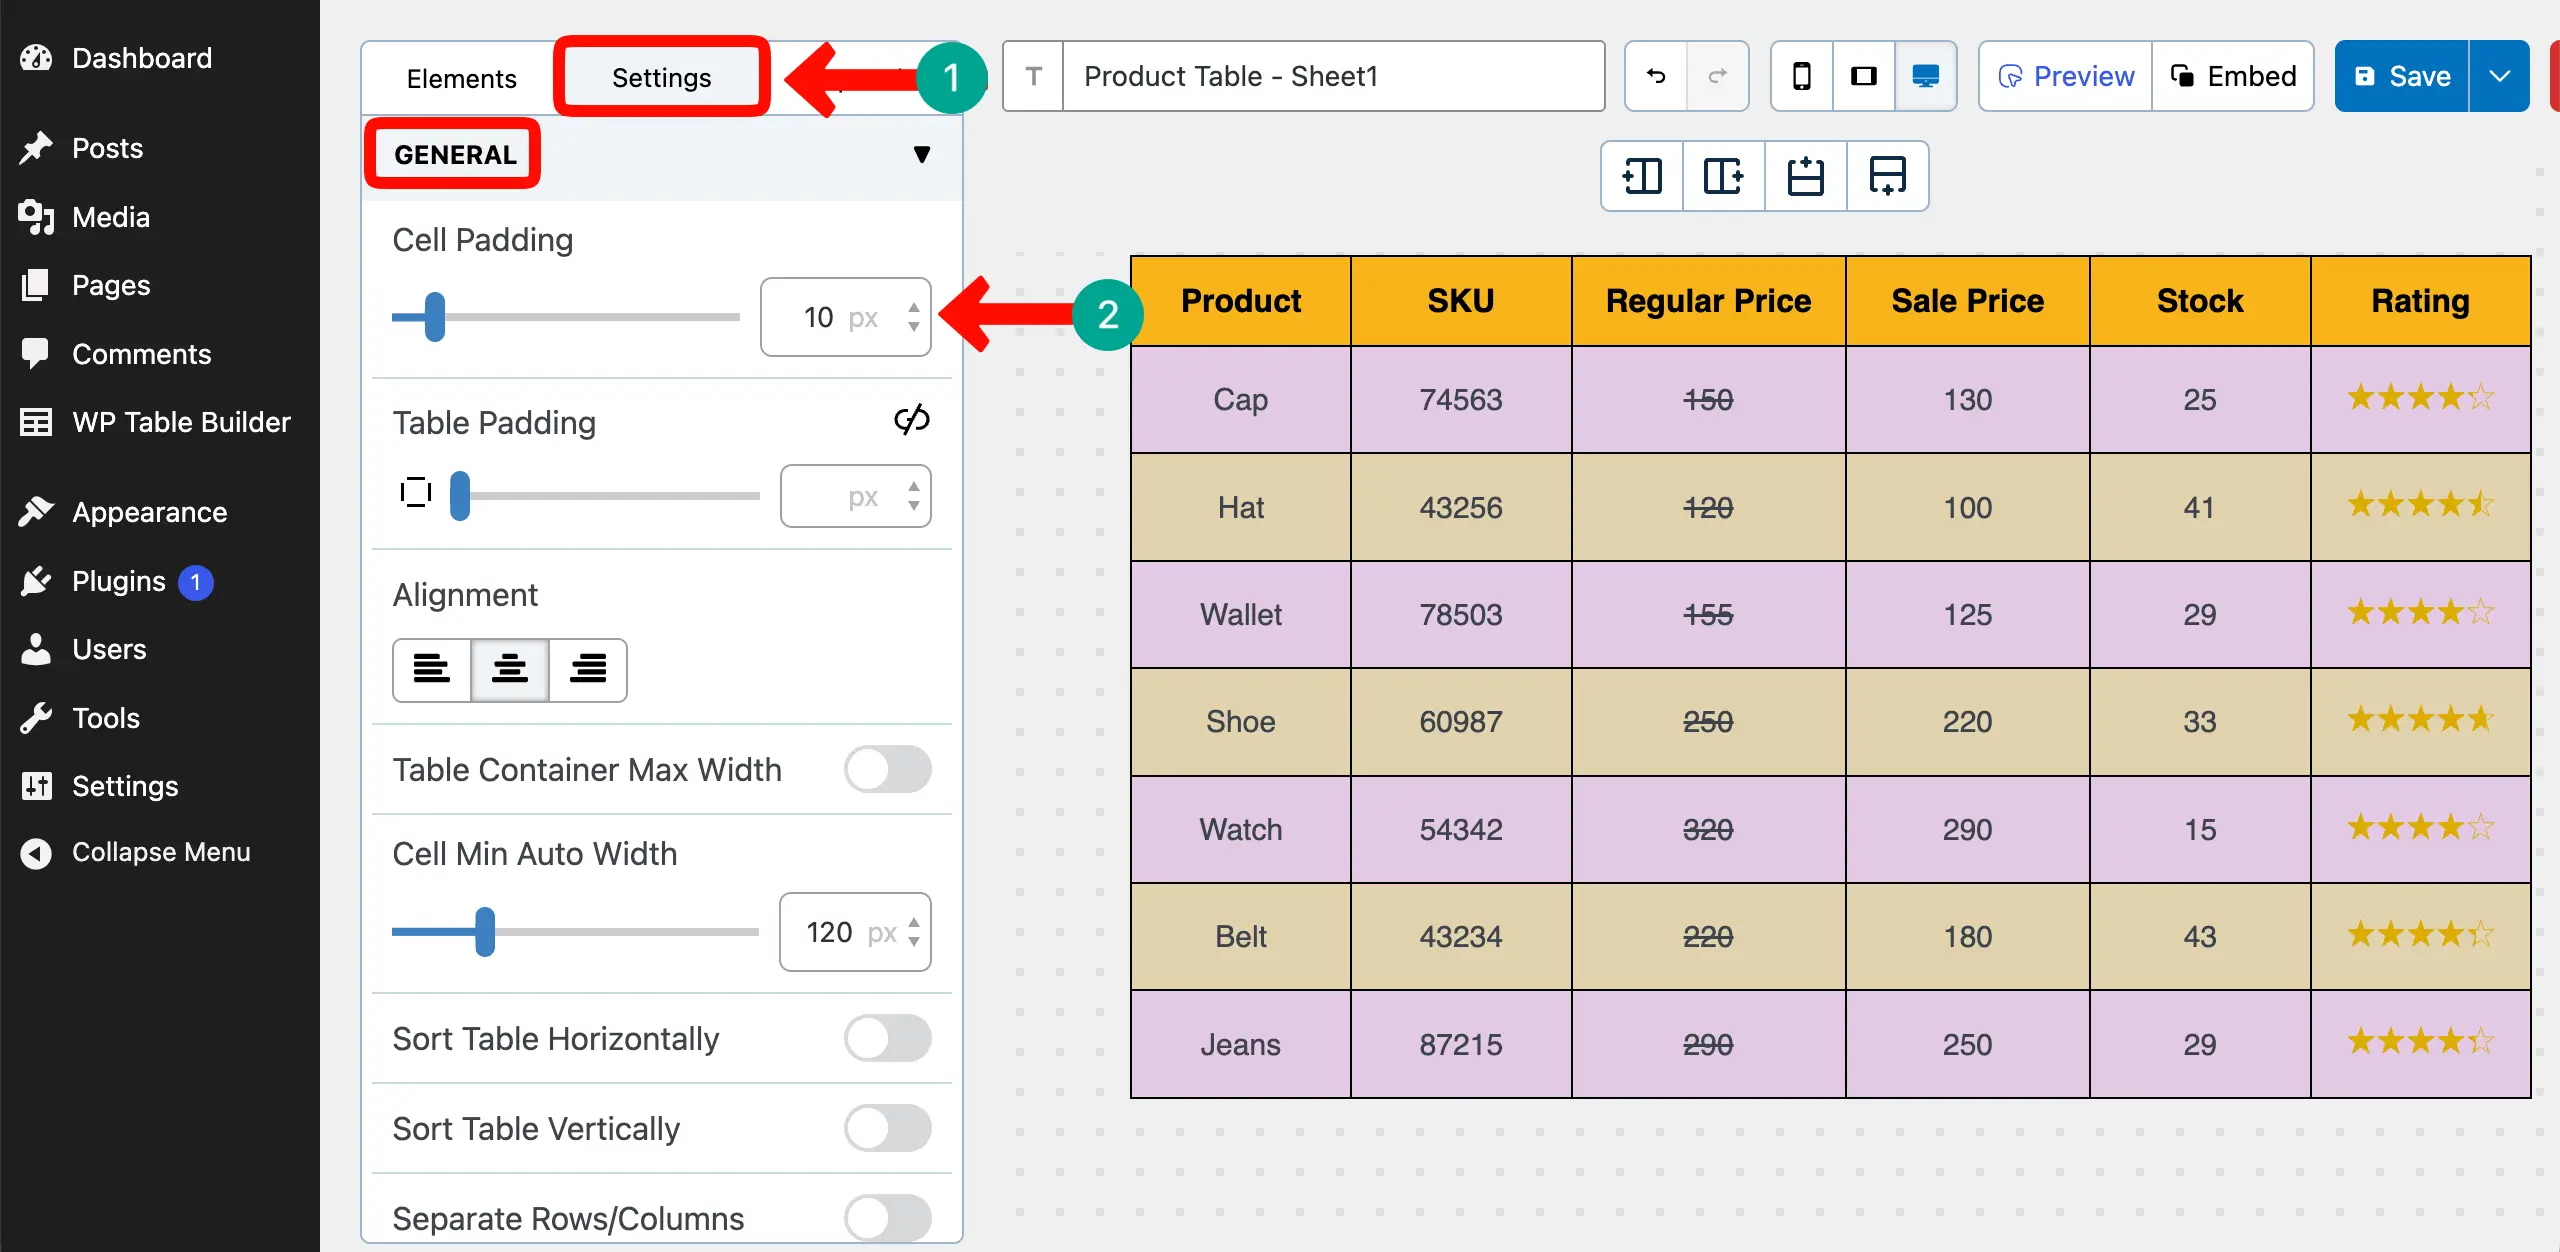
You can centrally align the table content. You can do it separately for each cell or for the entire column from the Settings tab > General section on the left sidebar.
Explore how to create a custom WooCommerce product table in WordPress.
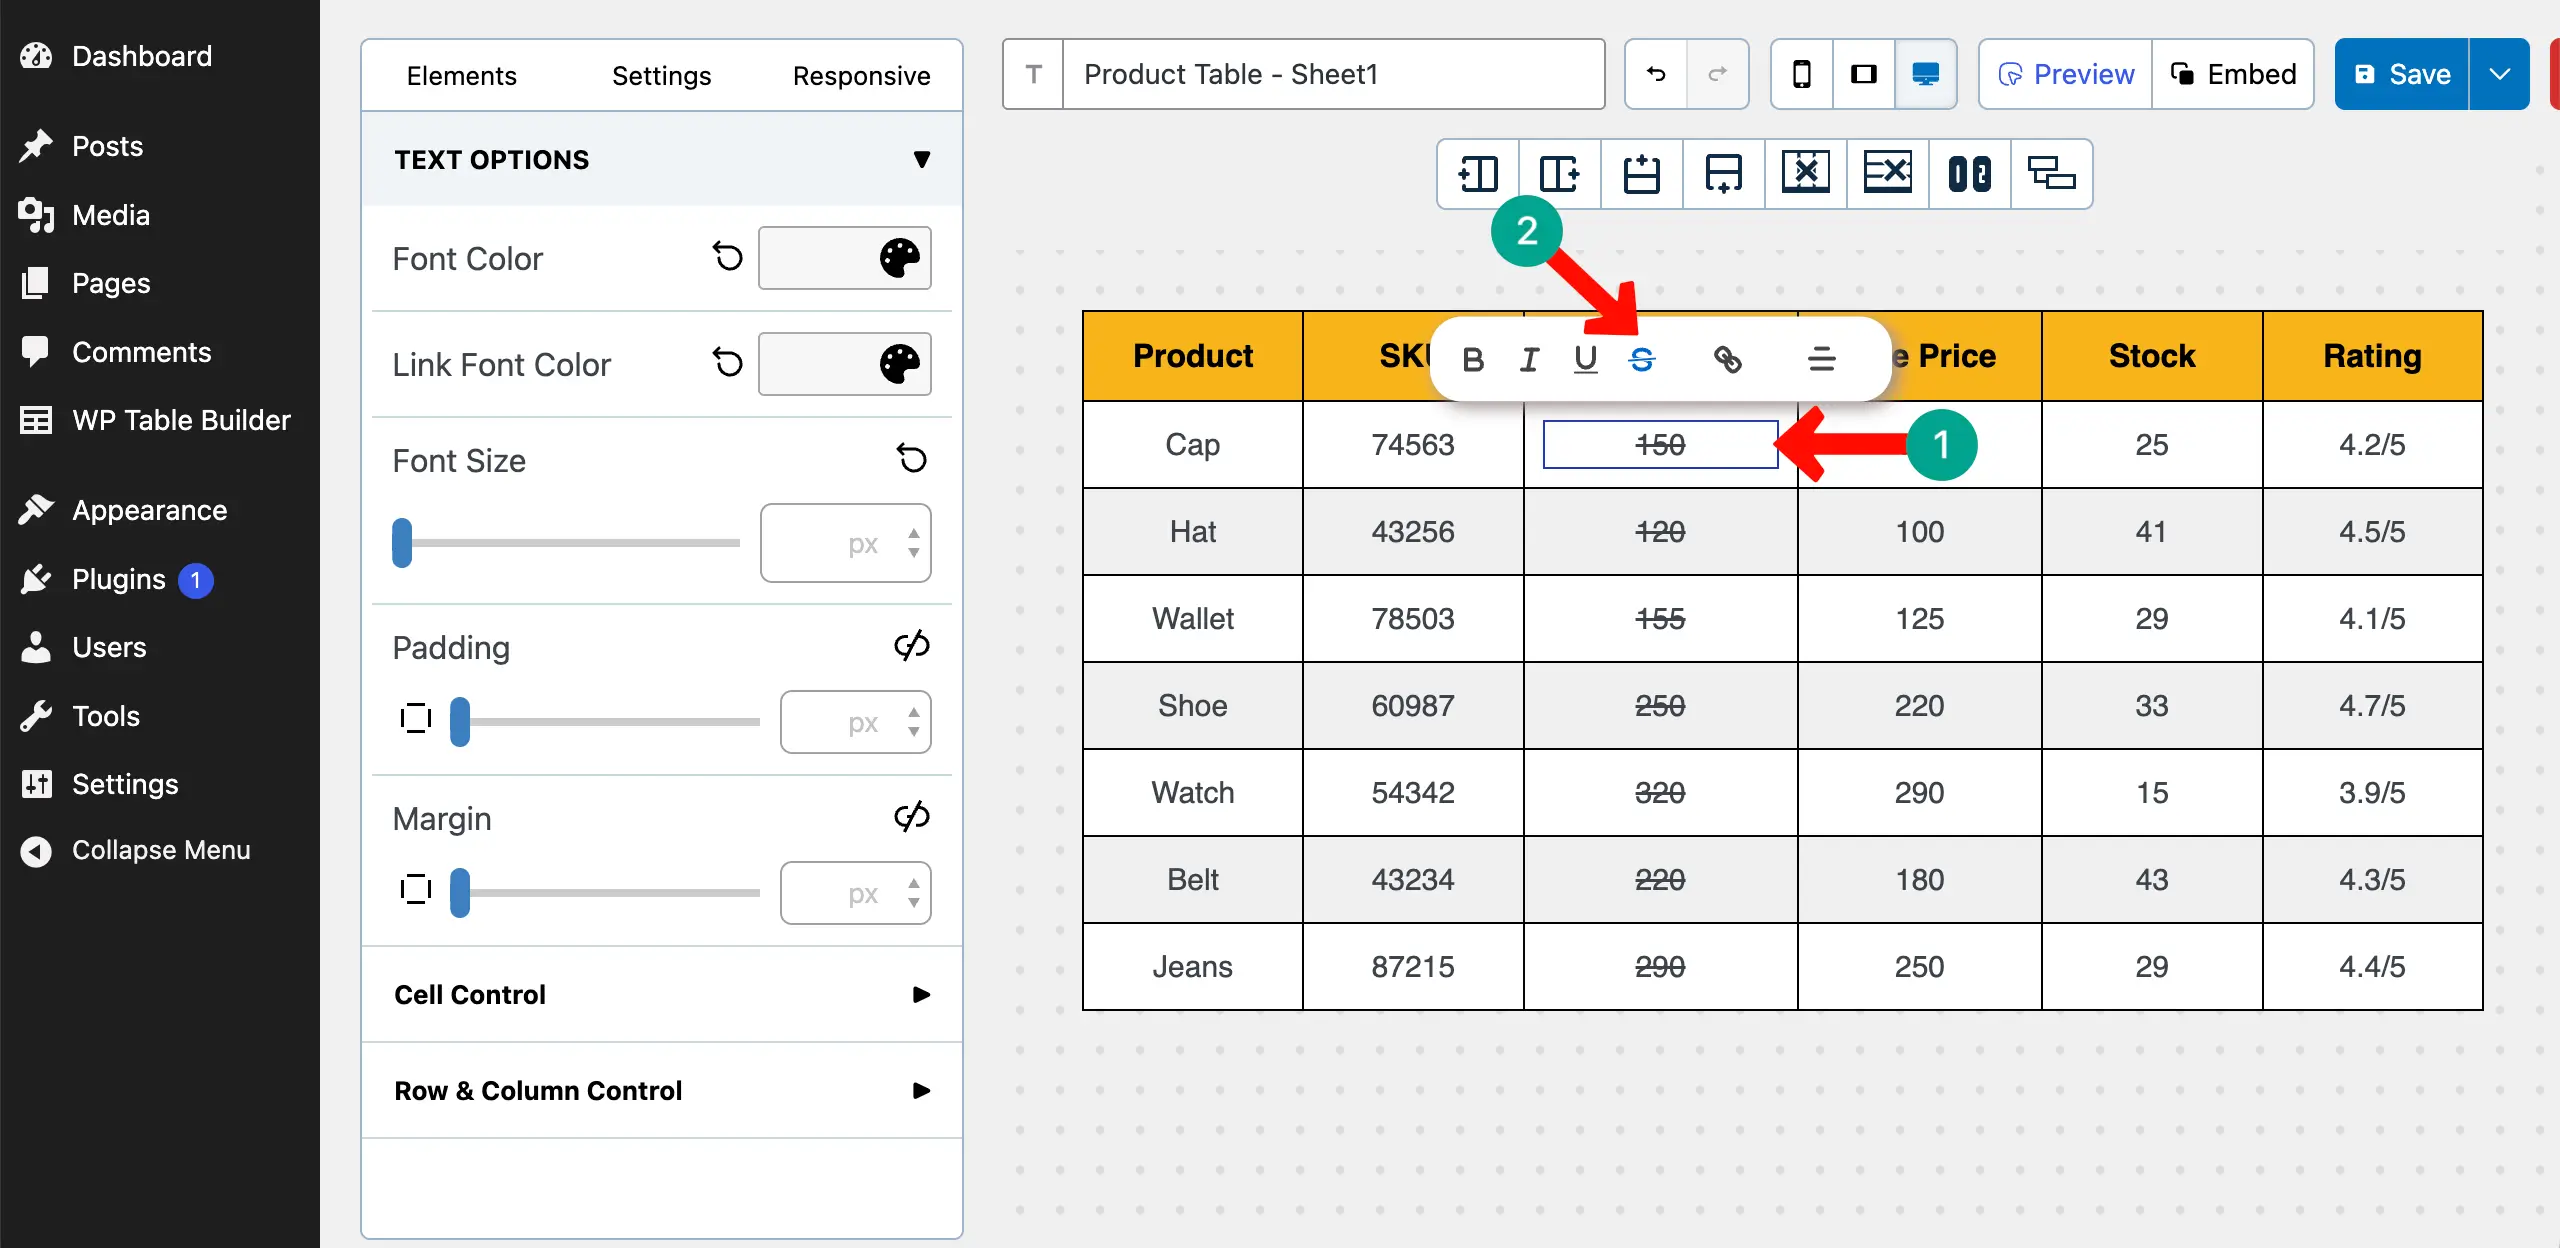
# Add Strikethrough to Regular Prices
By adding strikethrough to the regular prices, you can give customers a vibe that this price is now obsolete, so they can focus more on the sales price. This is a proven strategy to increase conversion.
You can do this by using the strikethrough feature on the toolbar.
# Add Rating Icons to the Table
You can see above that the table shows ratings with texts only. You can replace it with the Rating Element.
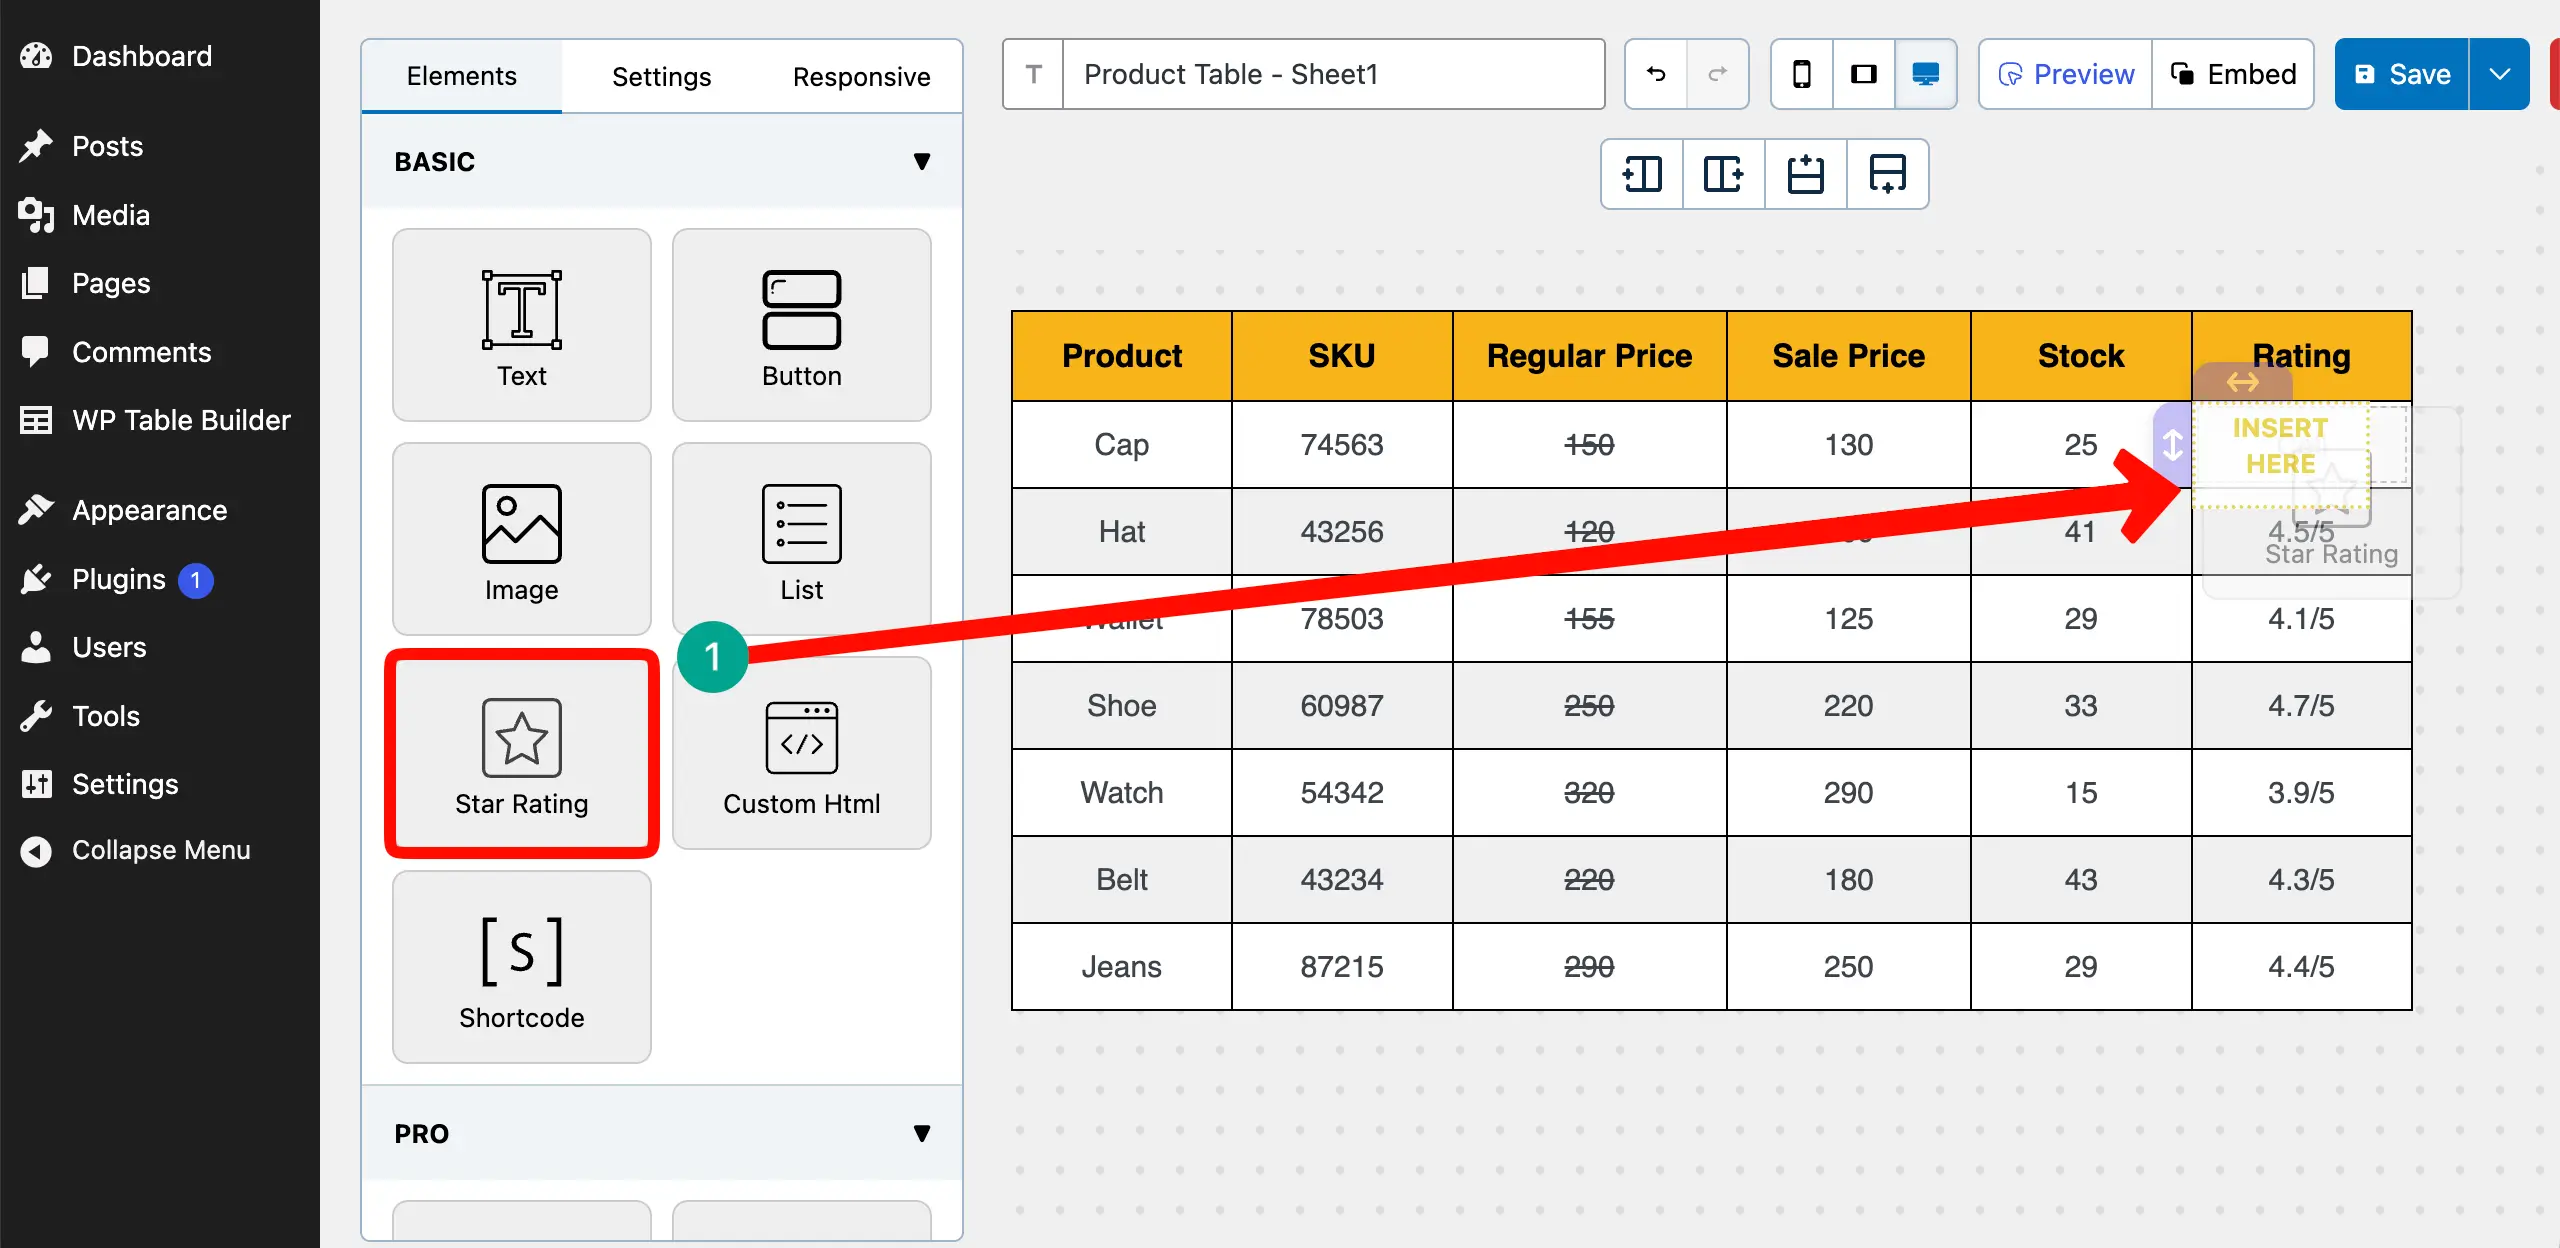
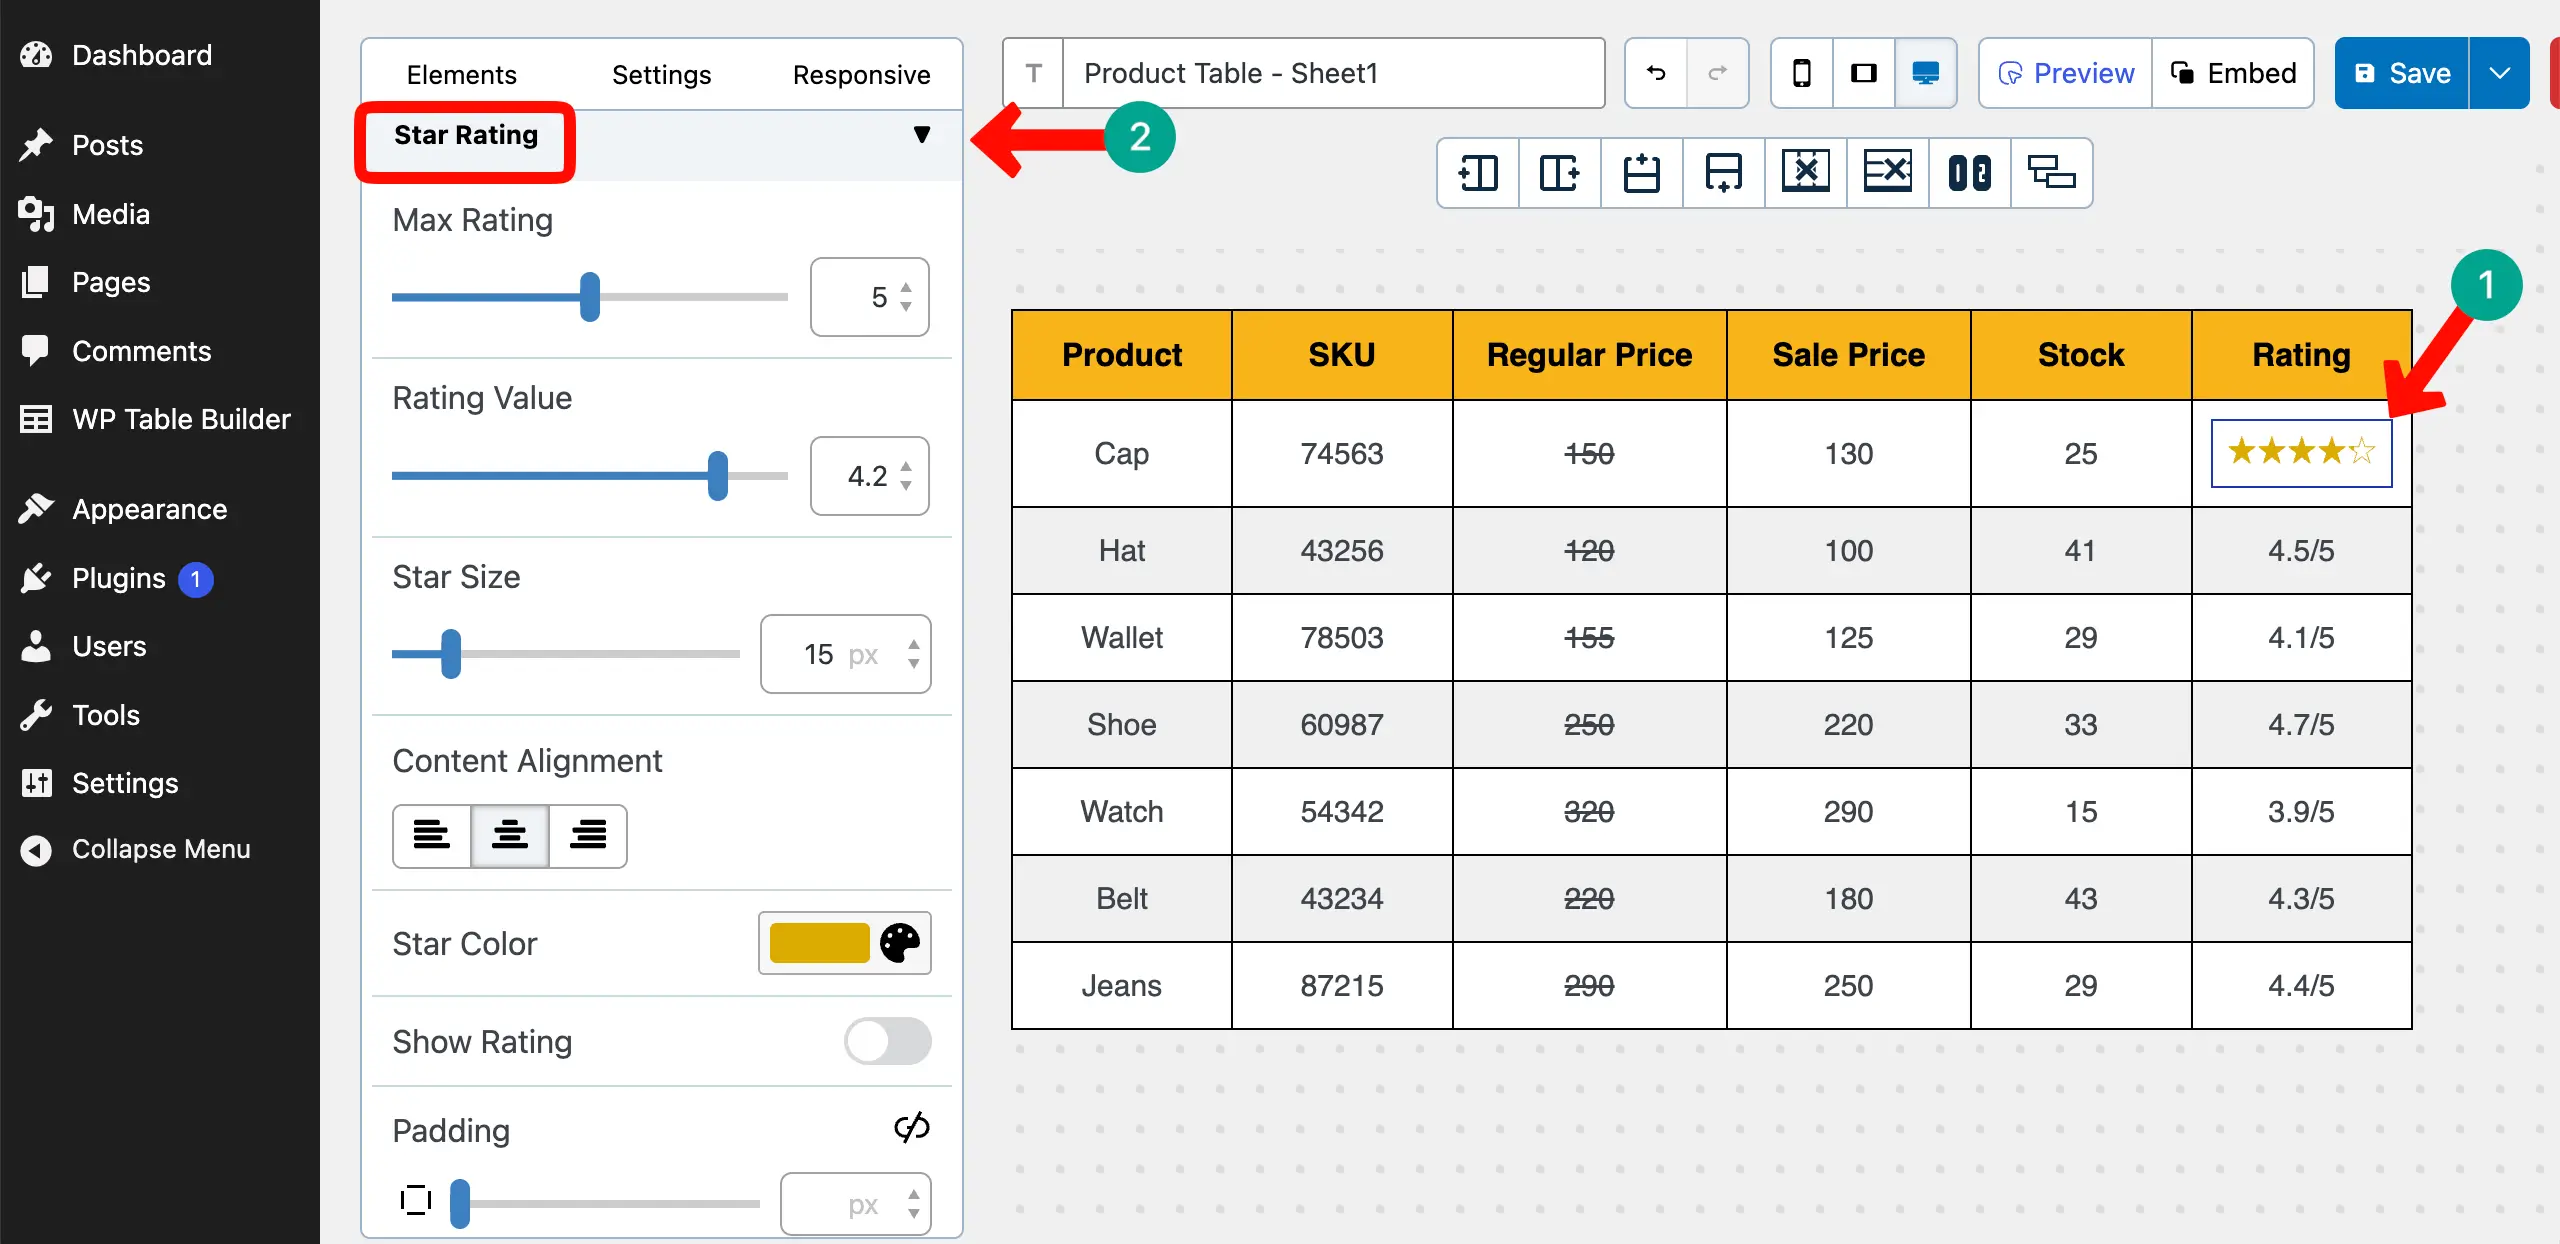
After the element is added, set your desired value for the rating from the left sidebar.
In the same way, add the rating element to all rows.
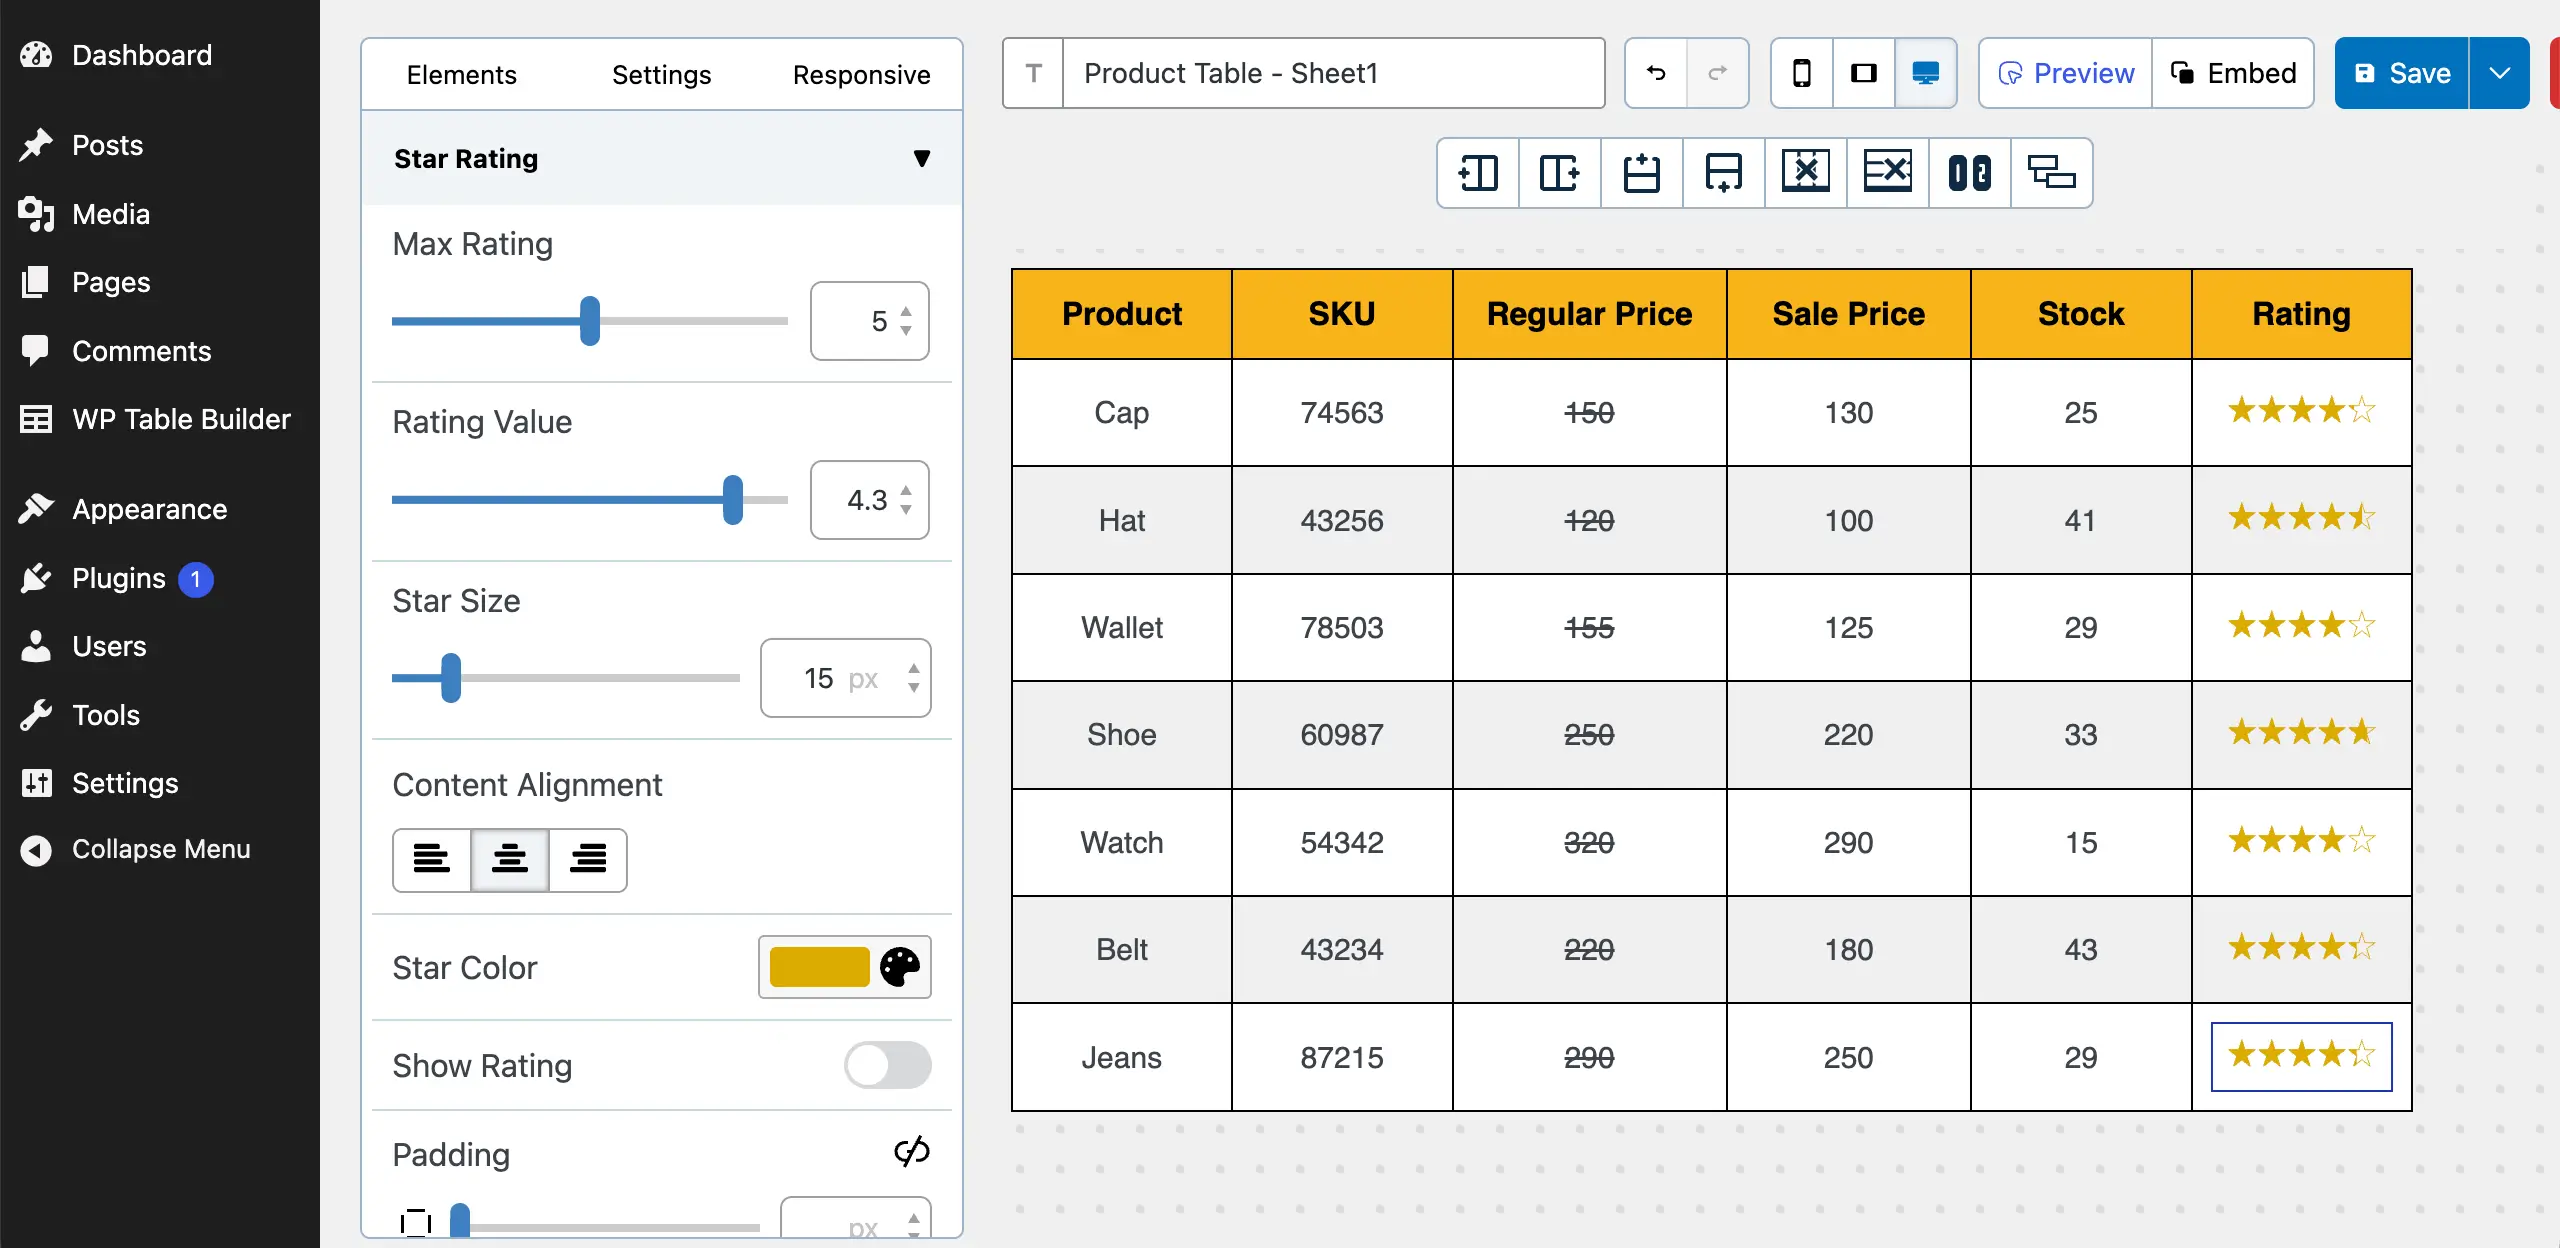
Similarly, you can add more elements to the table if required.
# Add Alternative Row Colors
Adding alternative row colors can make your table more gorgeous if you can choose colors suitably.
# Adjust Padding and Margin
From the General section under the Settings tab, you can adjust padding and many other things for the table.
Step 07: Save and Display the Table
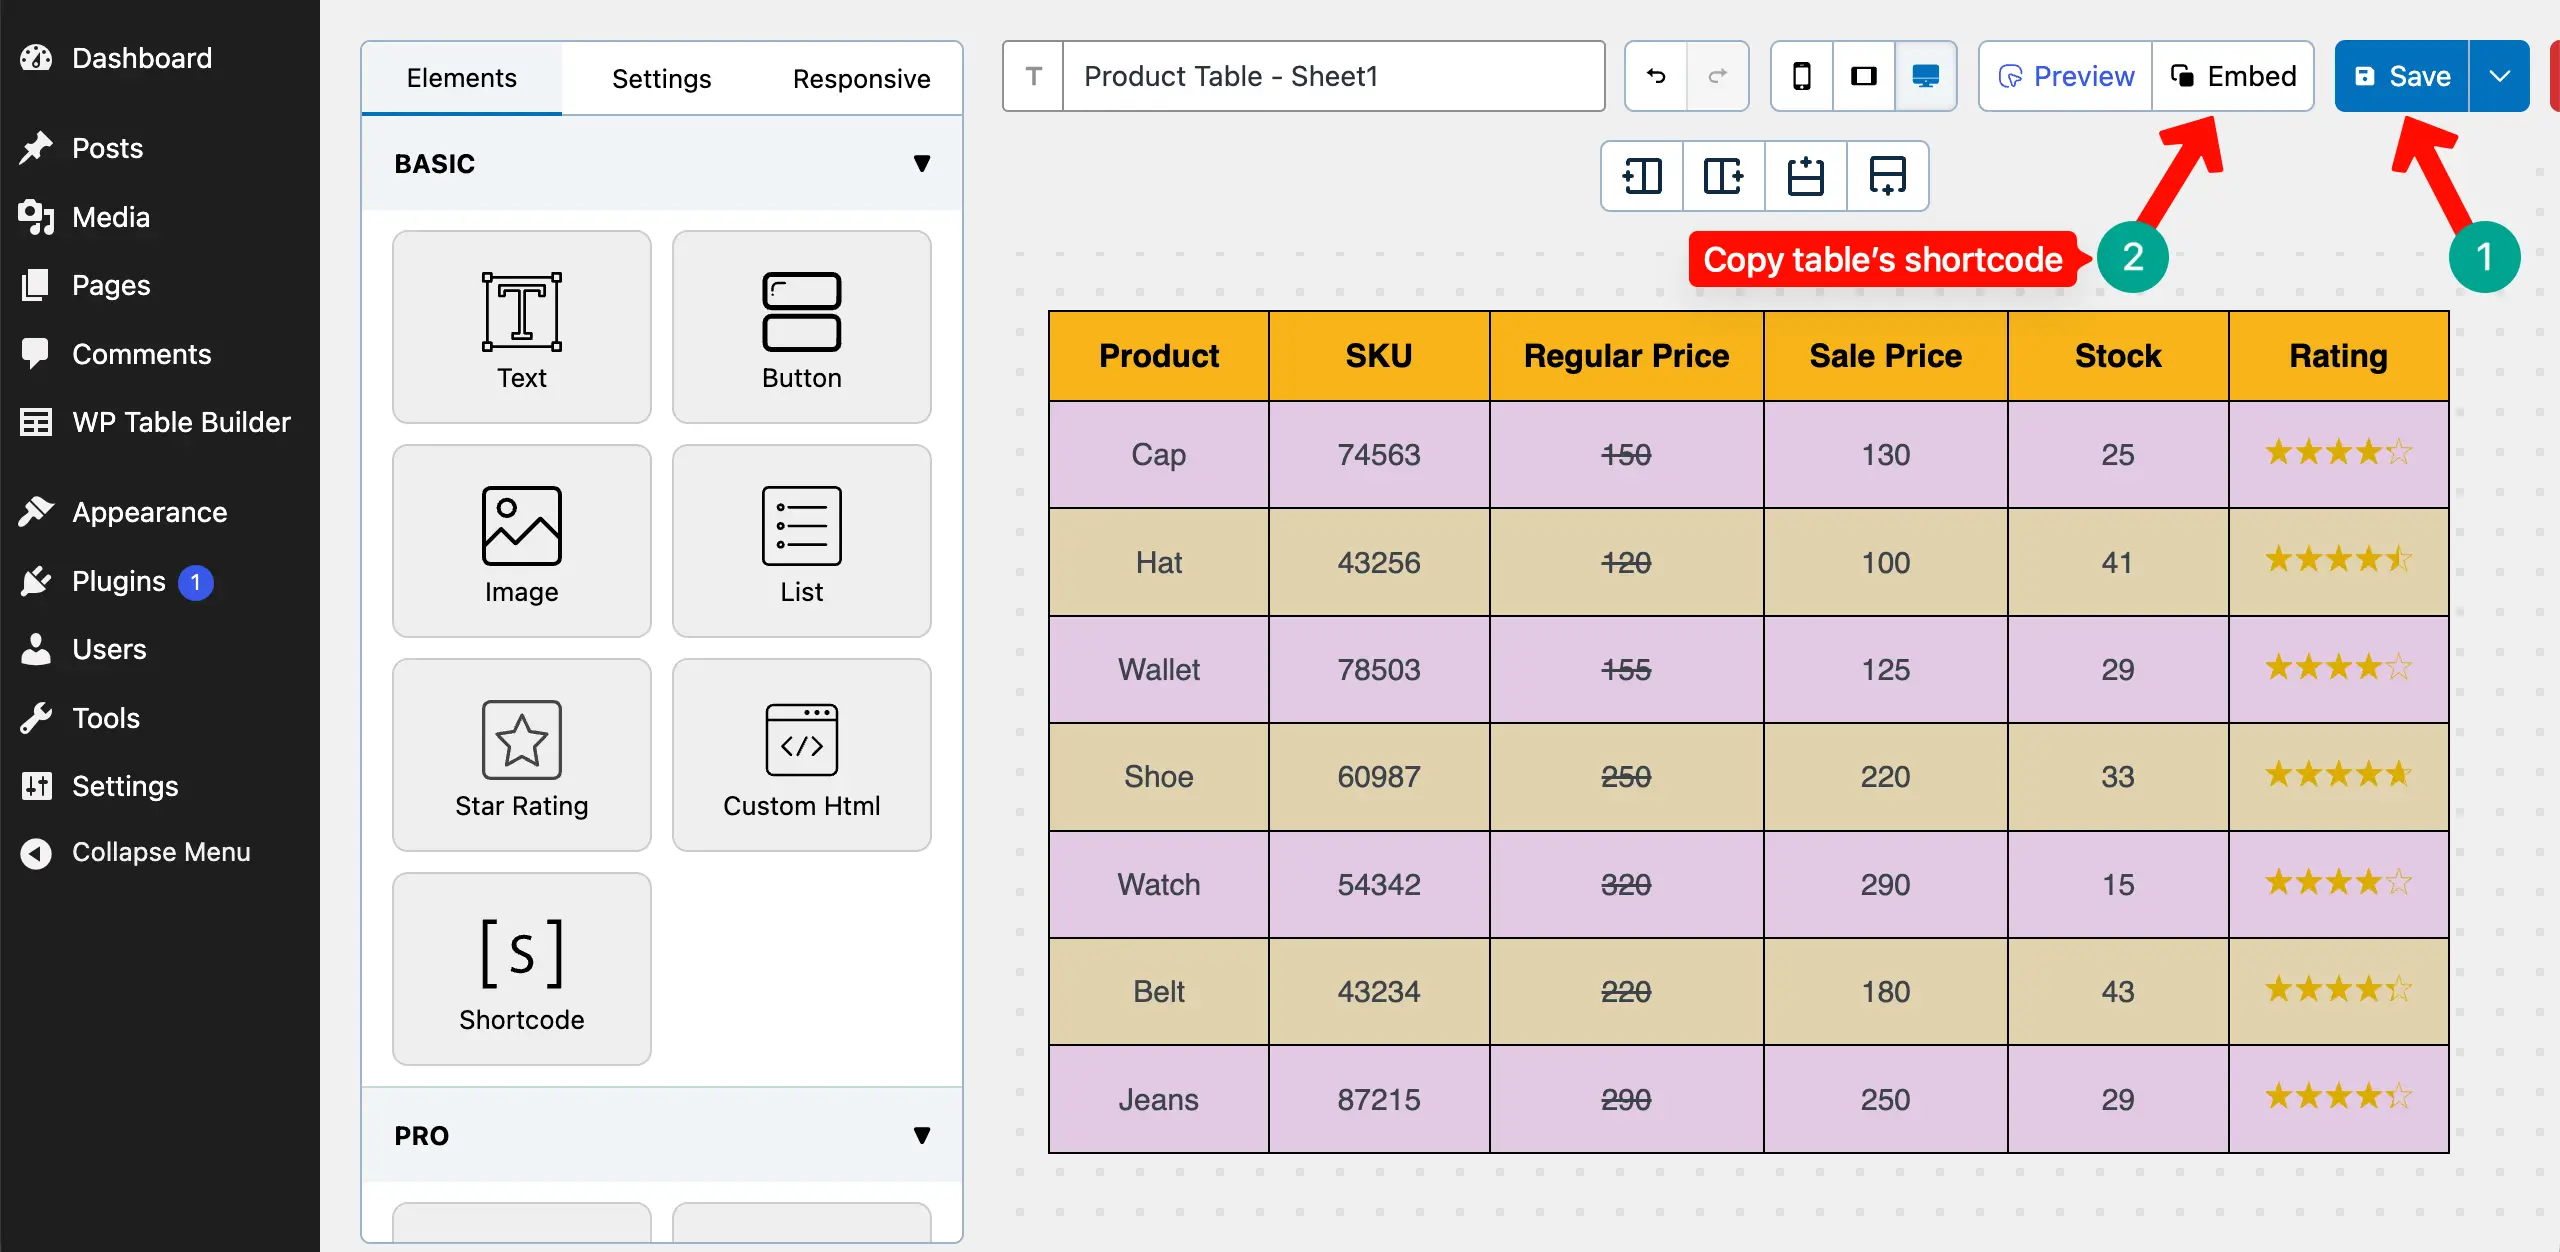
When all customizations are done, save the table and copy its shortcode by clicking the Embed button.
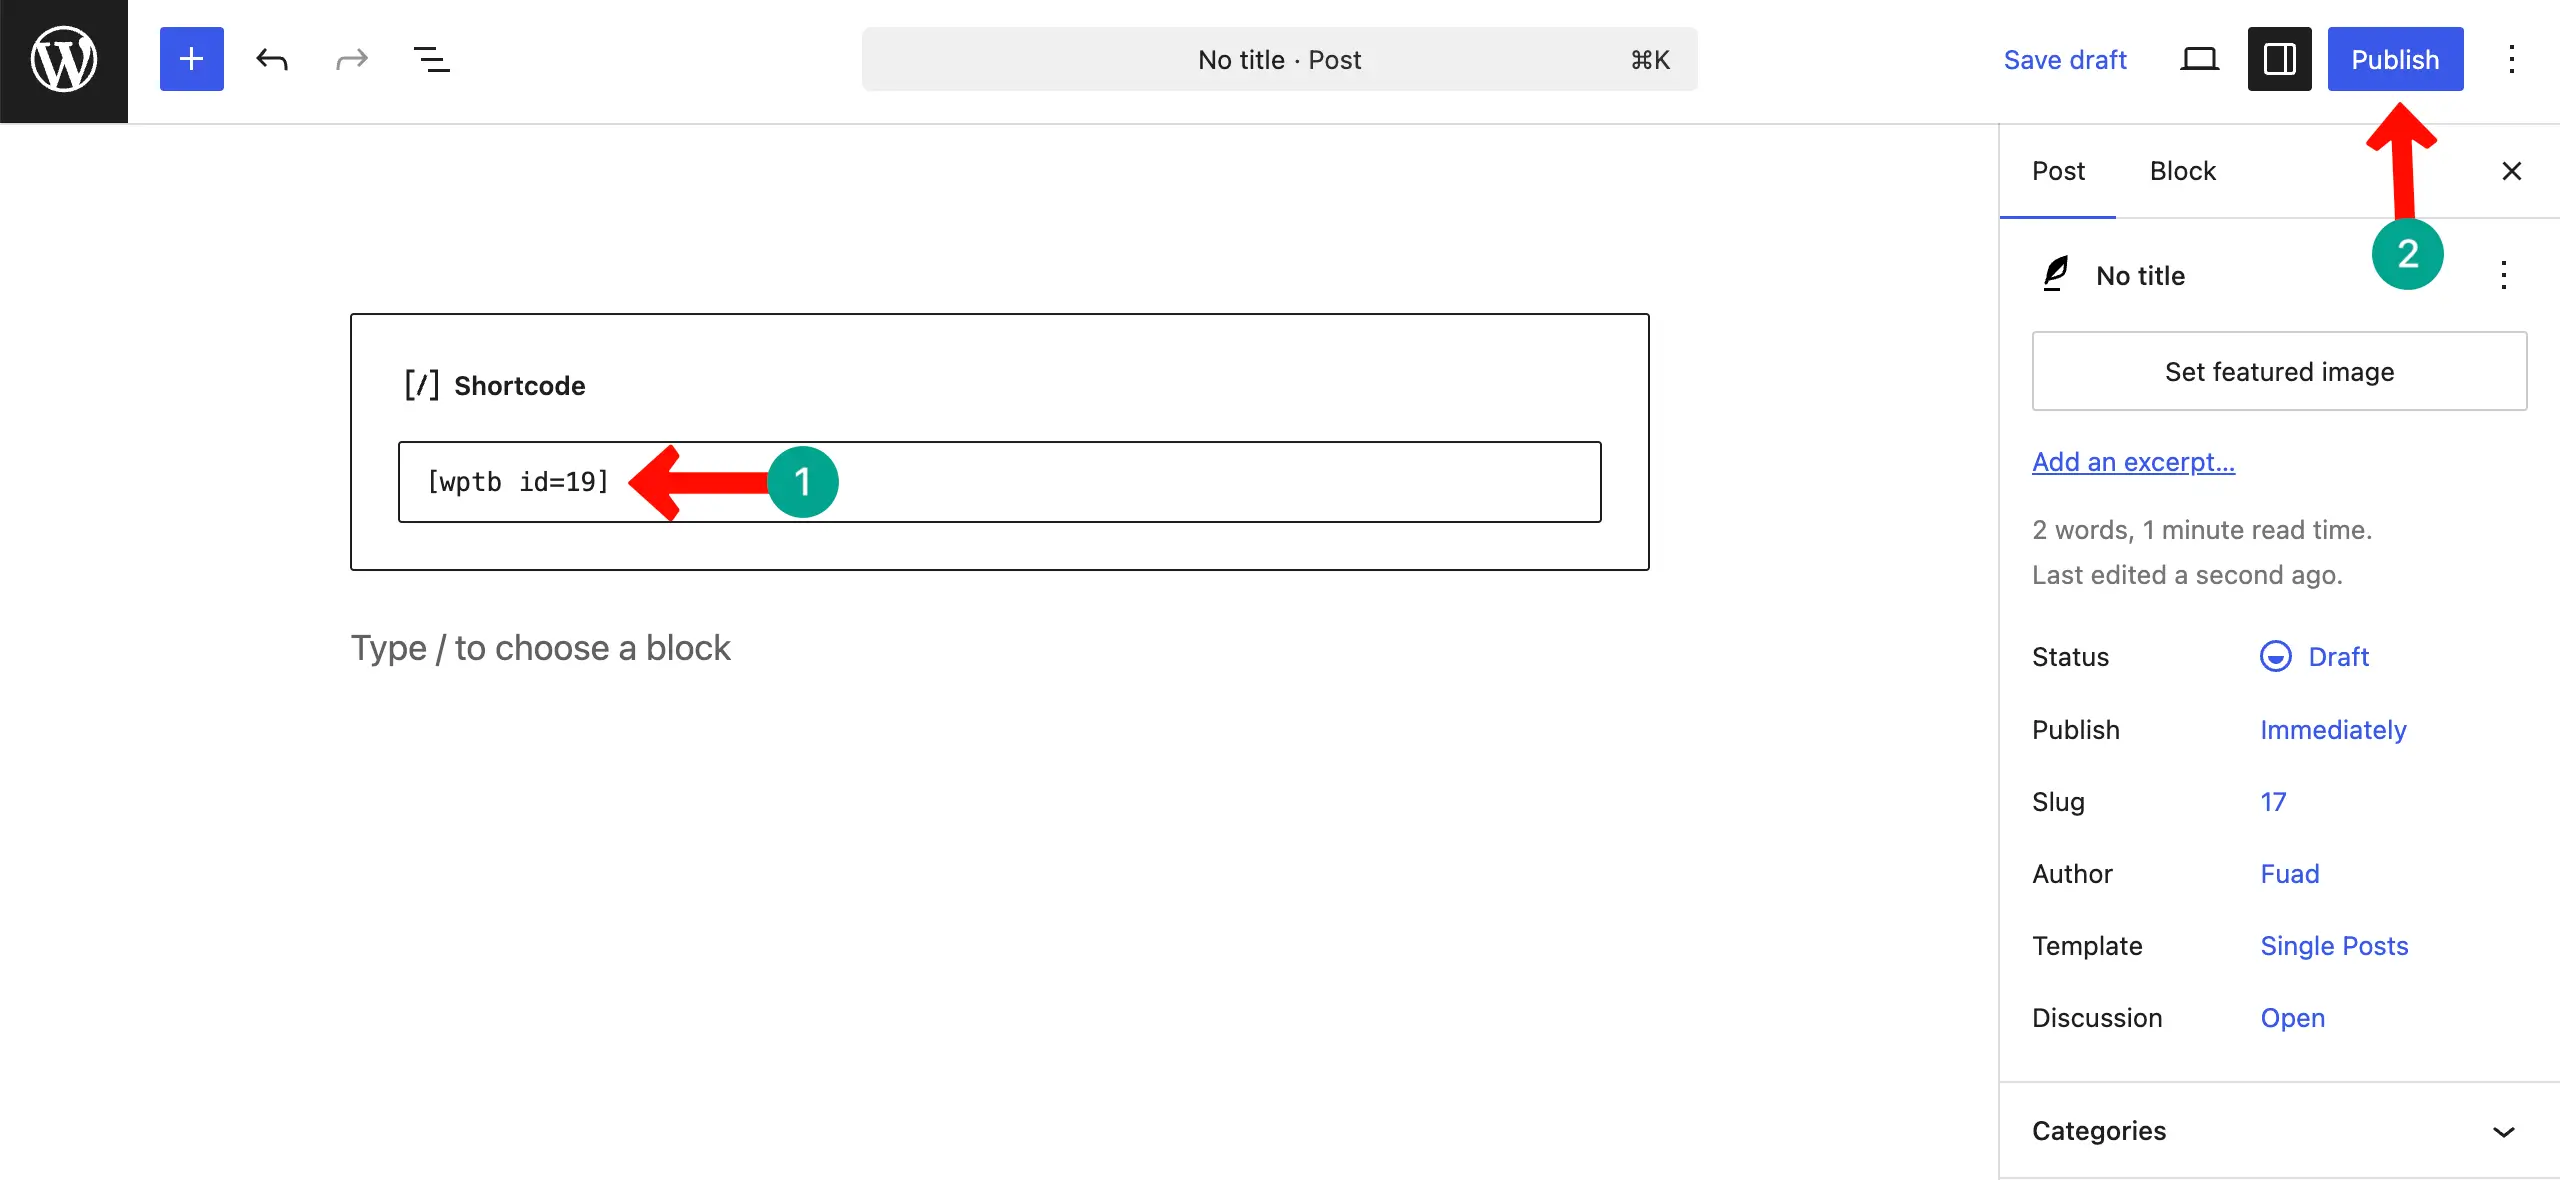
Now, open a post or page. Paste the shortcode in the editor. Then, publish the table.
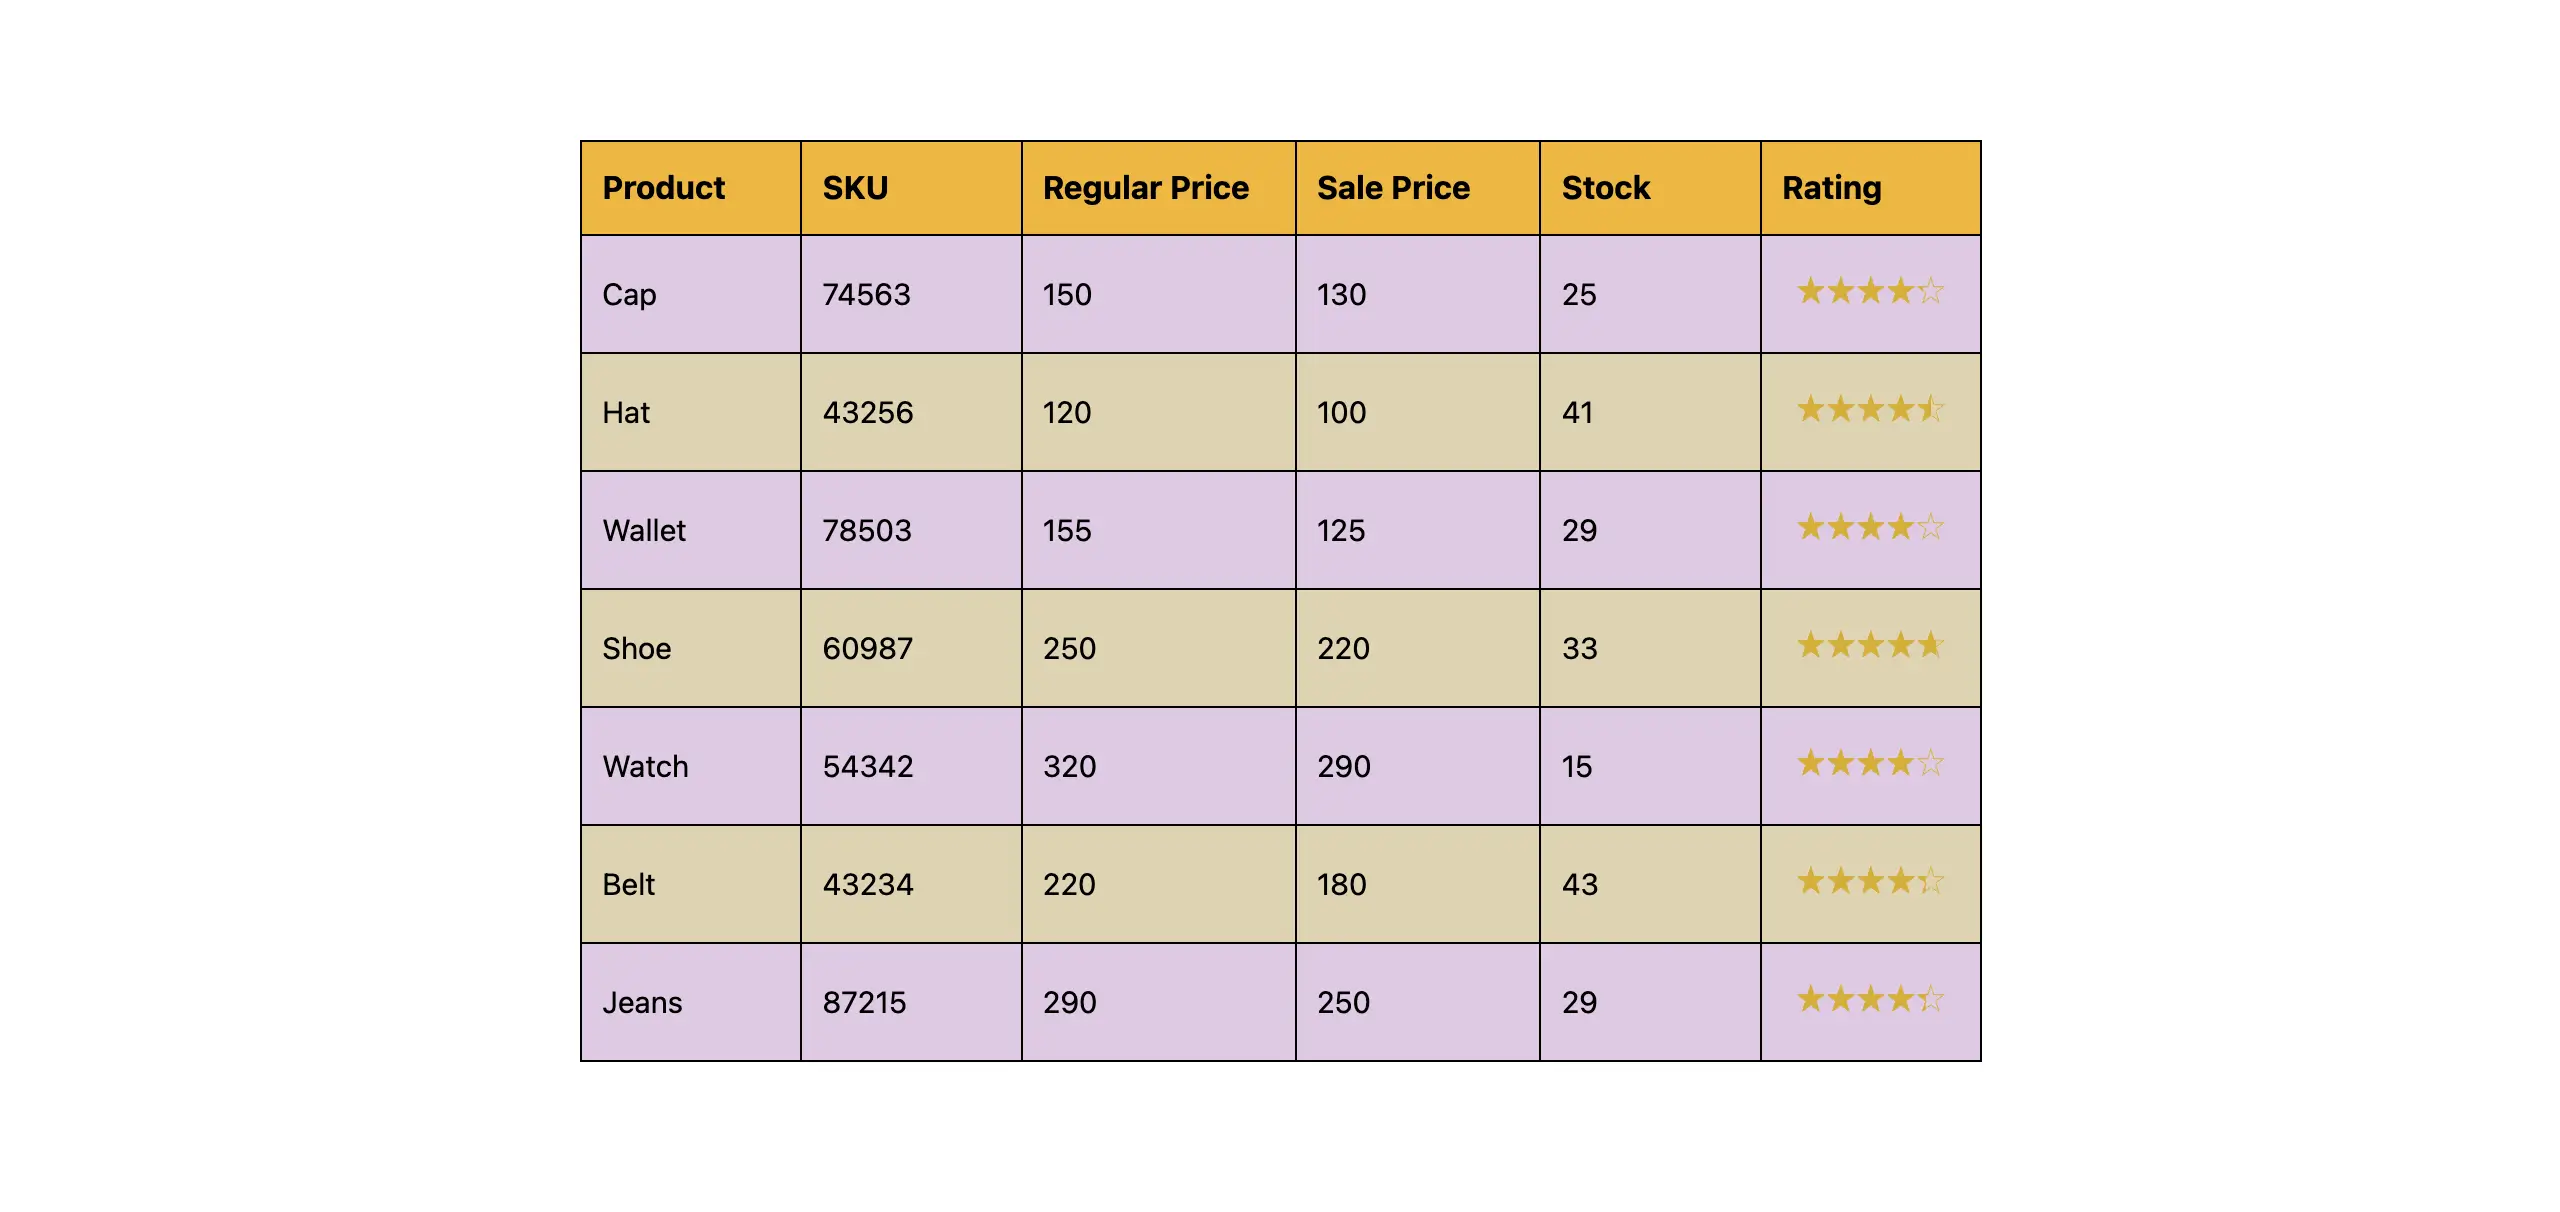
Come to the frontend of the page. Check if the table appears perfectly or not. You can see that it’s working fine on our end.
Thus, you can create a table in WordPress using data from Google Sheets. Learn how to create a feature comparison table in WordPress.
What Happens If You Update Google Sheets?
This is a very important thing to understand before you start using this method. WP Table Builder does not have live integration with Google Sheets. That means there is no automatic connection between your Sheet and your WordPress table.

What Happens If You Update Data in Google Sheets
If you update any data in Google Sheets, the table on your website will not change by itself. Even a small update, like editing a price or adding a new row, will not appear on your WordPress site automatically. Your published table will stay exactly the same as before.
What You Need to Do
To show the updated data on your website, you need to export the updated Sheet again as a CSV file. Then, you must re-import that CSV file into WP Table Builder and update the table.
The process is manual, but it is simple and easy to follow. It only takes a few minutes, and you still get full control over how your table looks on your website.
Learn how to create a size guide table in WordPress.
When Should You Use This Method?
There are specific situations when this method is highly effective, but not always. Unless you know about them, you can’t make the best use of the method covered above. Let’s explore them.

What to Use This Method
Let’s first take a look at the situations when this method is highly effective. Read the points discussed below.
1. You Manage Structured Data in Google Sheets
If you already organize product lists, pricing tables, reports, or comparison data in Google Sheets, this method is very helpful. You can prepare everything in Sheets first. Then, you can move the data into WordPress as a table.
2. You Want Full Layout Control
After importing the CSV file into WP Table Builder, you can fully control the design. You can change colors, adjust spacing, edit alignment, and customize the table style. This gives you more freedom compared to automatic embed methods.
3. You Don’t Require Real-Time Updates
If your data does not change every day or every hour, this method works well. You can update the table manually whenever needed without any problem.
4. You Prefer Design Flexibility Over Automatic Sync
This method focuses more on styling and presentation. If you care more about how the table looks than automatic data syncing, this is a good option.

What This Method Is Not Ideal
Let’s now take a look at the situations when this method won’t deliver you enough good results, and you should look for alternative options.
1. You Handle Frequently Updated Live Stock Data
As it doesn’t have direct integration with Google Sheets, you manually have to export the CSV file and upload it. But doing this again and again can be extremely difficult. In such a situation, you must avoid this method.
2. You Need Real-Time Dashboards
Often, you may want to display real-time changes in your product inventory. It could be a scorecard or anything else where an instant update matters. This method is not suitable because there is no live connection.
Why Not Just Embed Google Sheets?
You can embed Google Sheets into WordPress using an iframe. It is quick and simple. You just copy the embed code and paste it into your page. The Sheet will appear on your website. But this method has many clear limitations. Below we have discussed them.

a. Limited Design Control
When you embed a Google Sheet, you cannot fully control how it looks. The table keeps its default Google Sheets style. You can’t adjust fonts, spacing, borders, or row styles to match your website design. You can overcome these limitations with WP Table Builder.
b. Poor Styling Flexibility
Embedded Sheets do not offer advanced styling options. You cannot easily highlight important rows, add buttons, insert images, or customize cell designs. WP Table Builder allows you to add different content types inside cells. This gives a more professional look.
c. Not Optimized for Your WordPress Theme
An embedded iframe does not always match your theme’s design. Sometimes the font style, size, and spacing look different from the rest of your website. This can make your page look inconsistent.
d. Harder to Customize
Editing an embedded Sheet to change its layout can be more complicated. You may need to adjust settings inside Google Sheets and recheck the embed view. With WP Table Builder, you can edit the table directly from your WordPress dashboard.
Final Thoughts
Creating a table in WordPress using Google Sheets data is not complicated. You just need the right process. Export your Sheet as a CSV file, import it into WP Table Builder, and design the table the way you want. It gives you full control over how your data looks on your website.
Even though there is no automatic sync, the method is simple and easy to manage. So, don’t let technical limitations stop you from presenting your data in a clean, professional way. If you have questions regarding the tutorial, mention them in the comment box below.
Leave a Reply
You must be logged in to post a comment.