Many website owners today store important data in CSV files. You can create it using tools like Microsoft Excel or Google Sheets. But uploading a CSV file directly to WordPress does not show the data as a table on your website. You need the right steps to make it work.
If you want to show product lists, pricing charts, comparison tables, or large data sets, importing a CSV file can save you a lot of time. You do not need to copy and paste each row manually. Instead, you can upload the file once and turn it into a clean and responsive table.
This method is faster and reduces mistakes. In this guide, you will learn how to import a CSV file and display it as a table in WordPress step by step. The process is simple. You do not need coding skills. Let’s get started!
What Is a CSV File?
A CSV is a simple text file that stores data in rows and columns. Each line in the file is a row of data. Each value in the row is separated by a comma. That is why it is called comma-separated. You can open and edit a CSV file using tools like Microsoft Excel and Google Sheets.
CSV files are widely used because they are lightweight and easy to share. They do not store complex formatting like colors or fonts. They only store raw data. This makes them perfect for importing and exporting large amounts of information between different systems, websites, and apps.

Explore the best CSV import WordPress plugins.
When Should You Use CSV Import?
As already said, CSV import is very helpful when you need to handle a large amount of data in a simple and organized way. Instead of adding information manually inside WordPress, you can prepare everything in one file and upload it in minutes. Some crucial usecases are:
a. Handling Large Data of 20+ Rows
If you have more than 20 rows of data, adding them one by one inside WordPress can be slow and tiring. It also increases the chance of mistakes. With a CSV file, you can prepare all rows at once and import them in a single step. This is much faster and more accurate.
b. Working with Spreadsheet Tools
Many people manage their data in tools like Microsoft Excel or Google Sheets. These tools allow you to sort, filter, and edit data easily. When your data is already organized in a spreadsheet, exporting it as a CSV file and importing it into WordPress becomes a smooth process.

Learn how to make a table sortable in WordPress.
c. Updating Information on a Regular Basis
If you need to update your data often, CSV import makes the task simple. You can edit the file, save it again, and re-upload it. This method is much easier than editing each table row manually inside your website.
d. Importing Product or Inventory Lists
Online stores and business websites often export product or inventory lists from other systems. Many platforms allow exports in CSV format. You can take that file and quickly import it into WordPress to display product details, pricing, or stock information in a table format.
e. Displaying Structured and Complex Tables
When you want to show structured and detailed tables, CSV import is a smart choice. It helps you keep columns and rows properly aligned. This is useful for comparison charts, pricing tables, reports, or any large data presentation where clarity is important.
EExplore the best WordPress table builder plugins.
How to Import a CSV File and Display It as a Table in WordPress
Now, we’re in the main part of this post. In this section, we’ll explain to you step by step how to import a CSV file and display it as a table in WordPress. Keep reading it to the end.
Step 01: Prepare Your CSV File
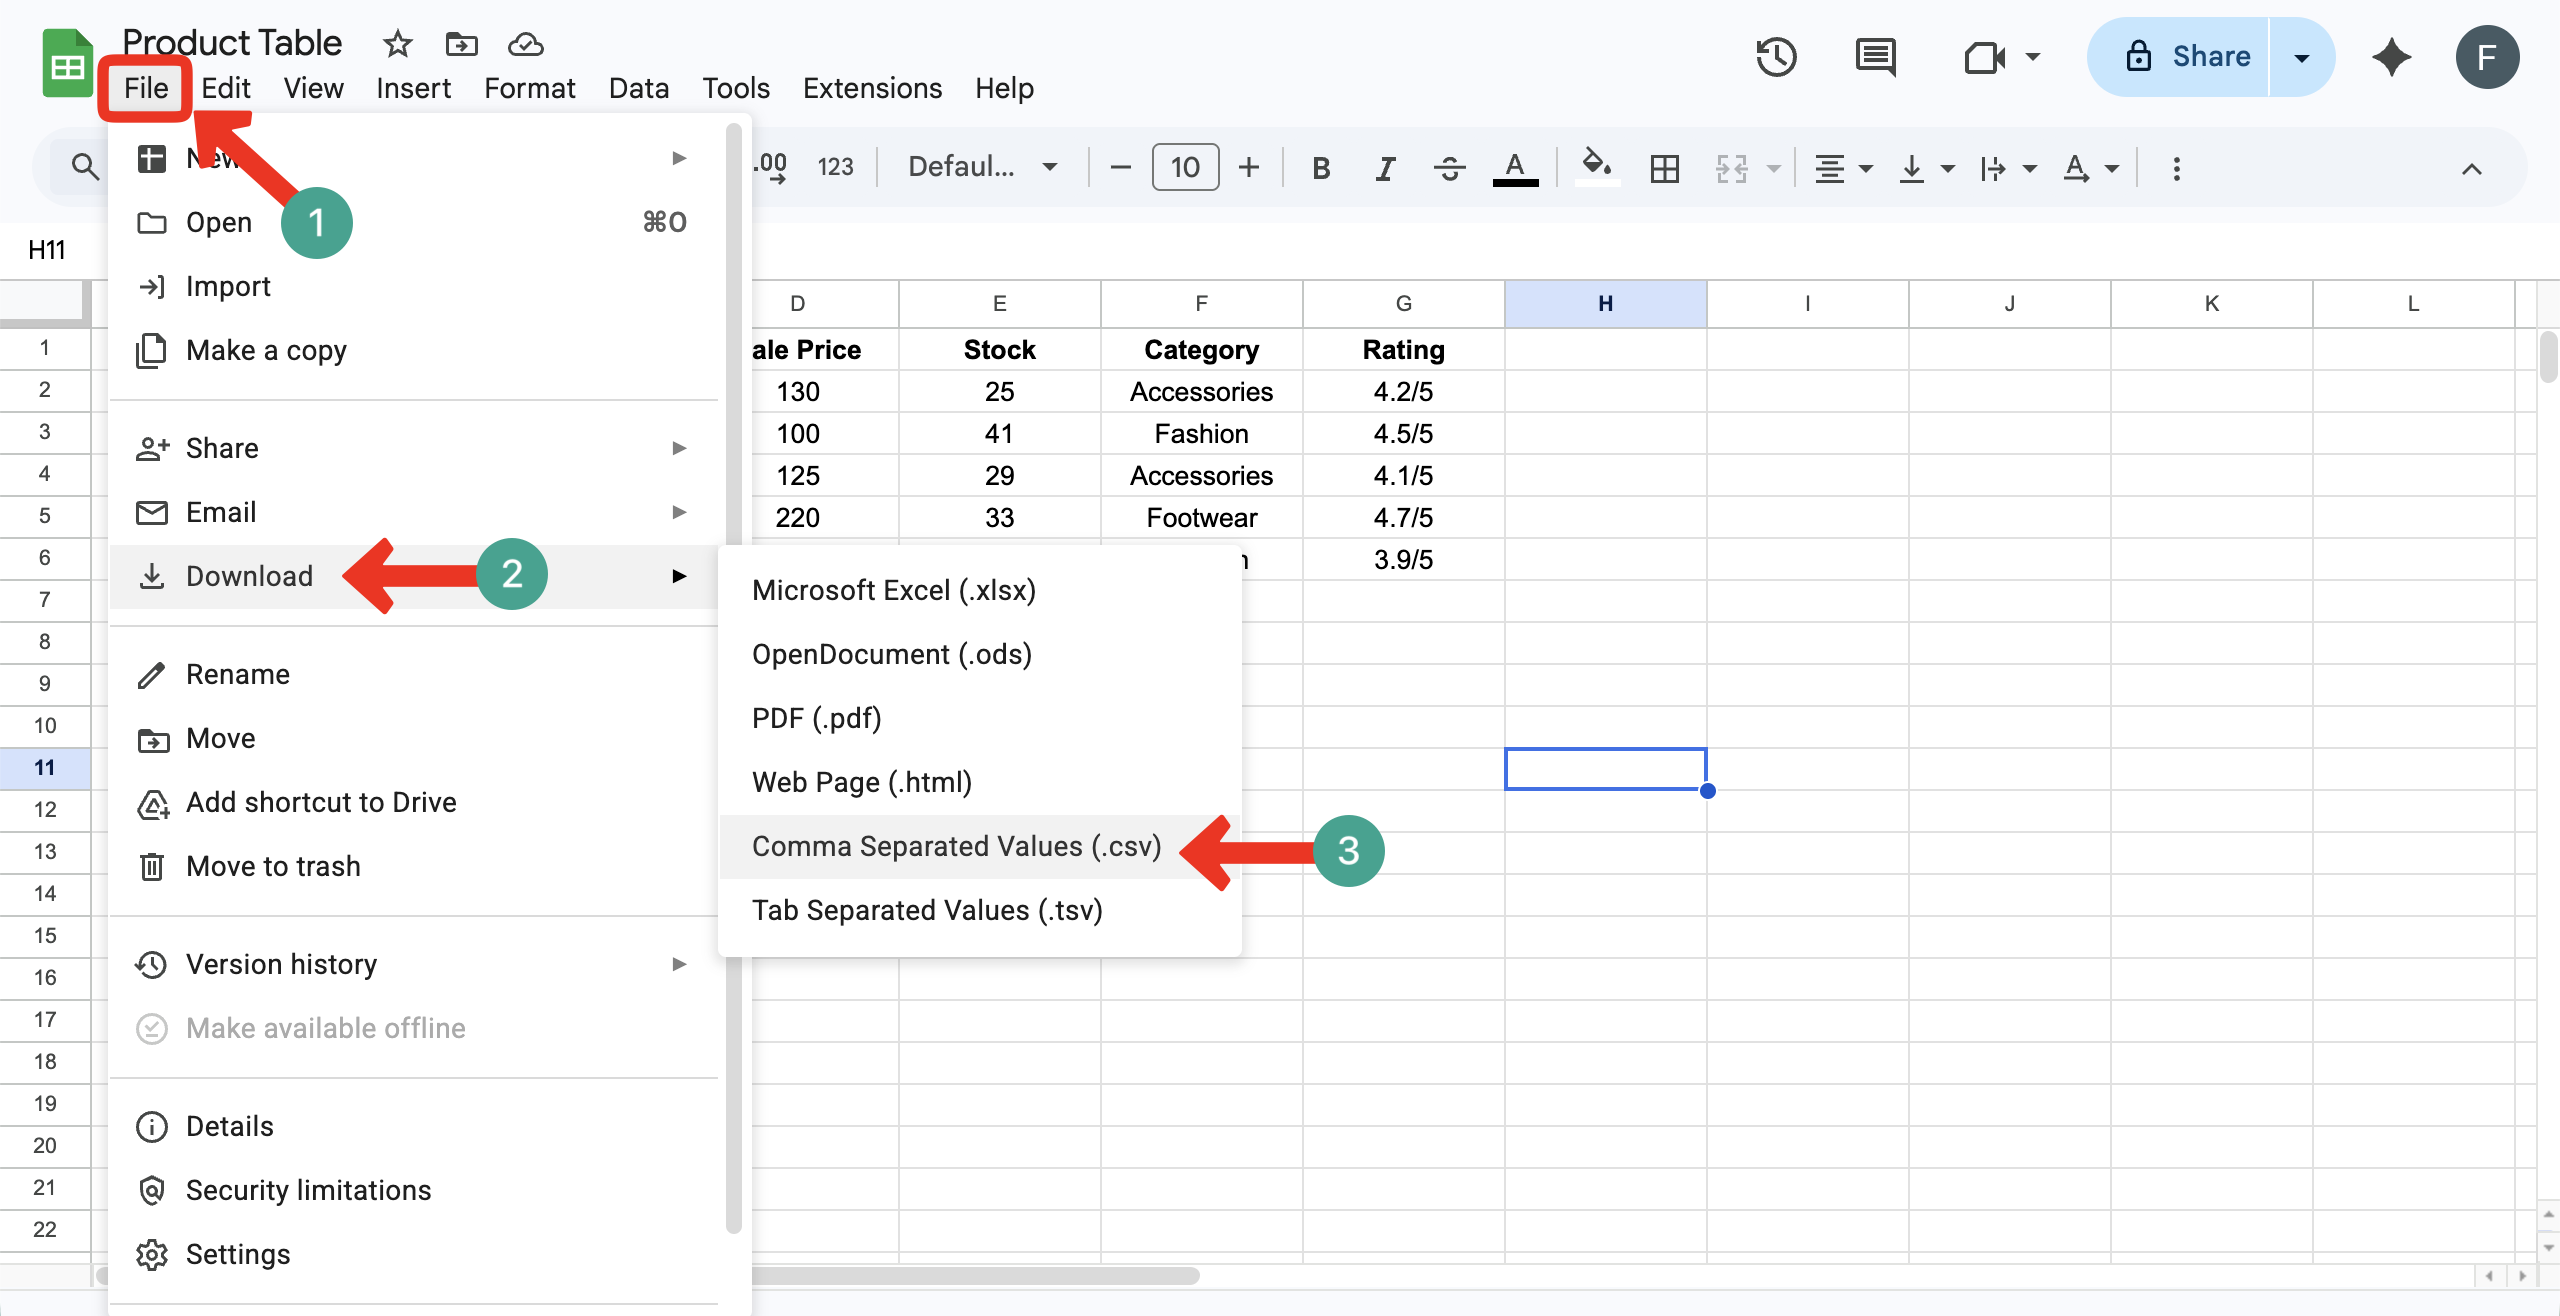
You can prepare your CSV file on various platforms. For this tutorial, we have prepared a table on a Google Sheet. Let’s download it as a CSV file.
Click File → Download → Comma Separated Values (.csv). The sheet will be downloaded as a CSV file.
Step 02: Install and Activate WP Table Builder
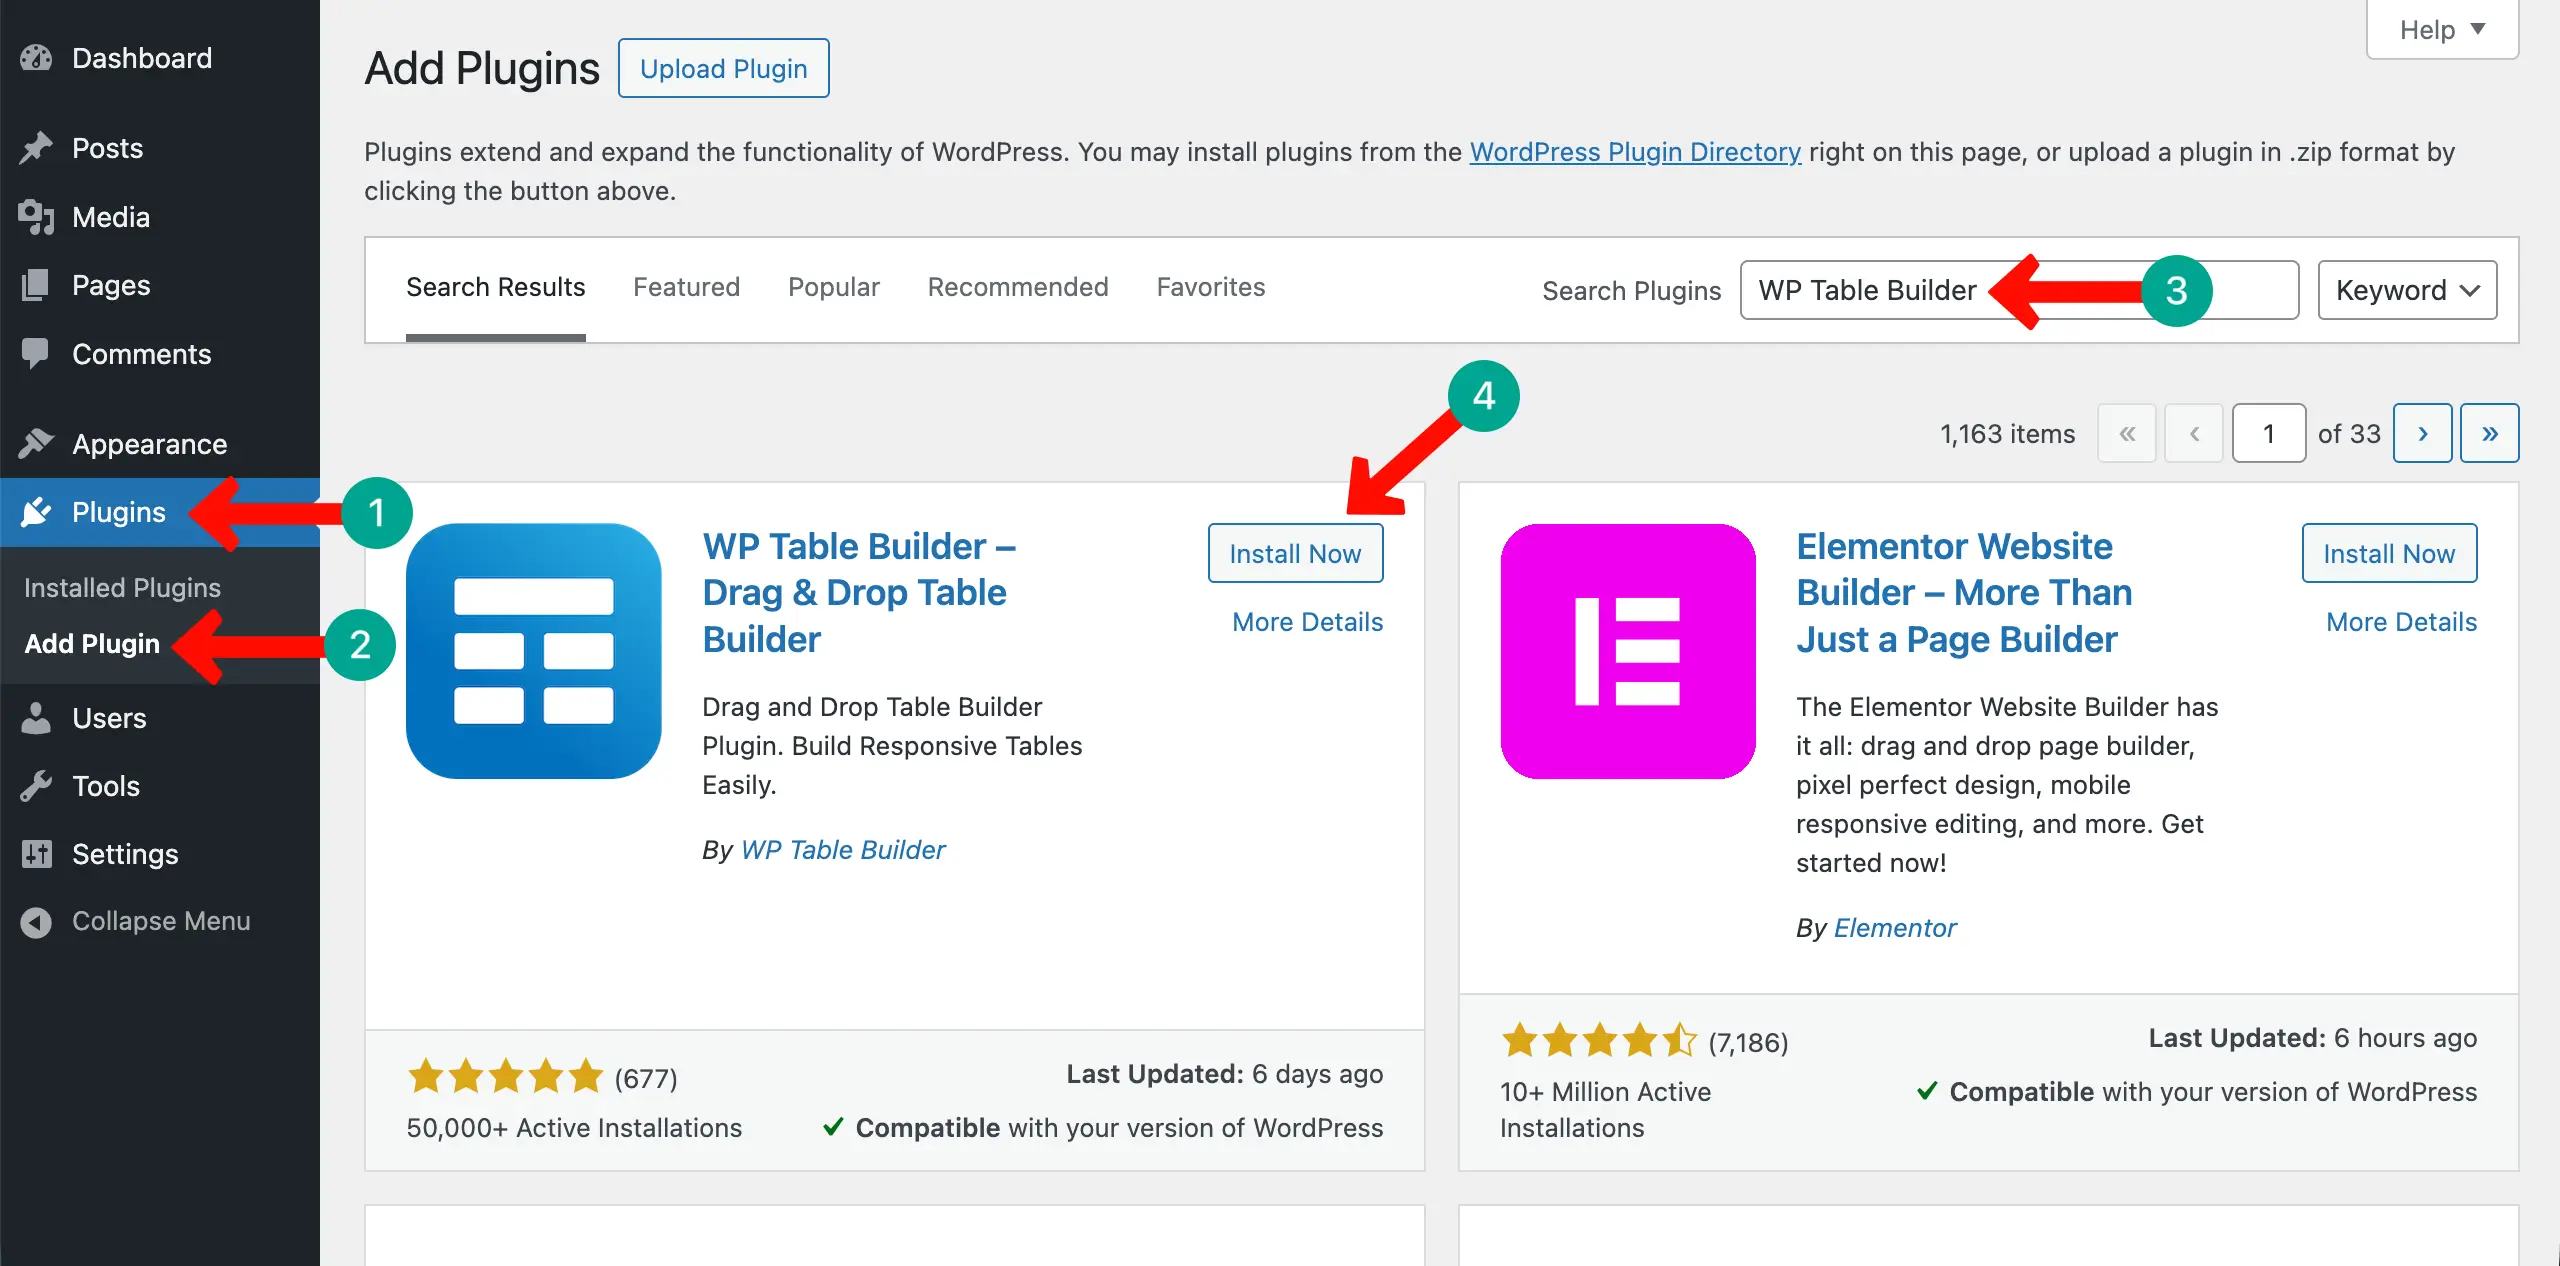
There is no default way to import a CSV file into WordPress. Also, if you want to display it directly as a table, you will need a table builder plugin that supports CSV import.
WP Table Builder is one such plugin. Install and activate it on your WordPress site.
Step 03: Import the CSV File
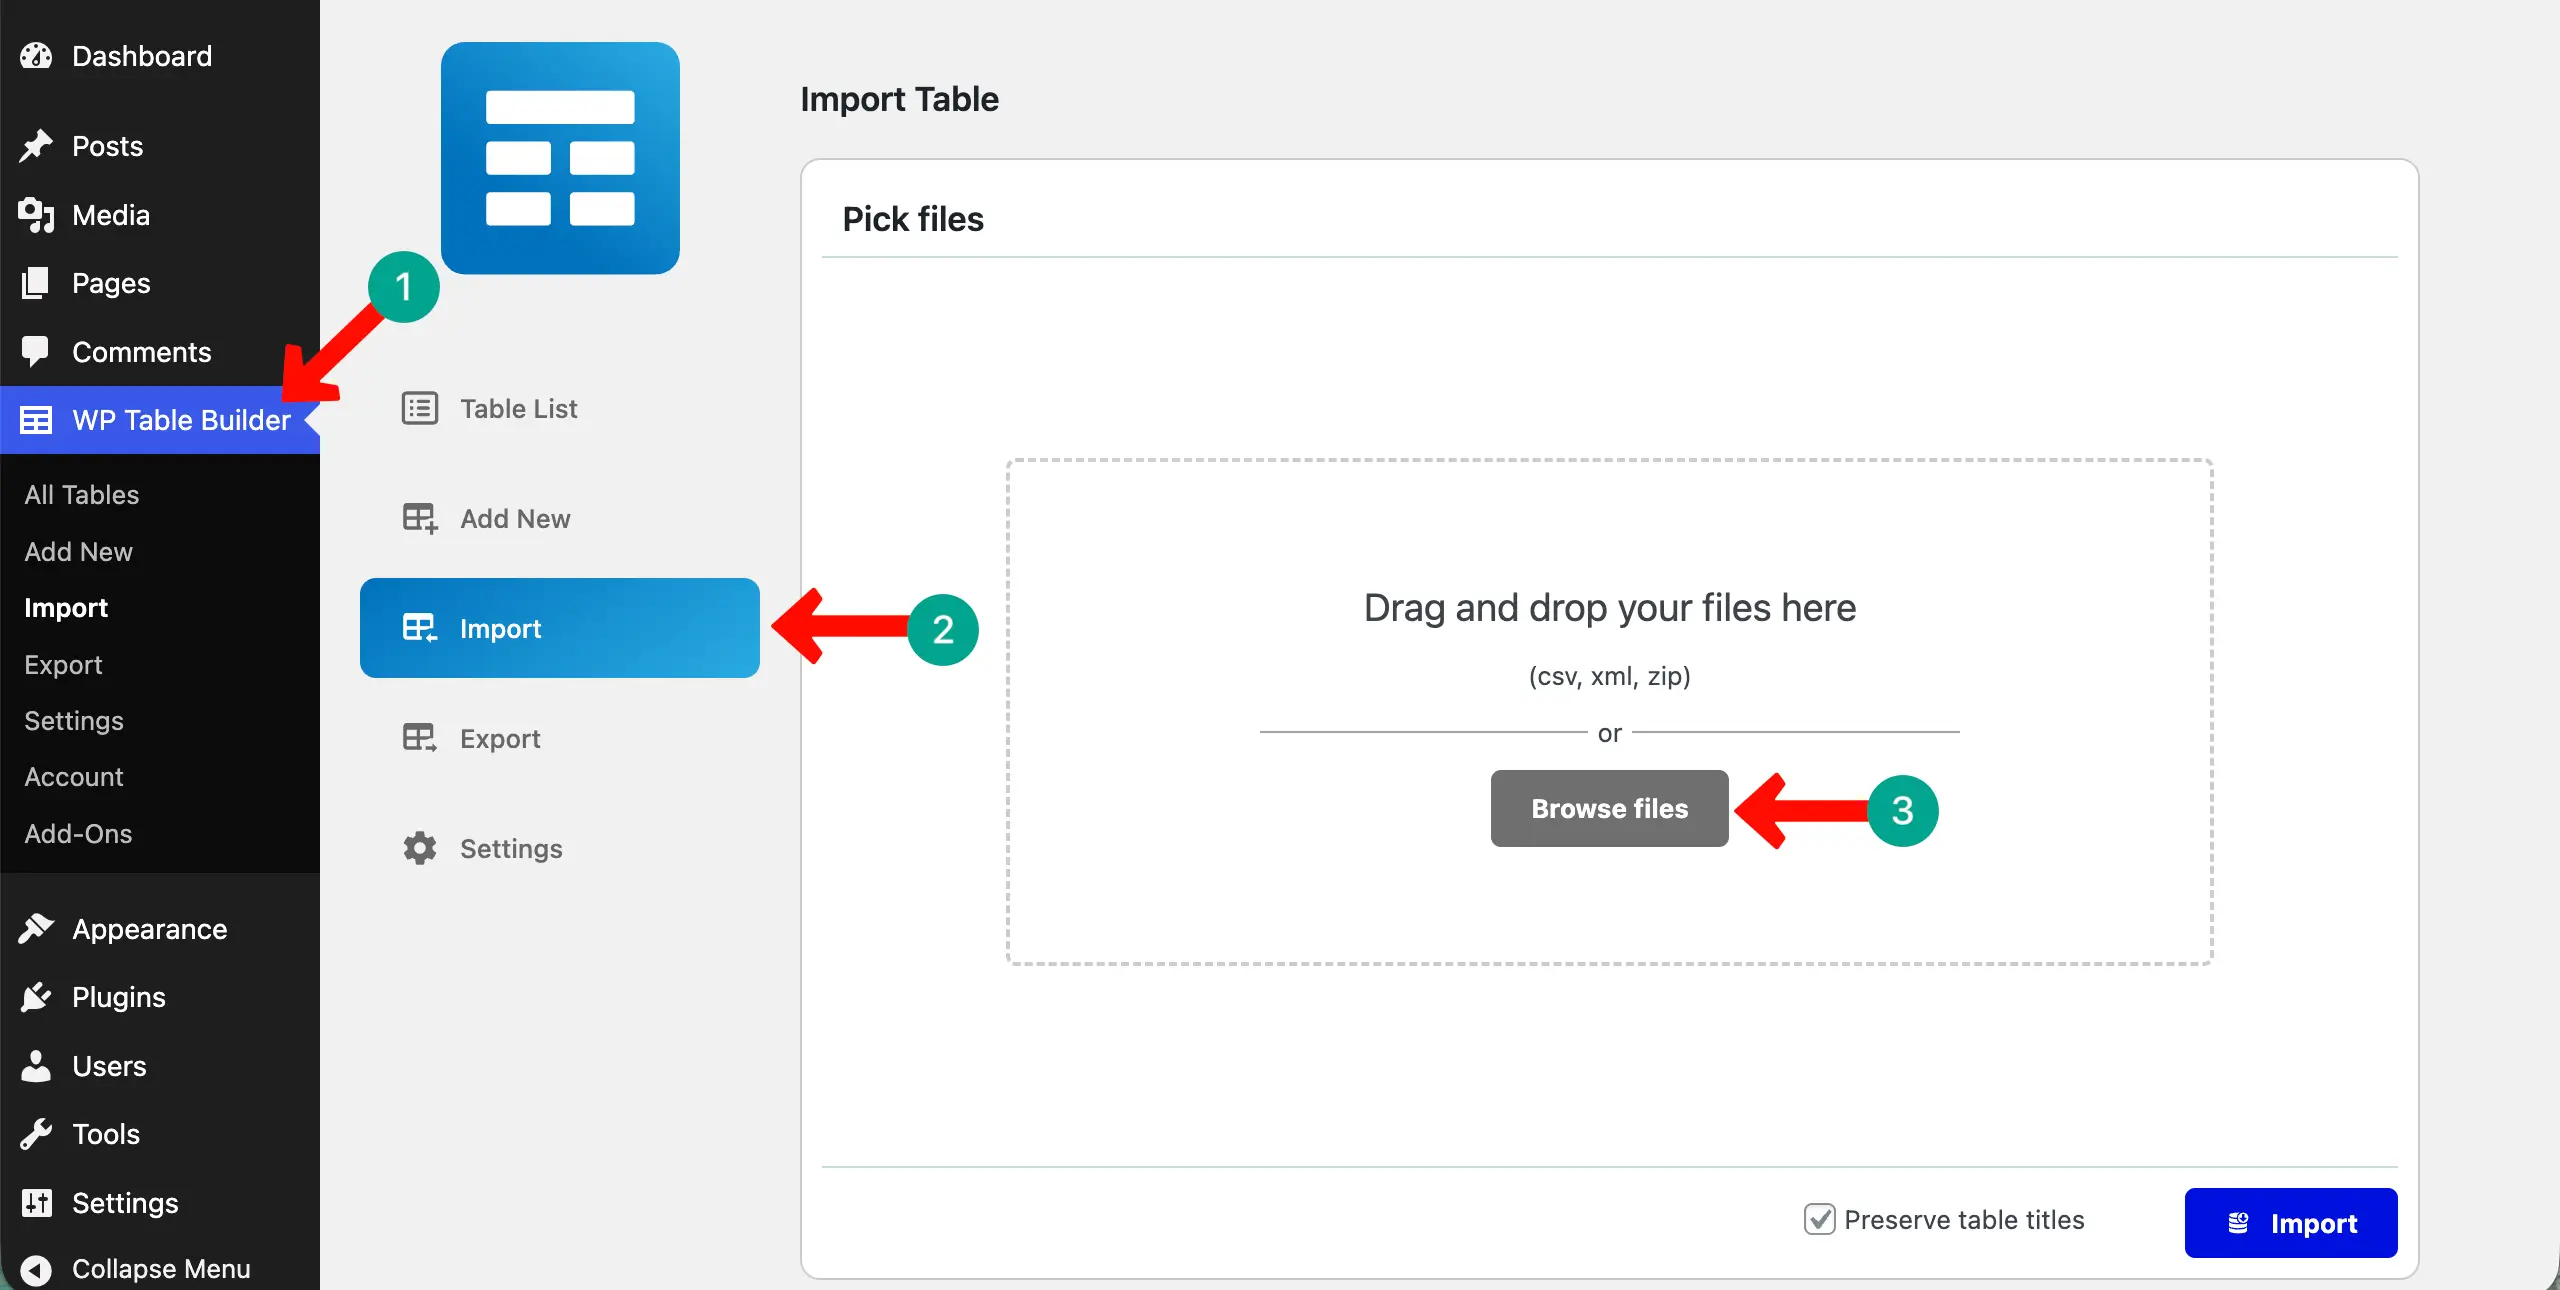
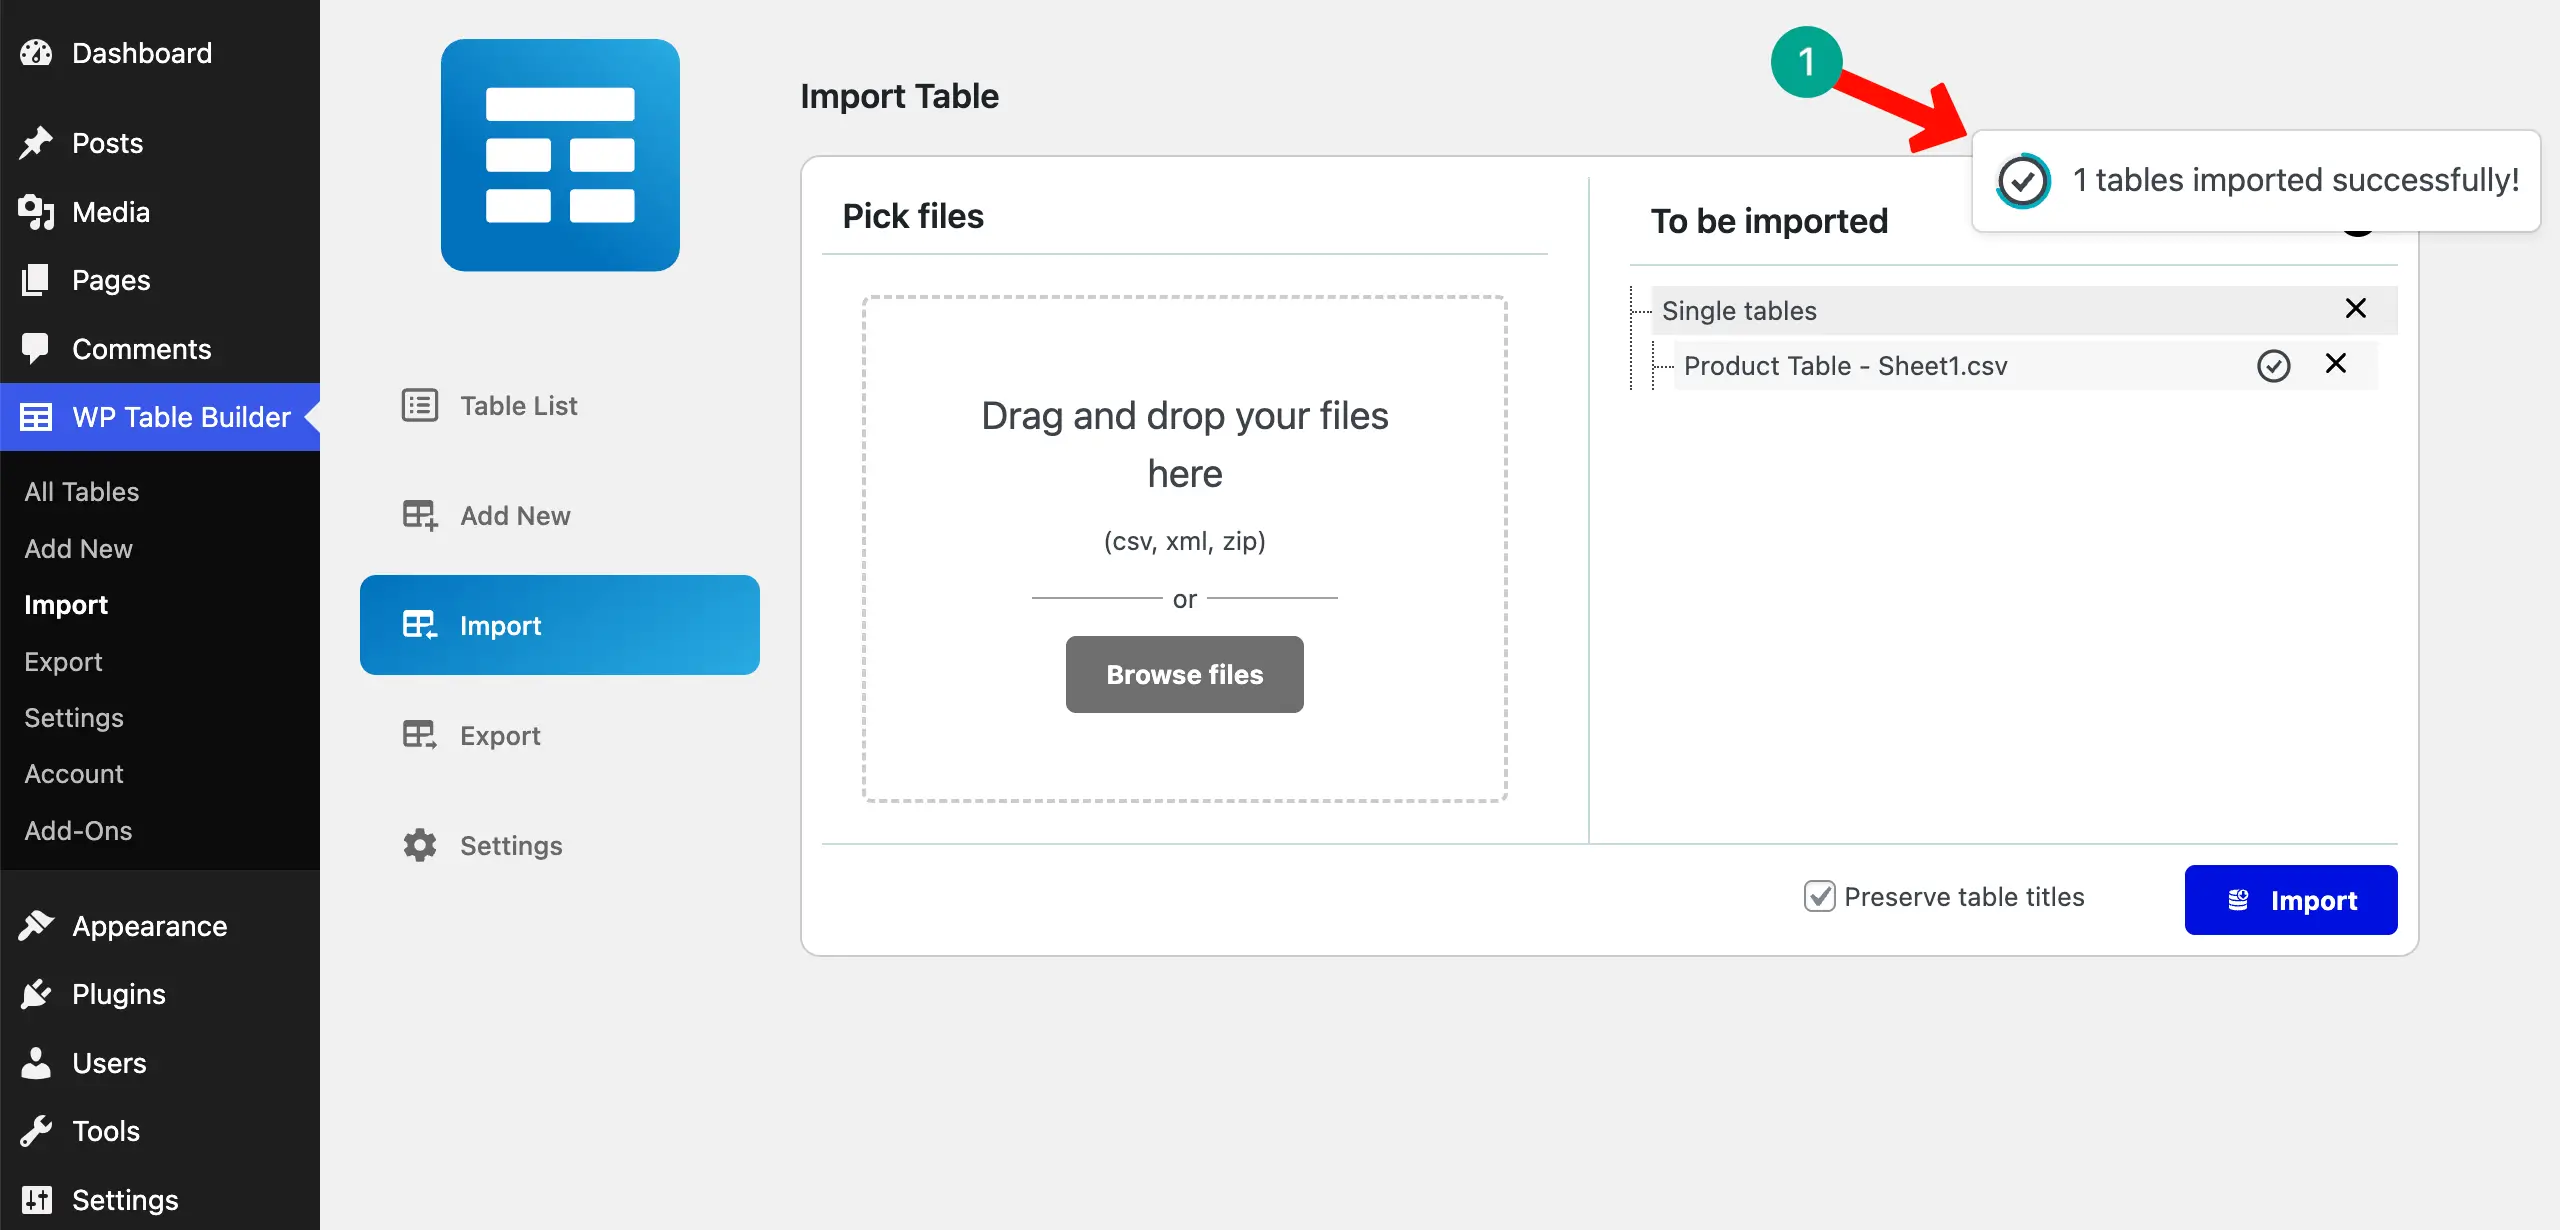
After the plugin is installed and activated, navigate to WP Table Builder > Import. Click the Browse files button. This will let you choose the CSV file you want to import.
After the CSV file has been selected, click the Import button.
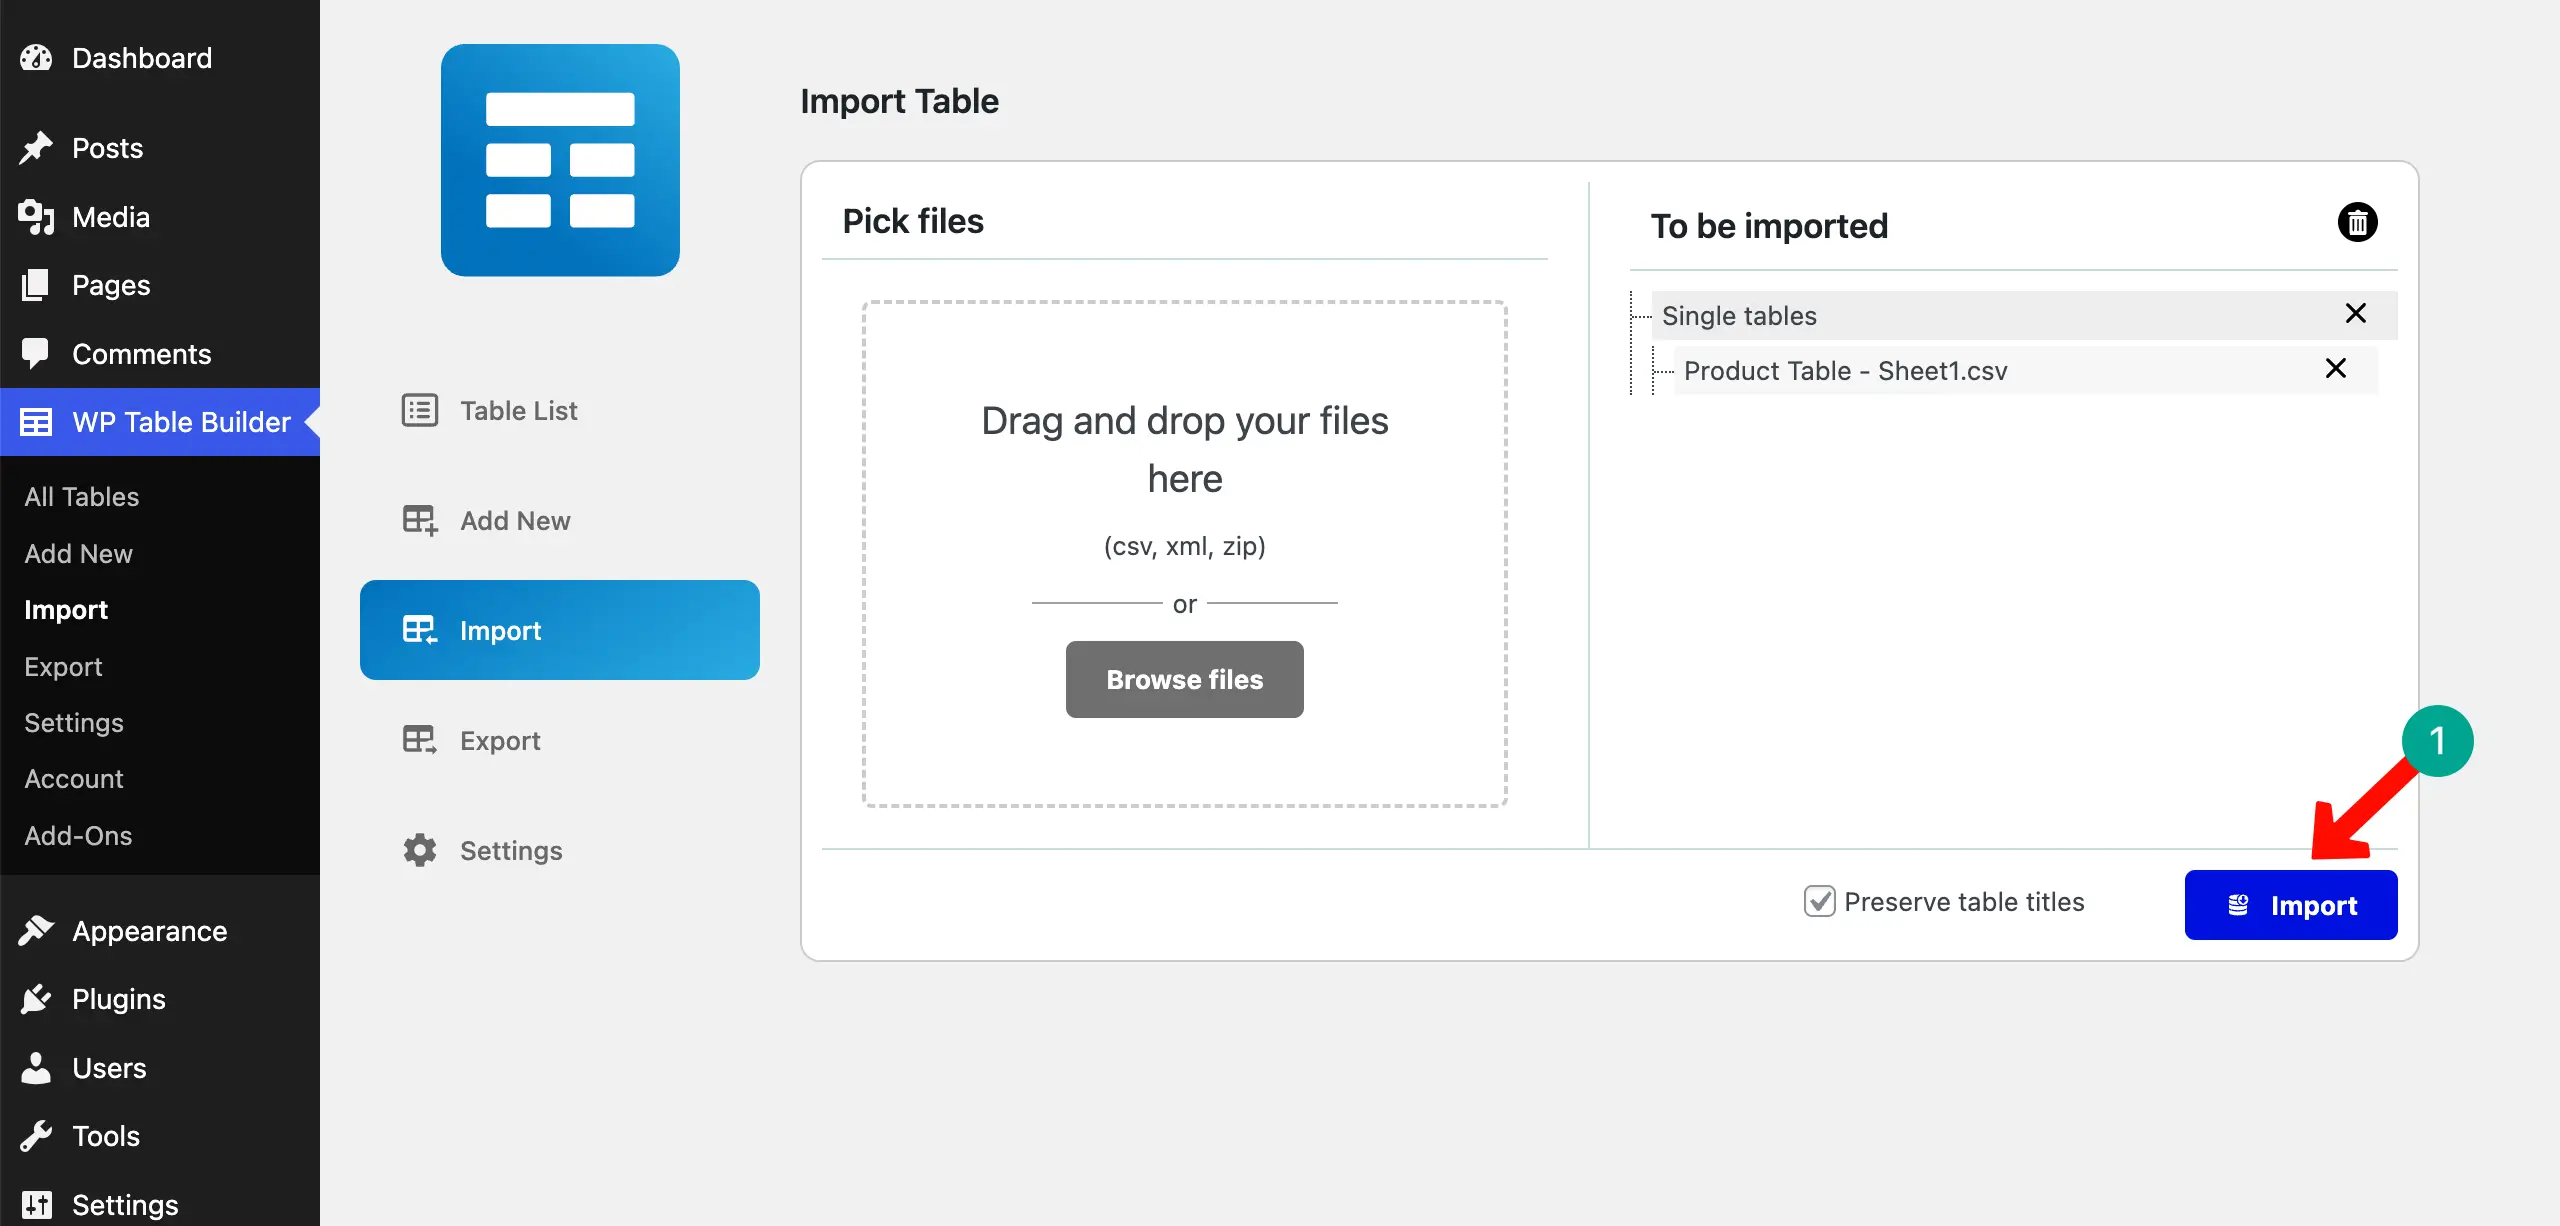
Once the import completes, you’ll see a notification like the one in the attached screenshot below.
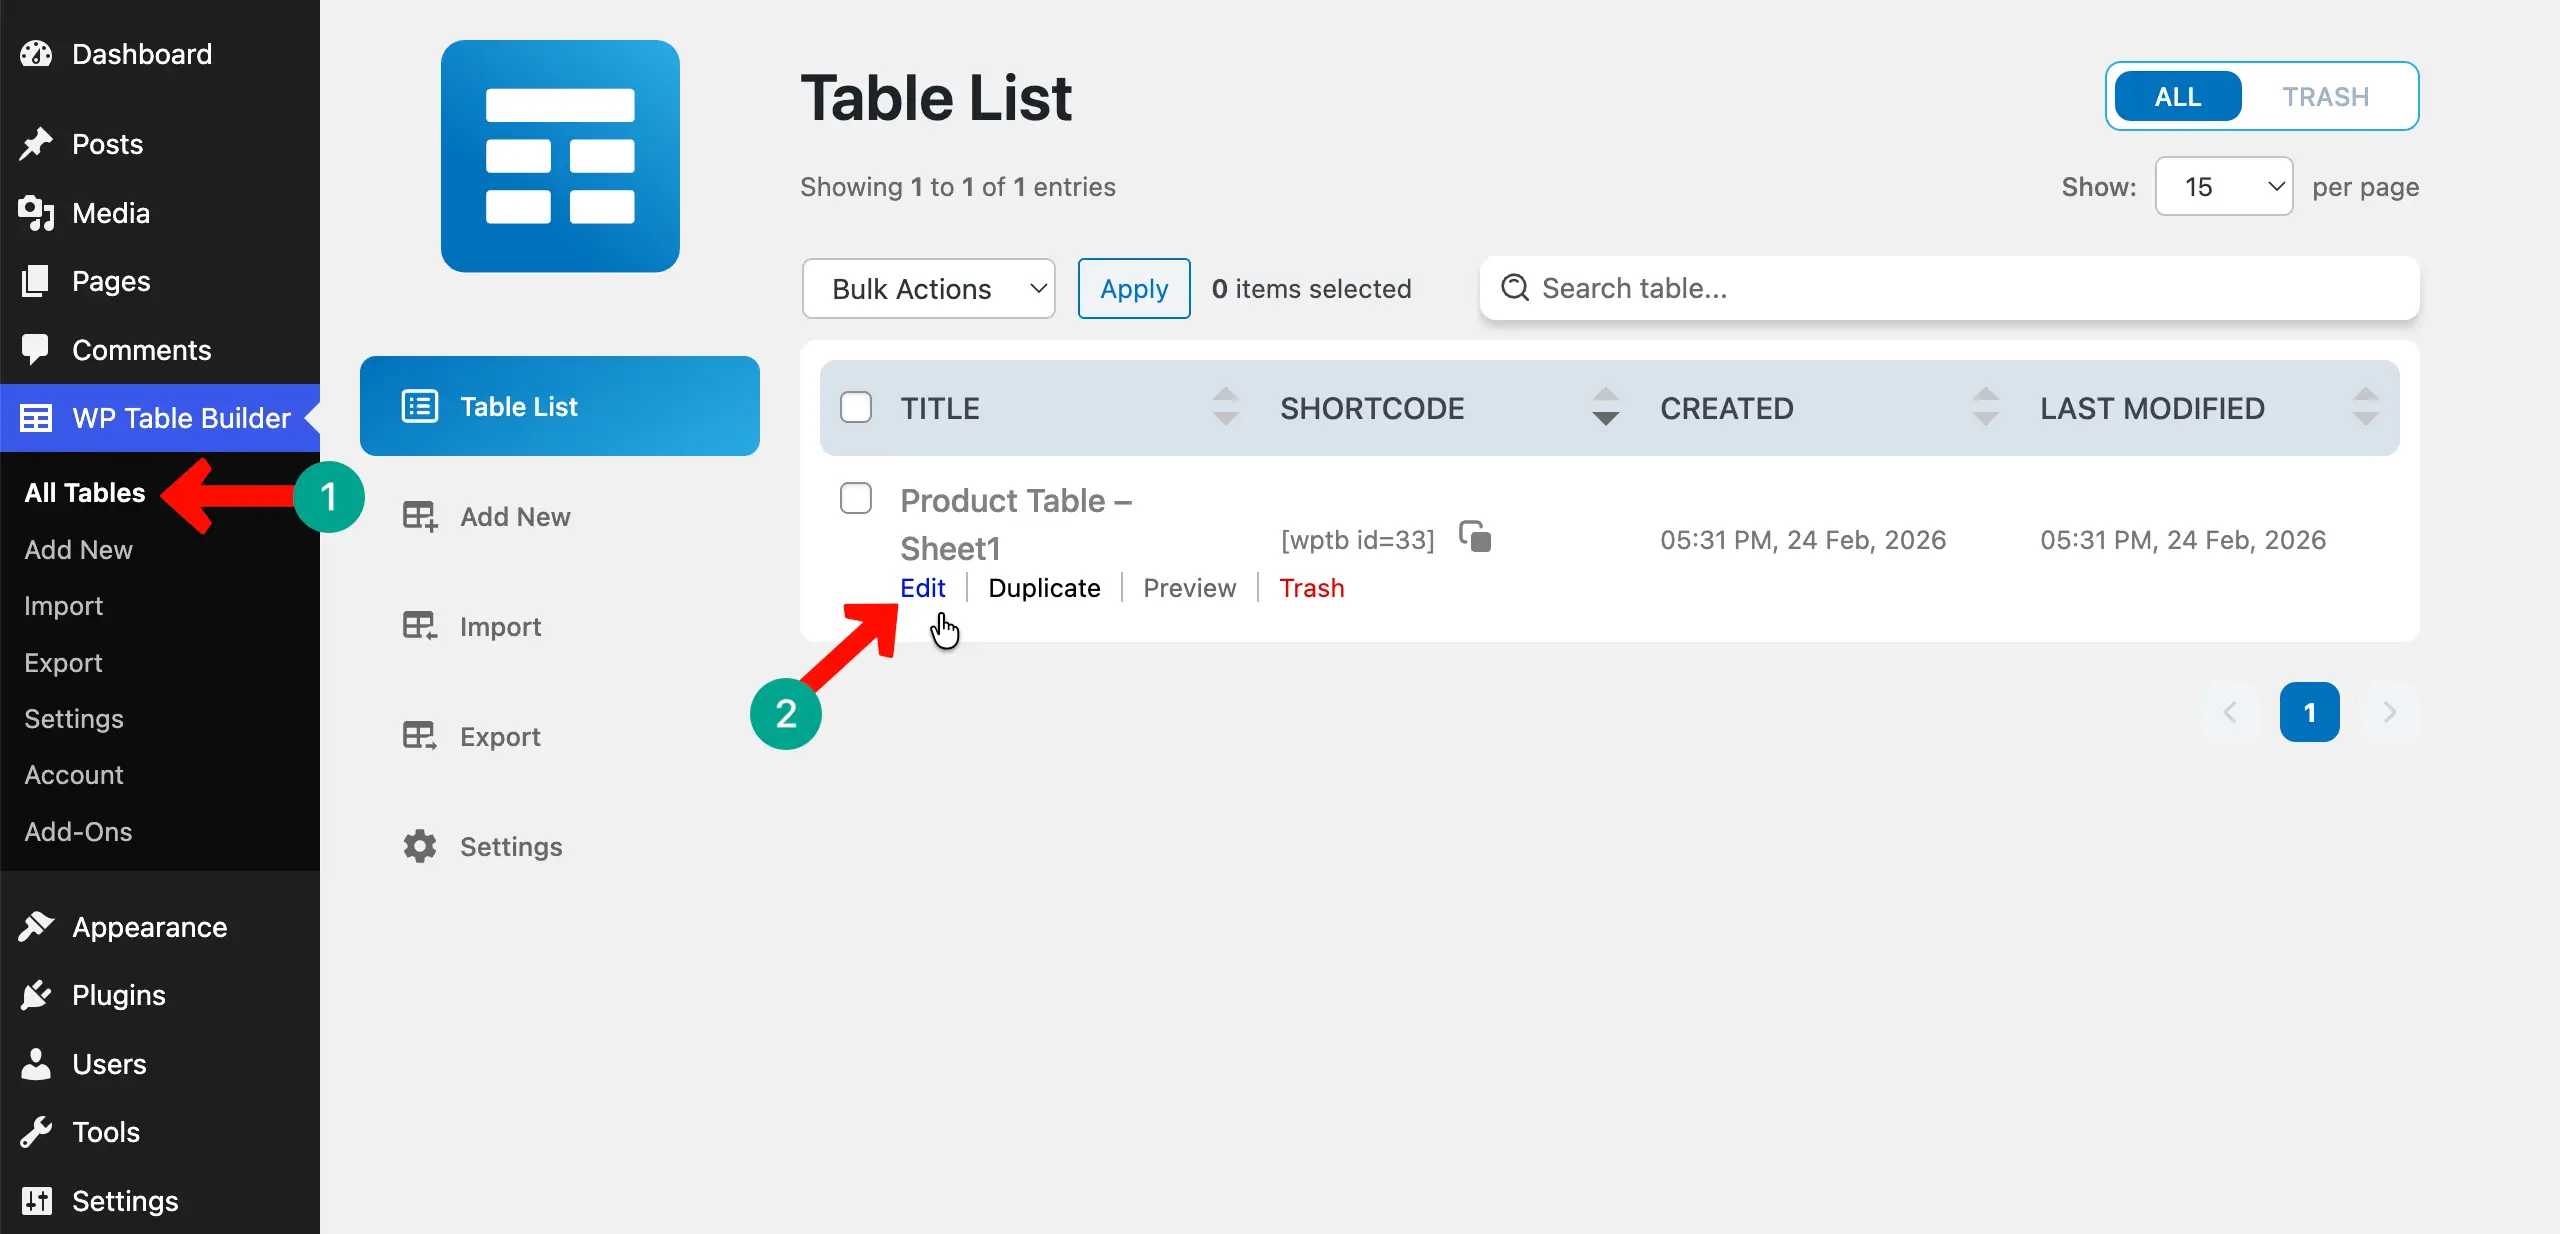
Come to the All Tables section to see the table you have imported. It will have almost the same name. Click the Edit button if you want to check and customize it.
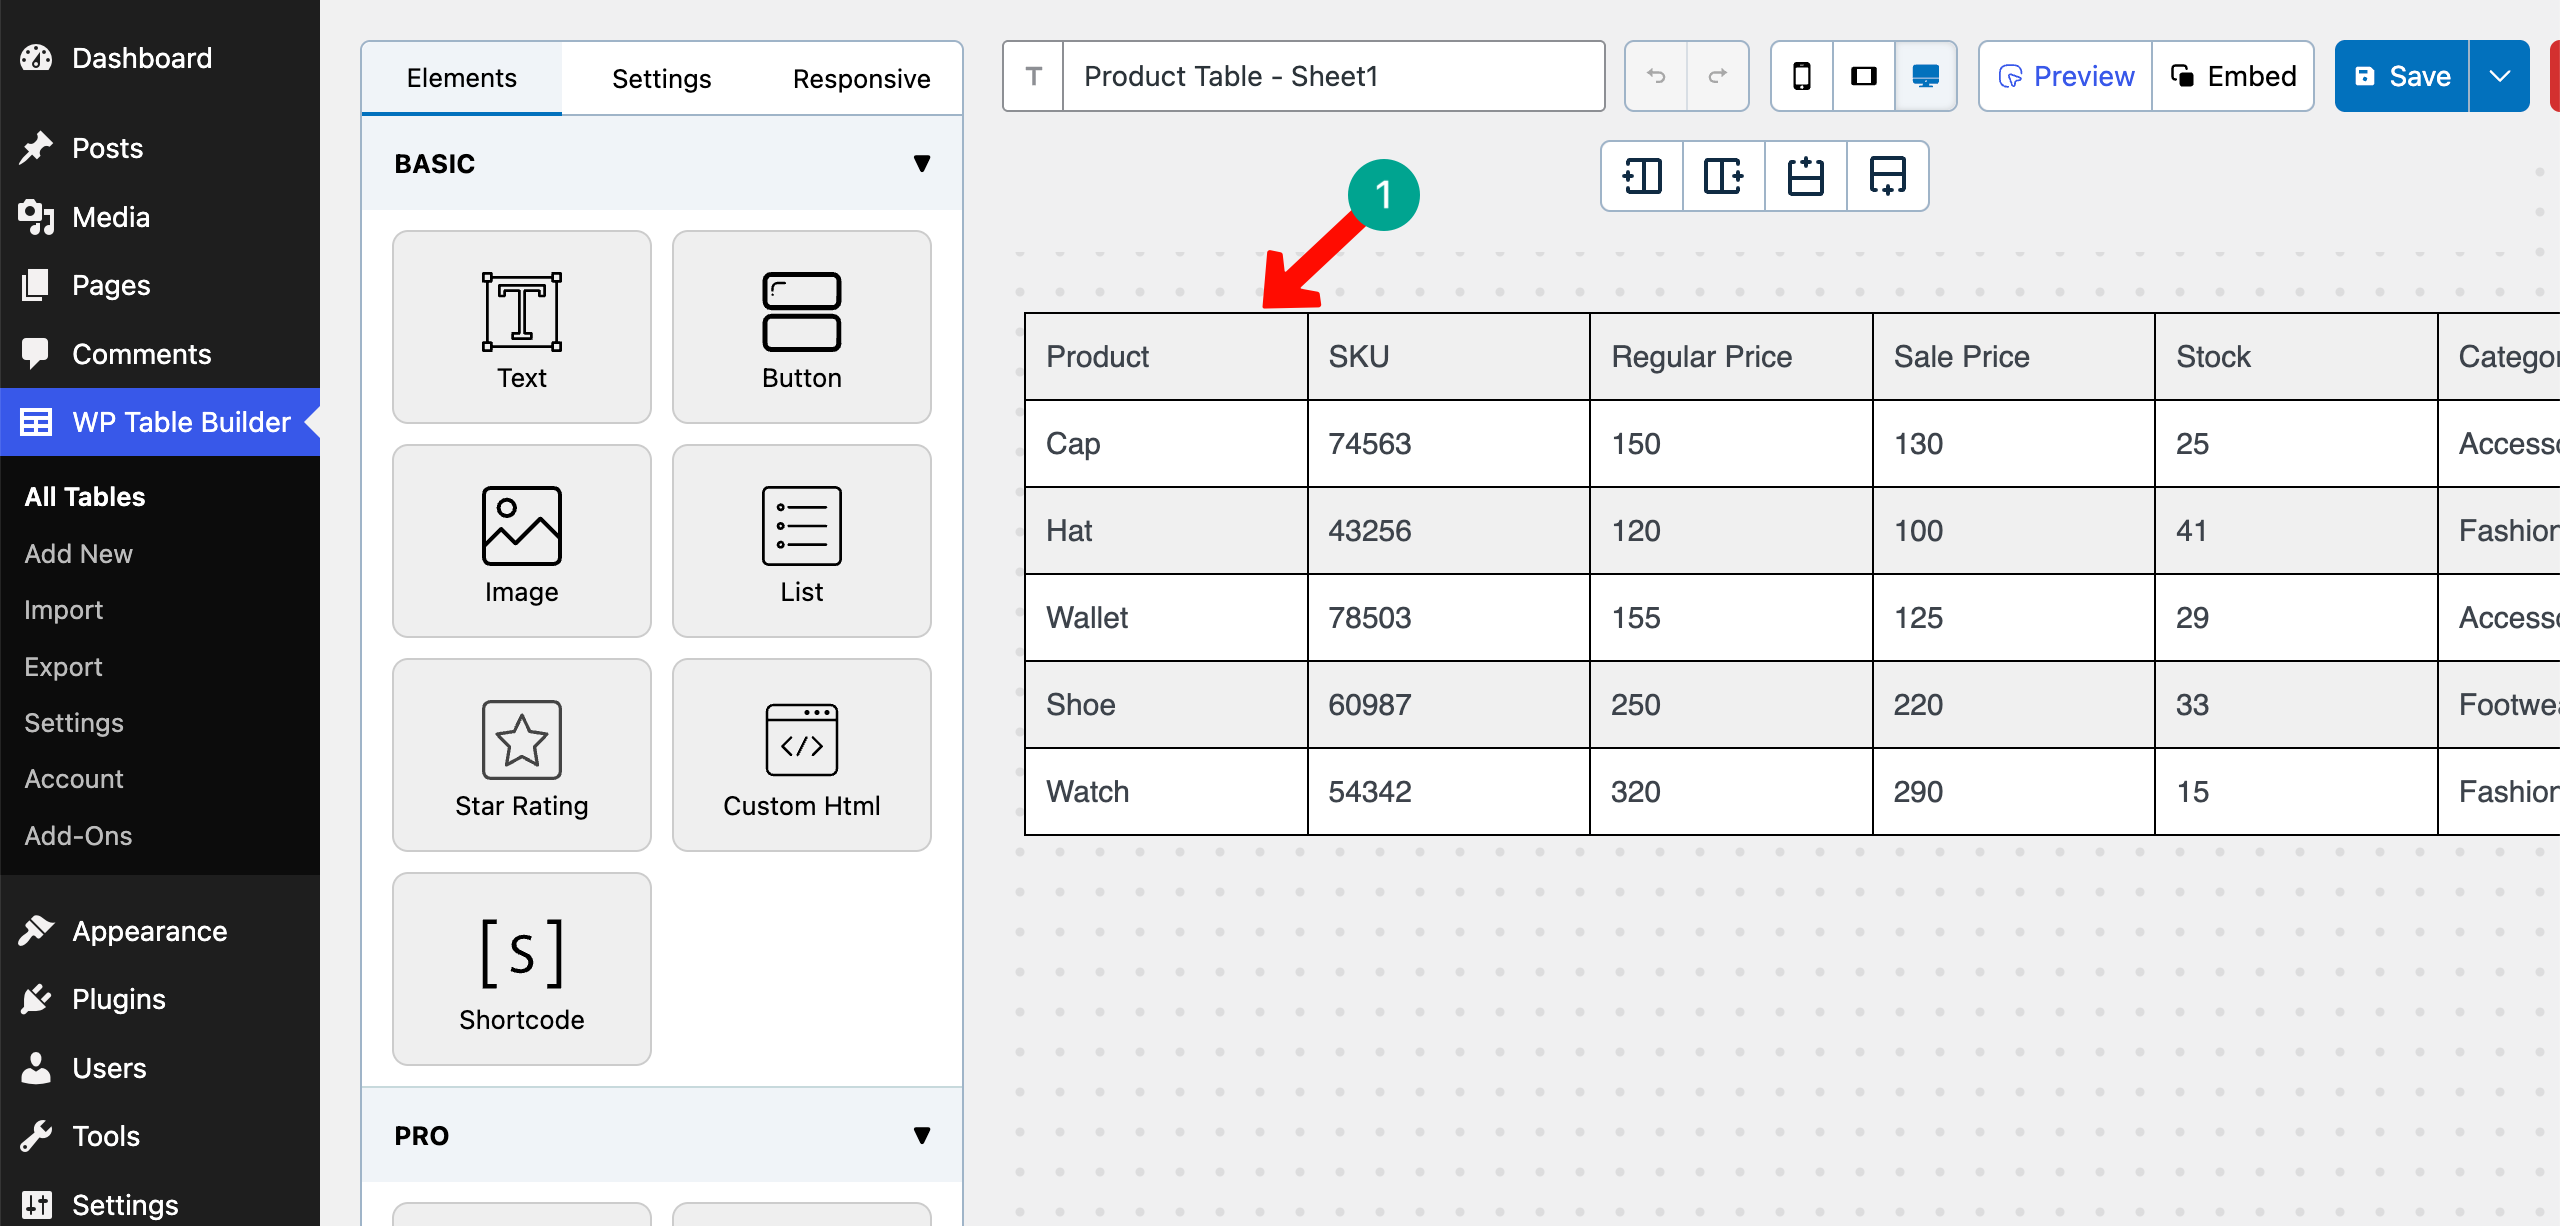
Step 04: Review the Imported Table
You can see the table now. All the data is similar.
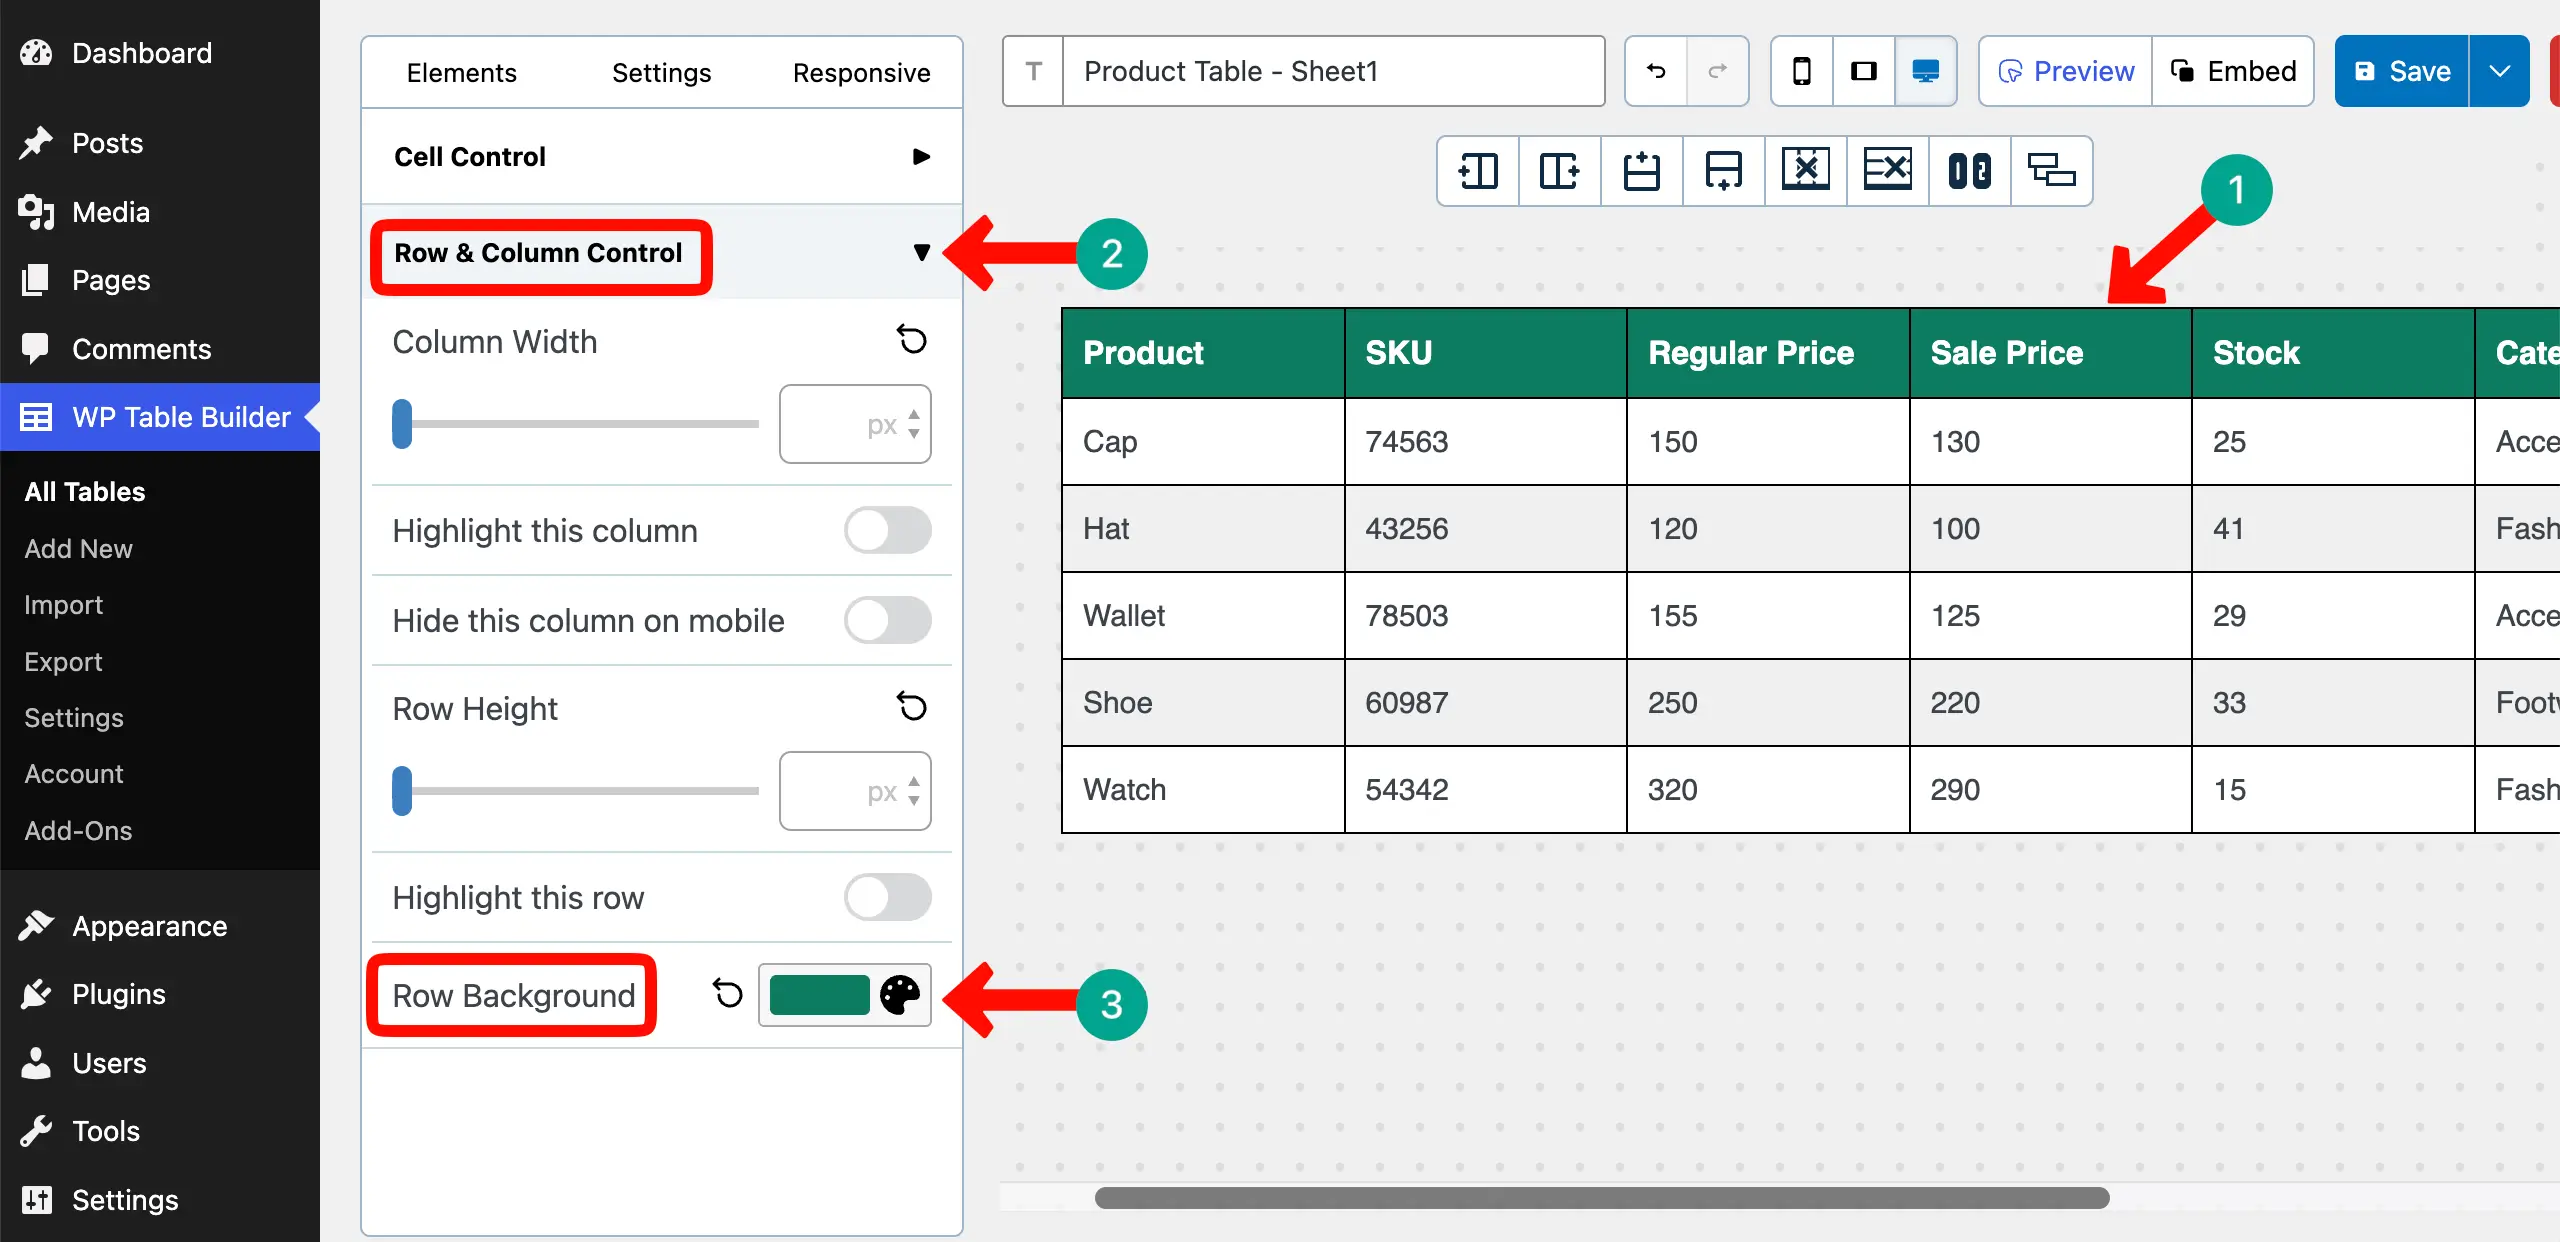
# Add a Background Color to the Header Row
Select the header. Expand the Row & Column Control section. Set a color for Row Background.
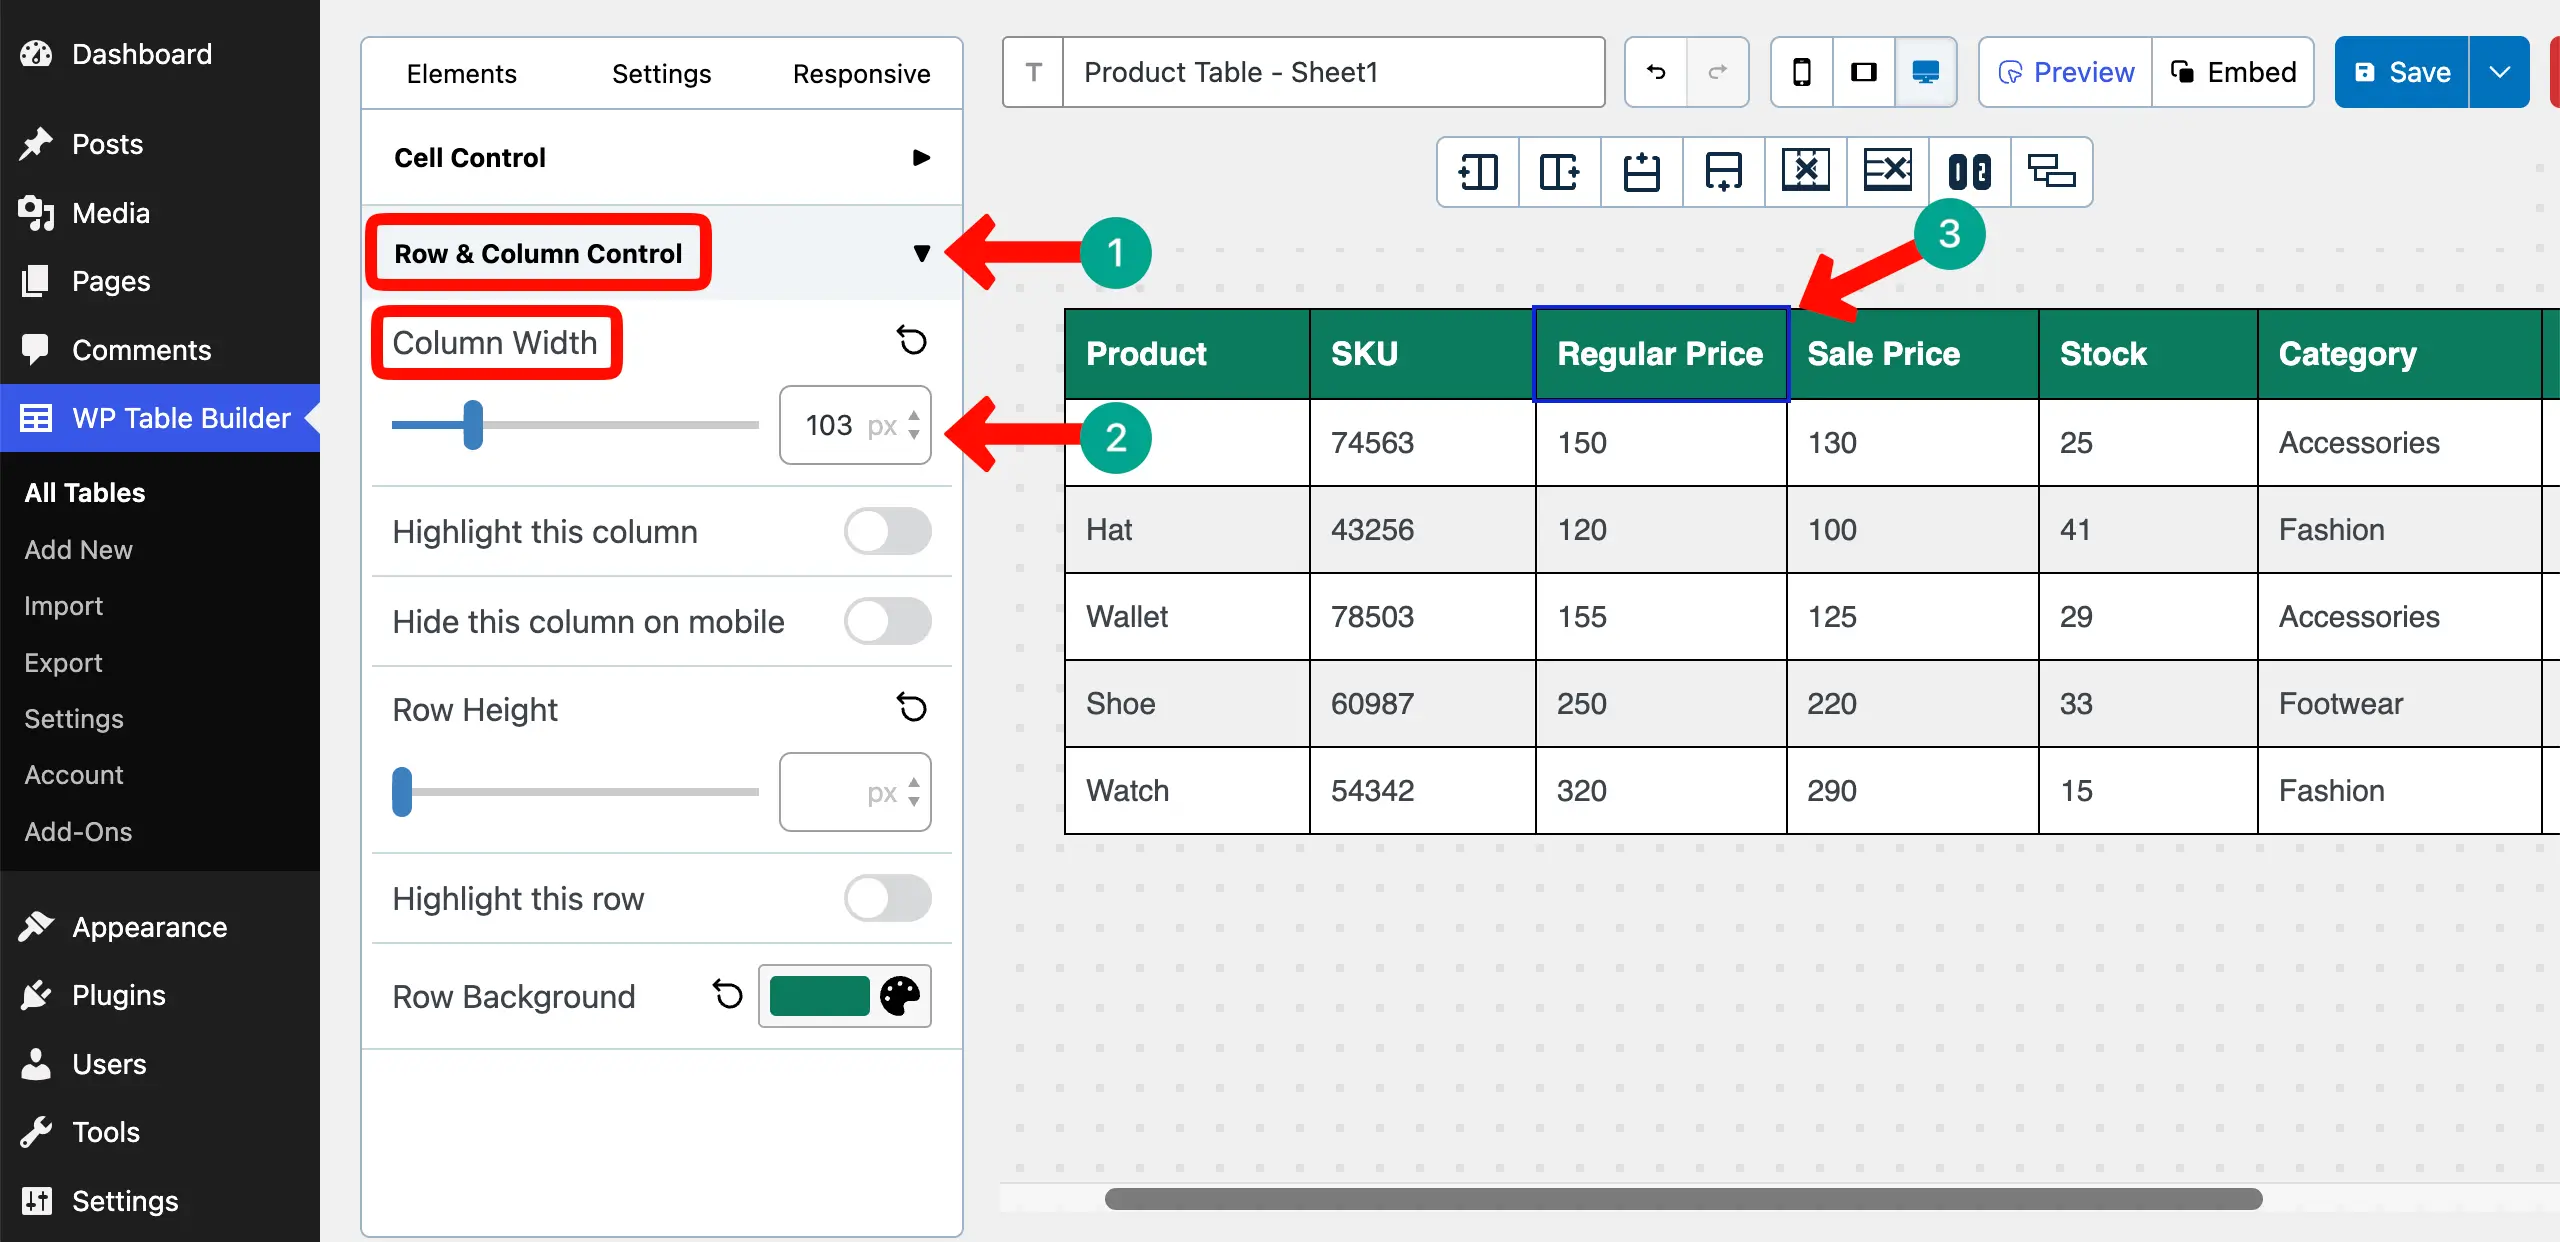
# Change Columns’ Width
If columns are so wide, you can modify this. Select a column, expand the Row & Column Control section, and adjust the Column Width. Do this one by one for all columns if needed.
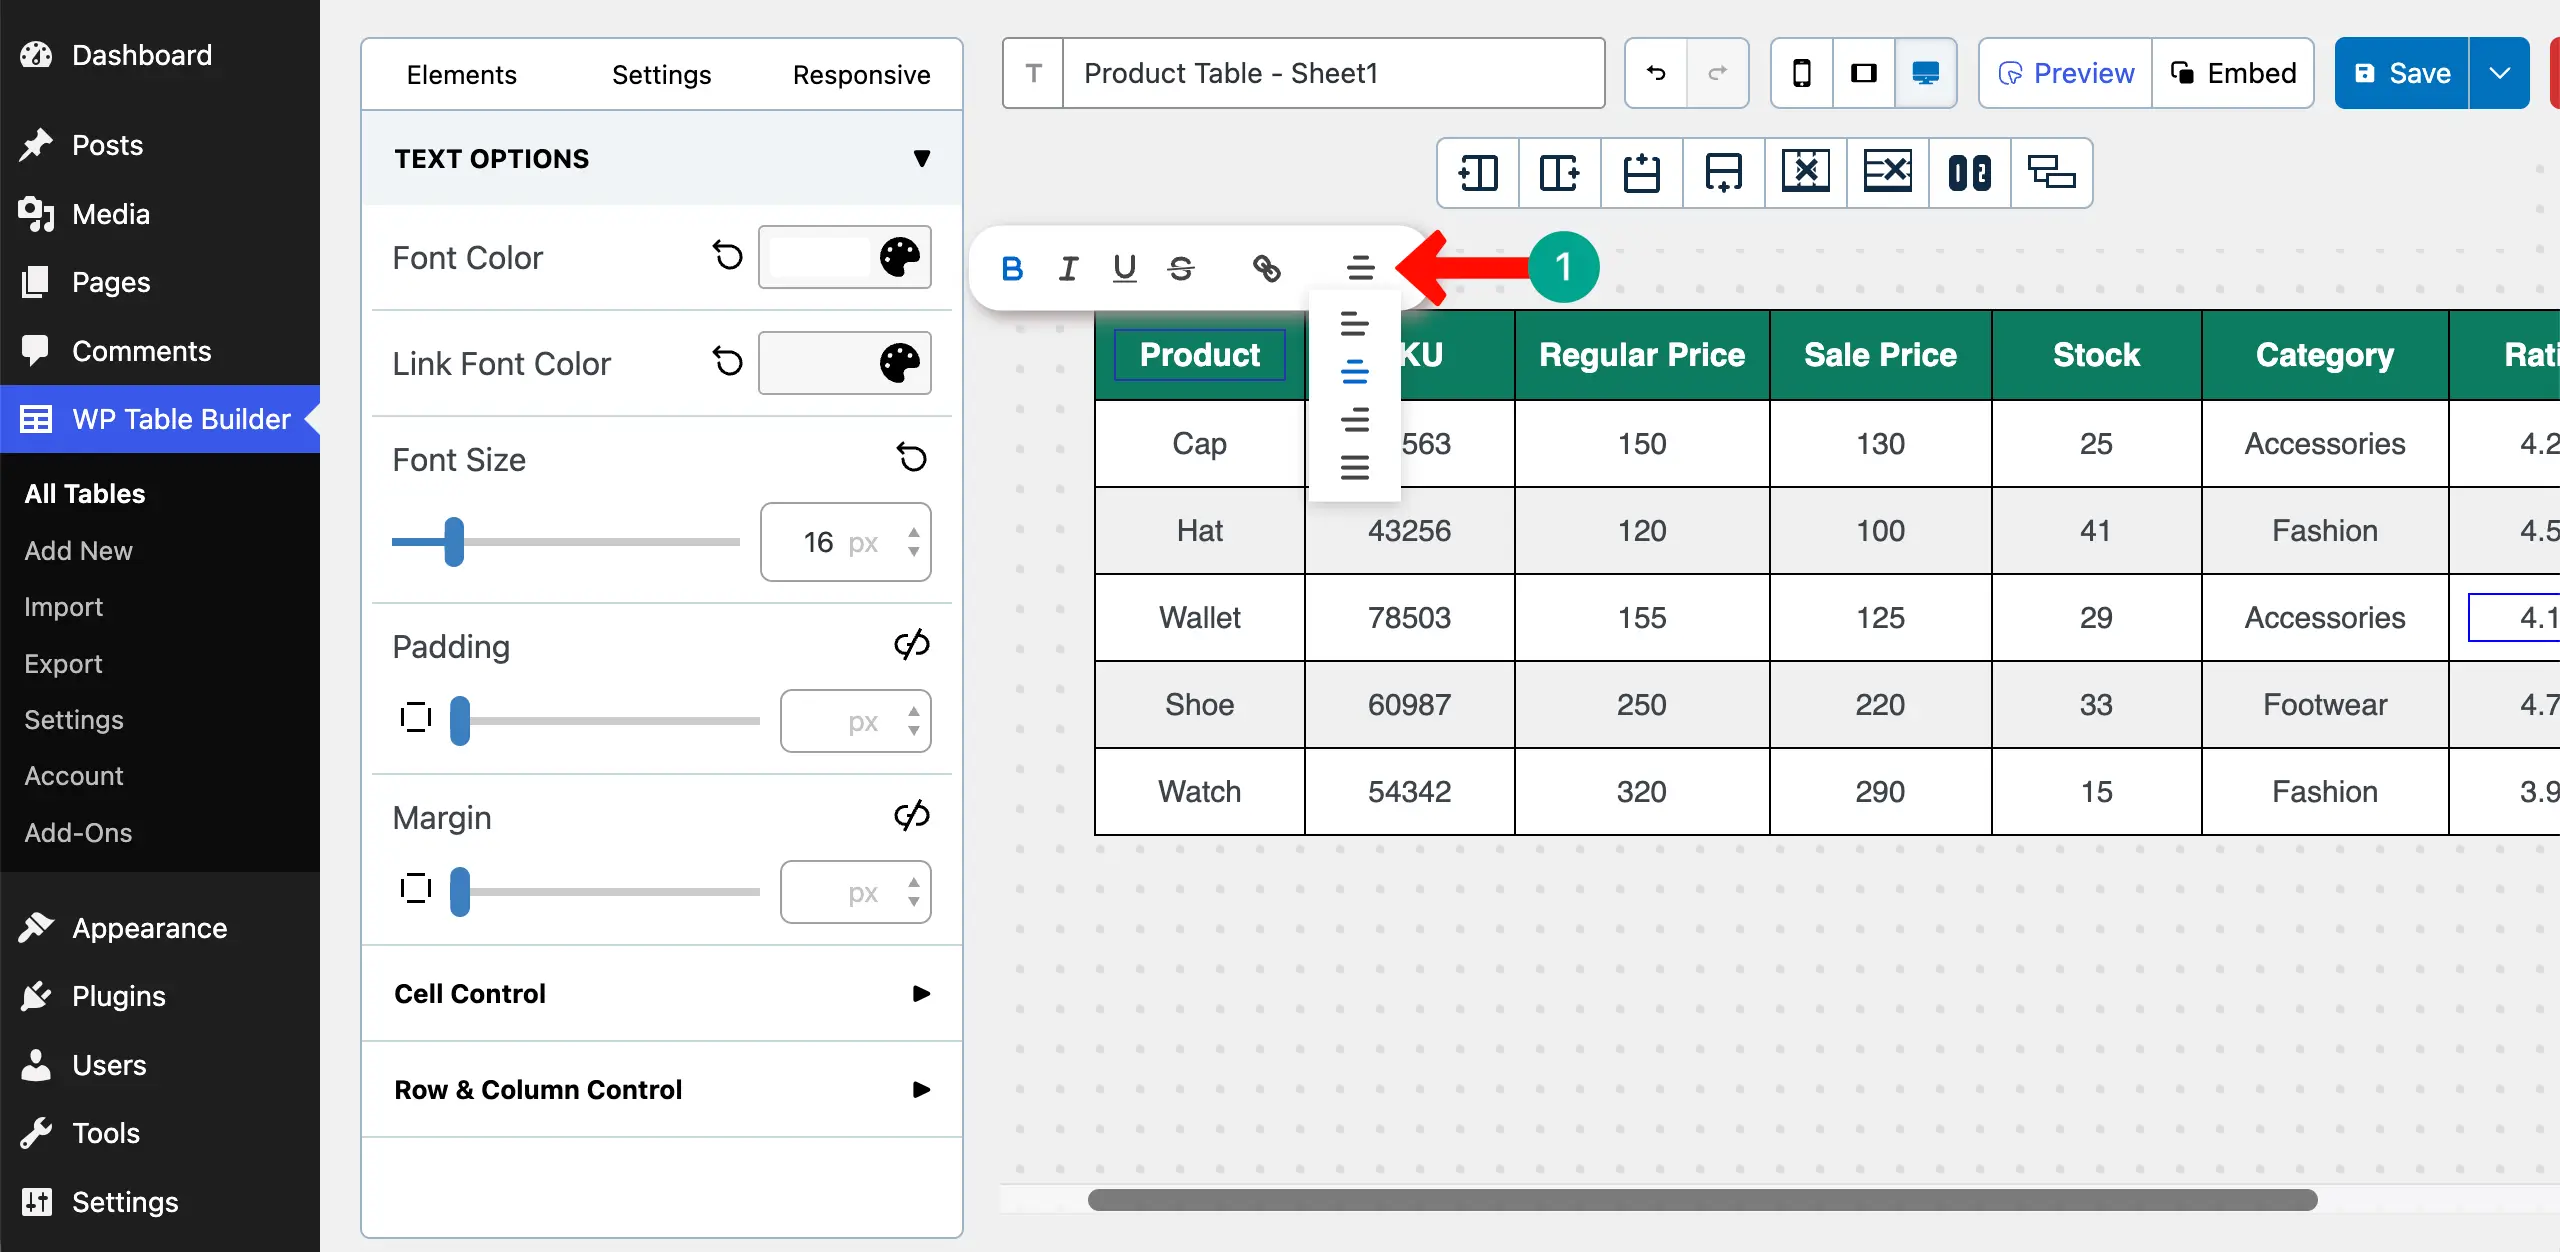
# Change Alignment of the Content
For better presentation, you can centrally align the content on the table.
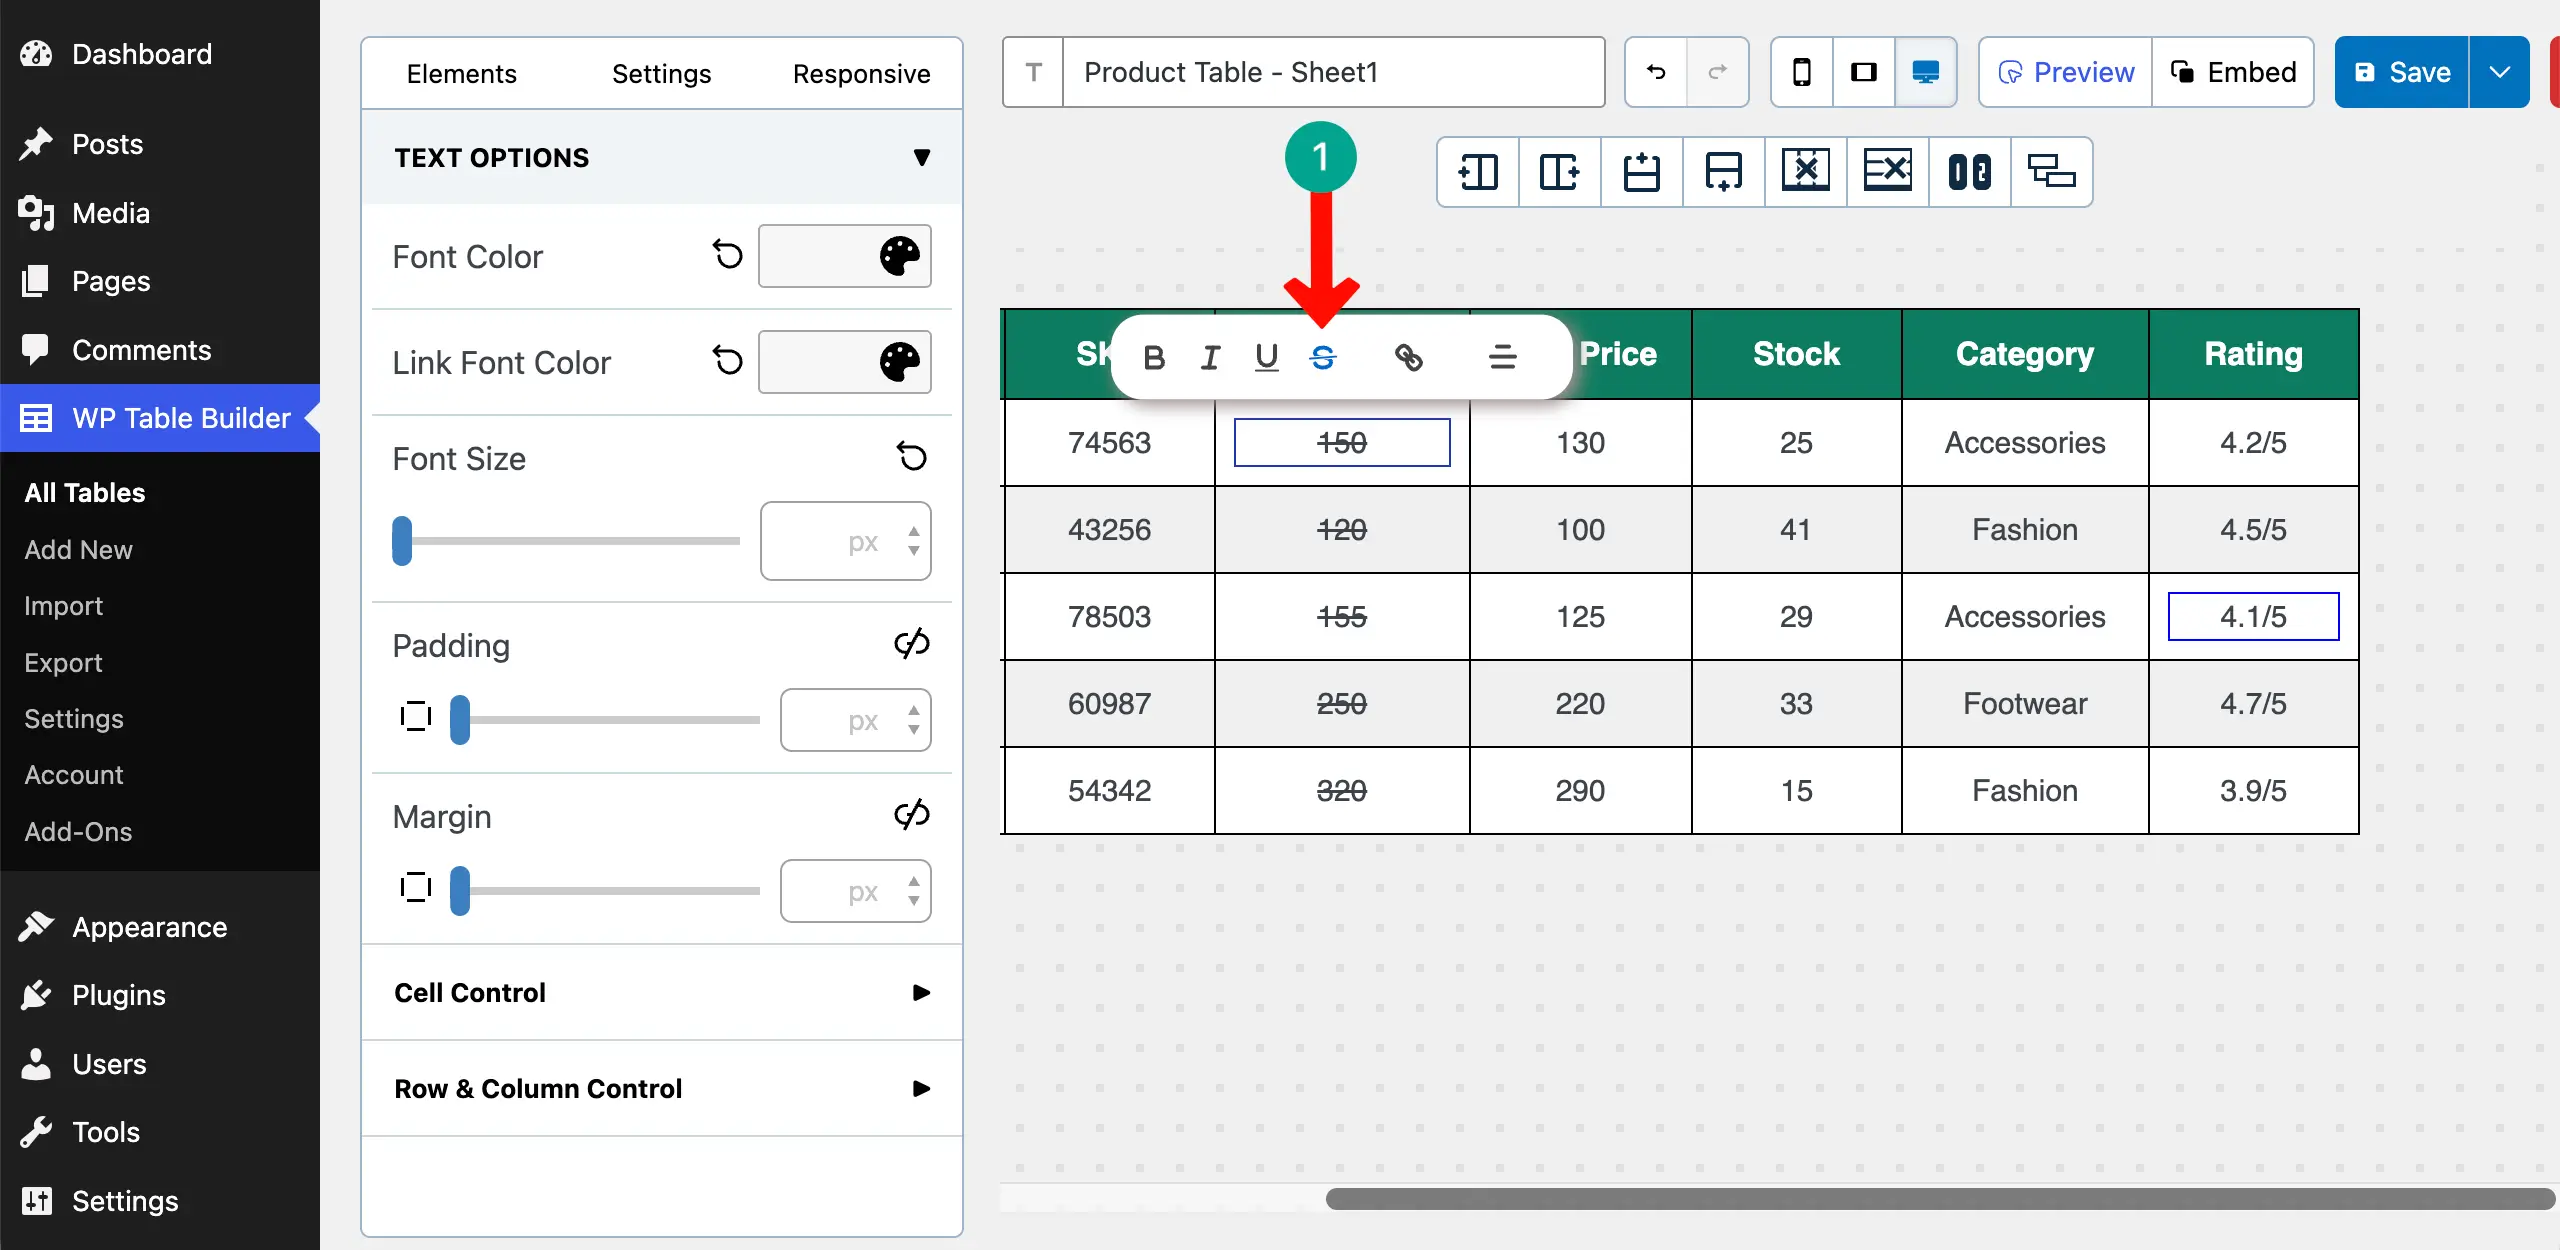
# Strikethrough the Regular Price
To make the table highly converting, you can strikethrough the regular price so people can focus more on the sales price.
Step 5: Enhance the Table (Optional)
If the table is boring, you can enhance it by adding various elements for better visualization.
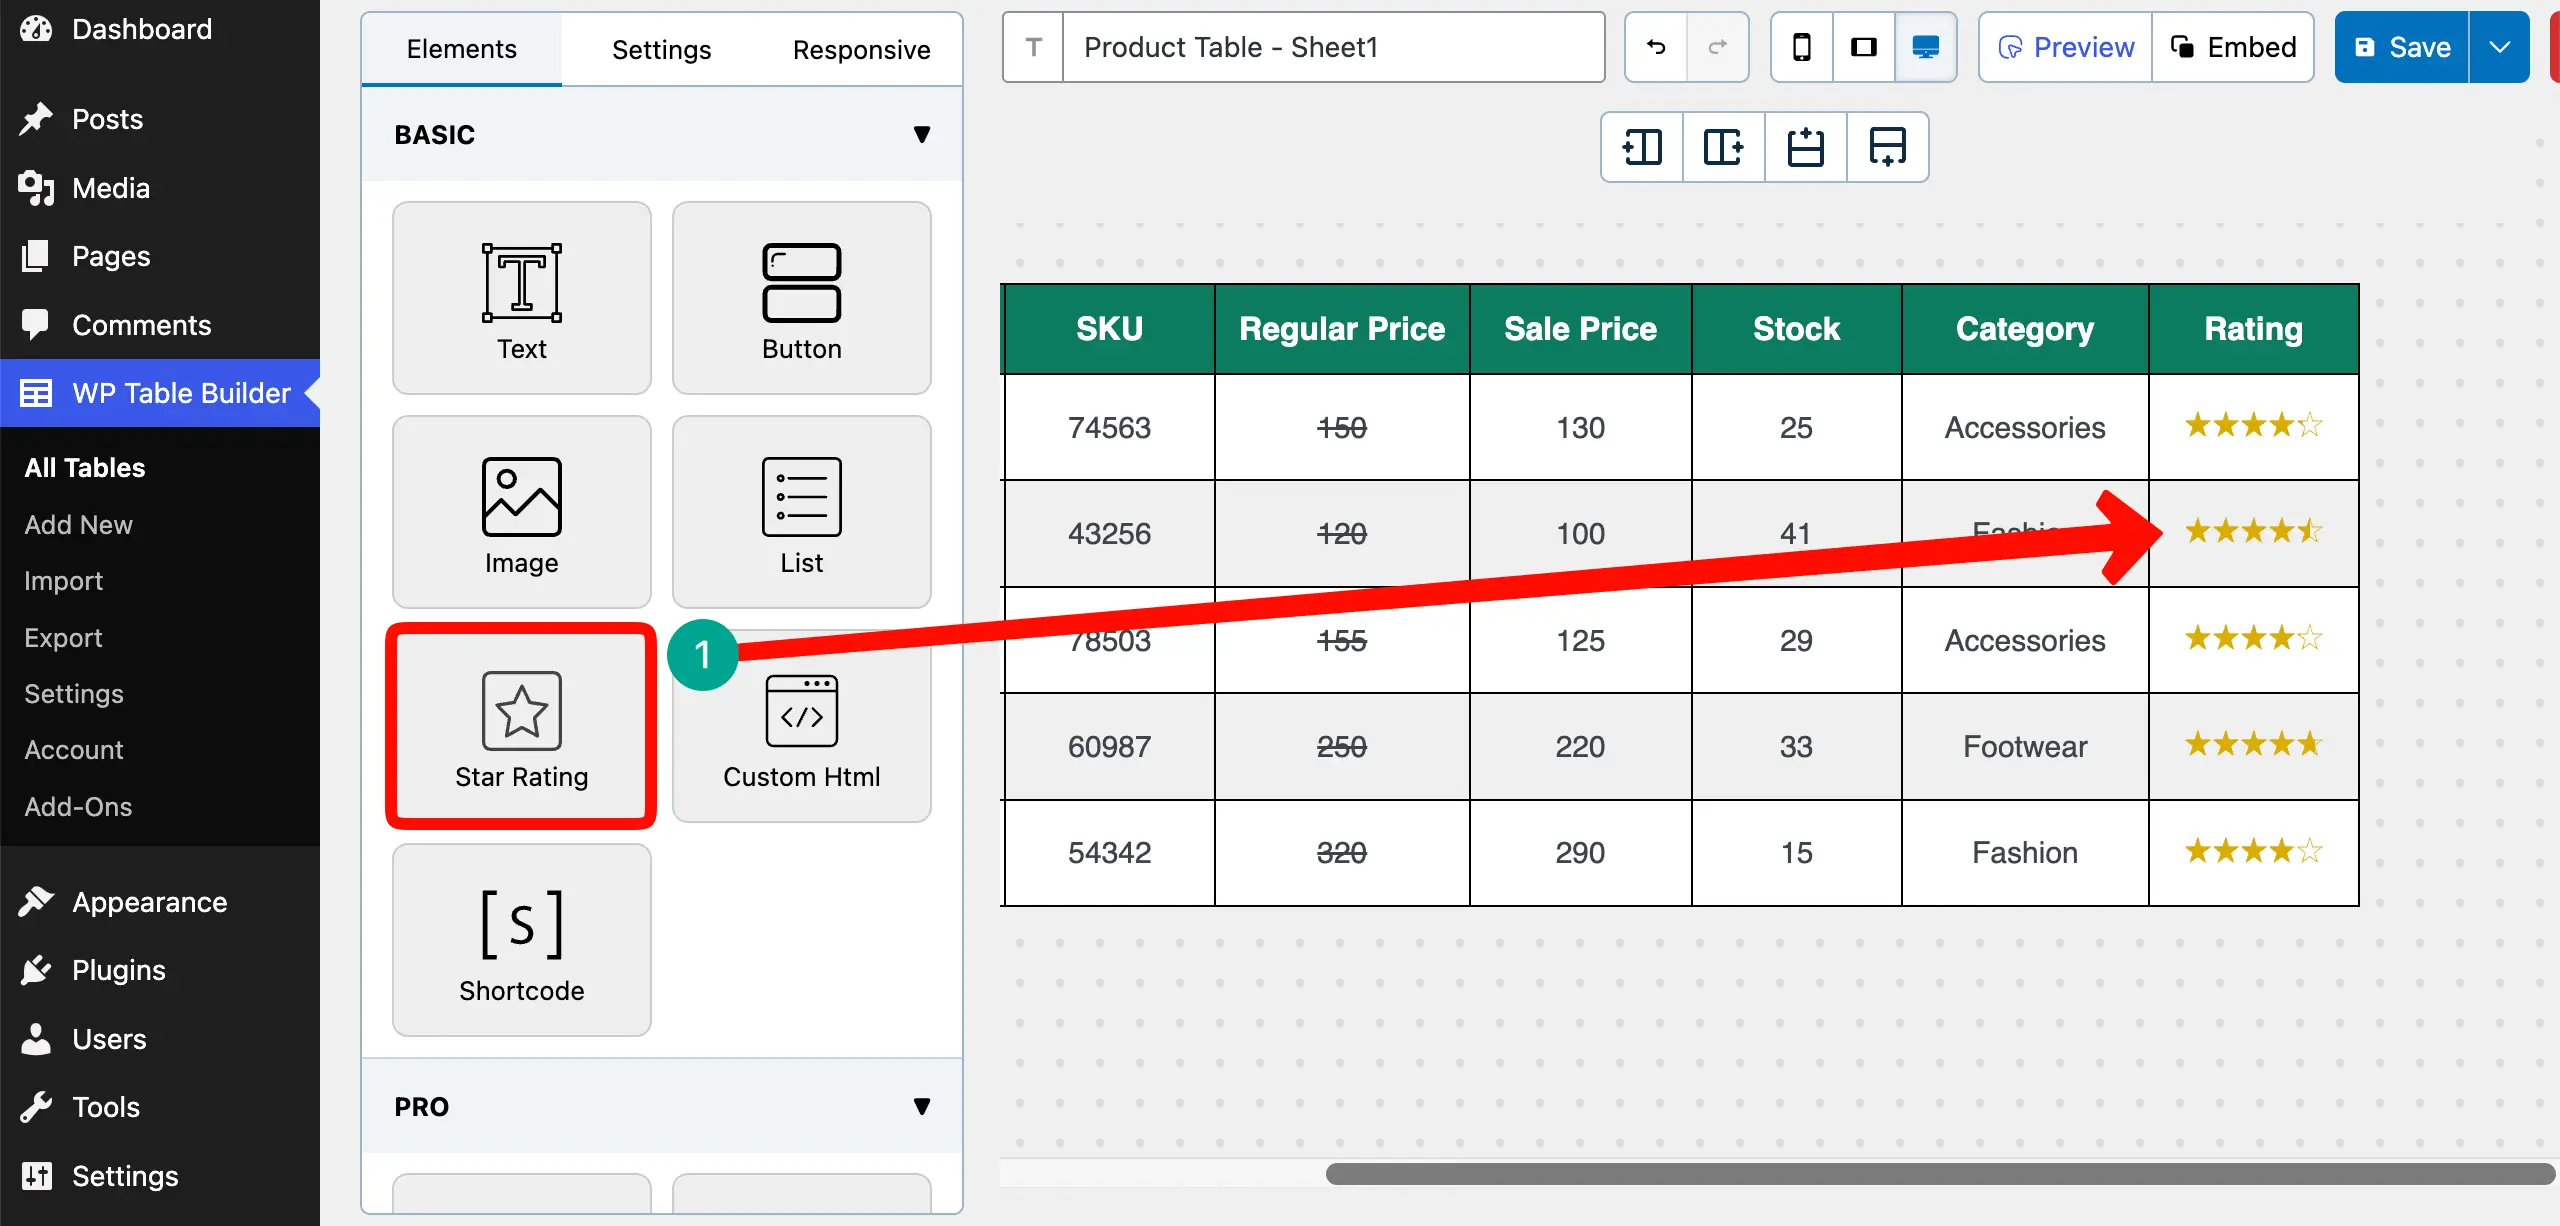
# Add the Rating Element
Drag-and-drop the Star Rating element to the rating cells. This will allow you to show user ratings visually.
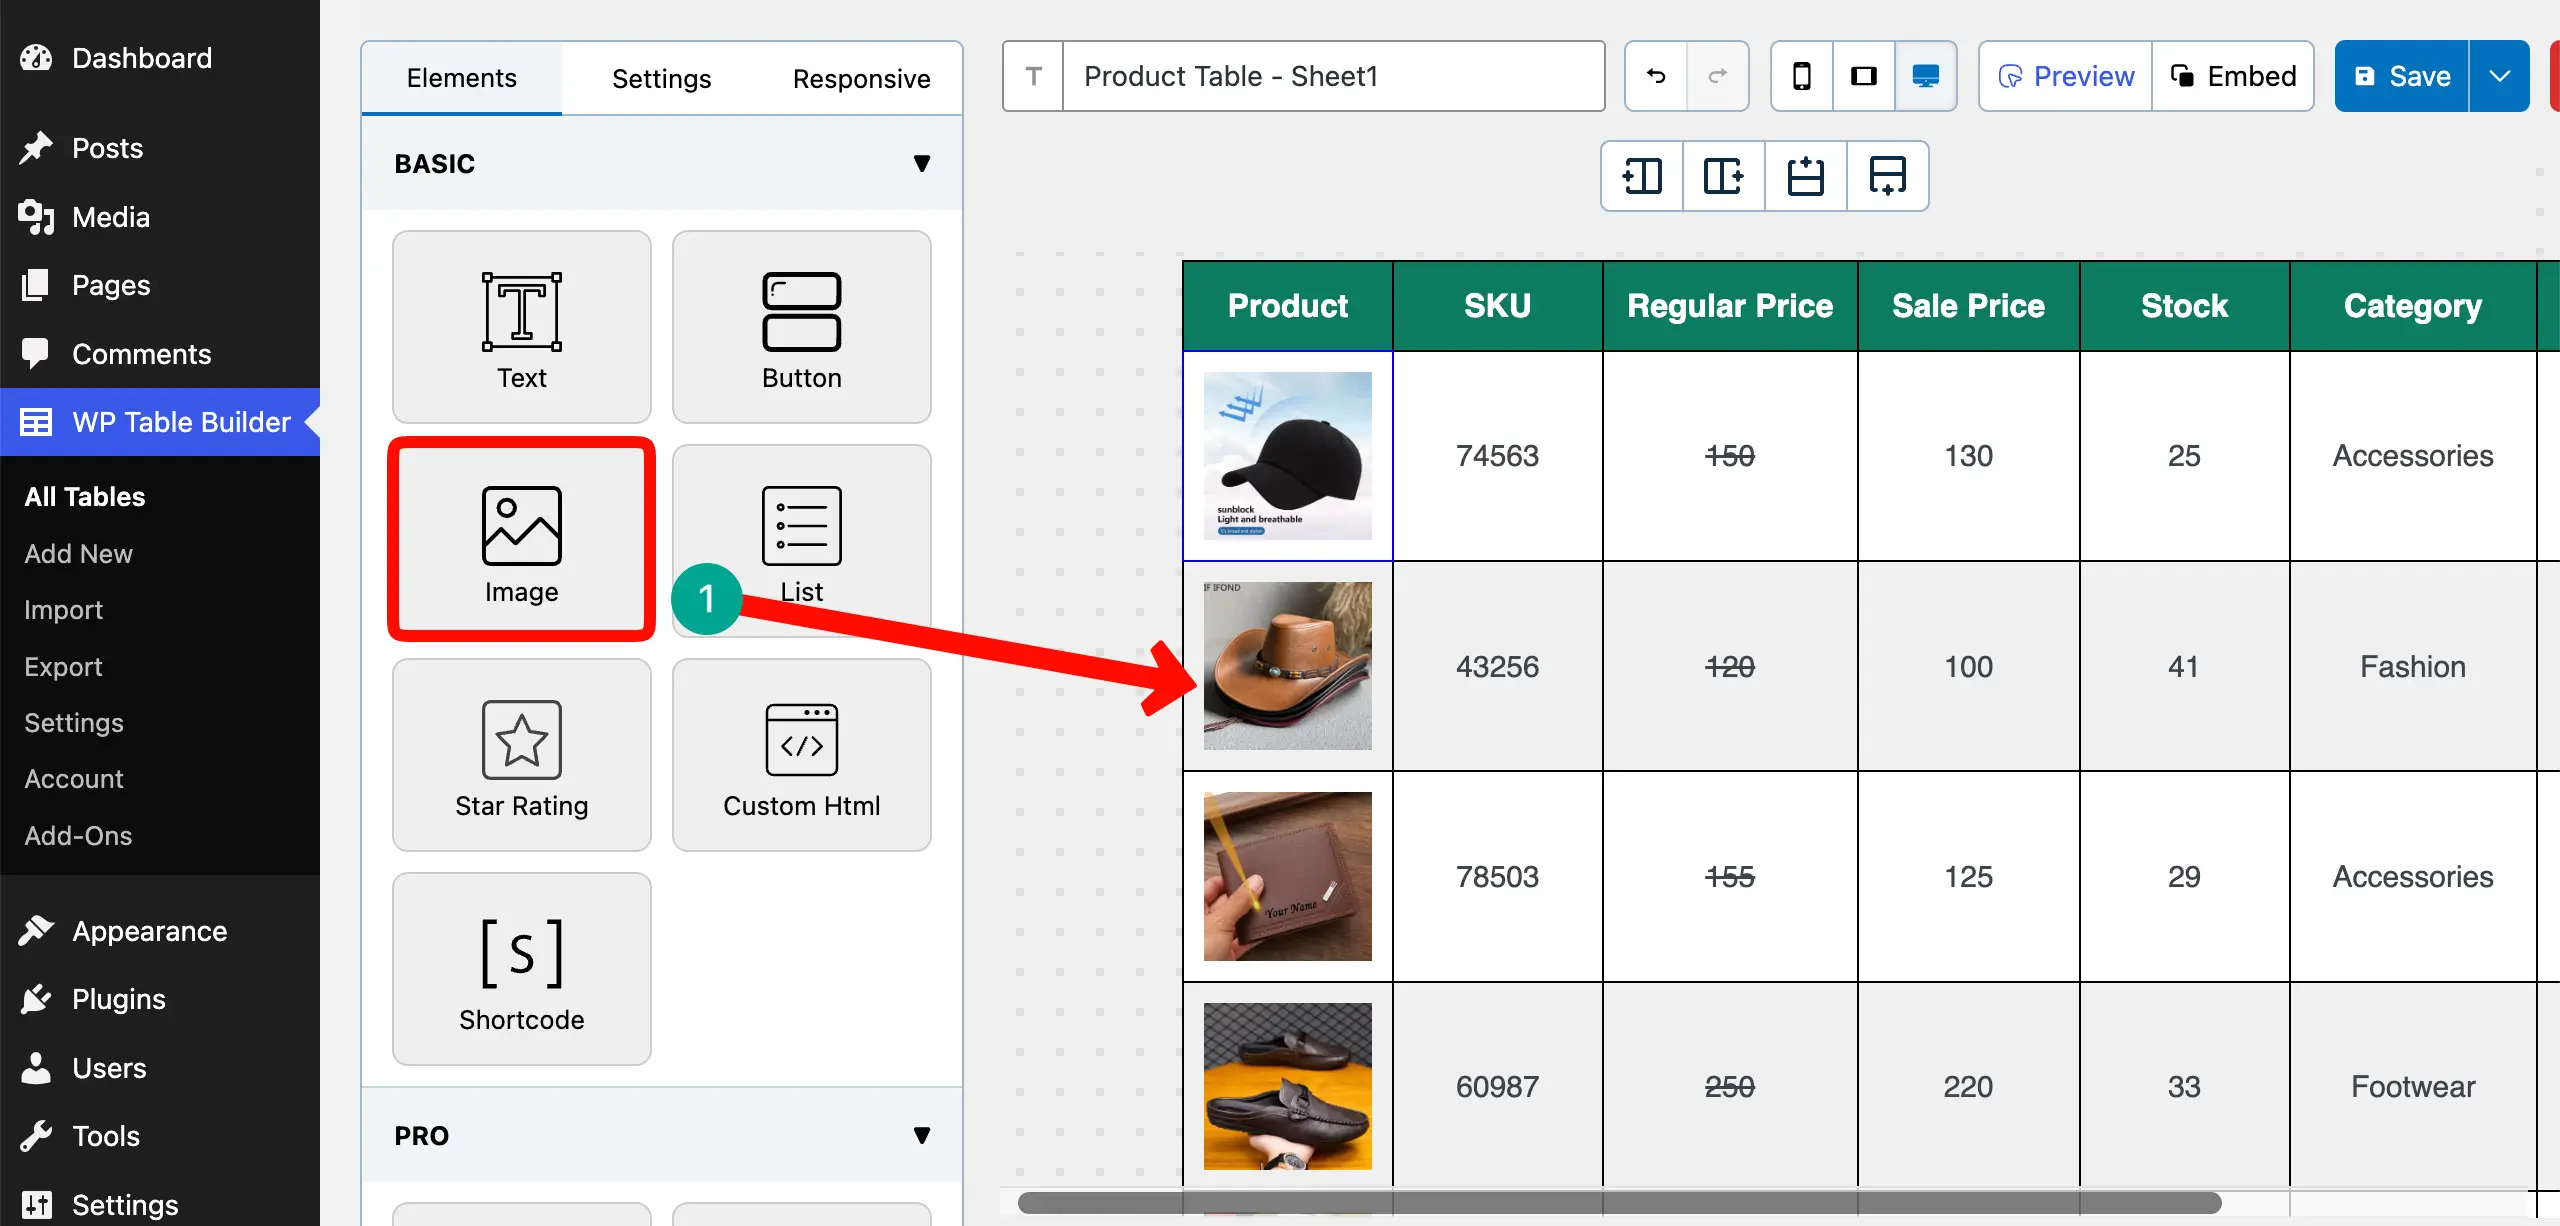
# Add the Image Element
It’s better to show the products by images, not names. Use the Image element on the table. This will let you upload your product image thumbnails.
# Add the Button Element
A CTA button can make the table highly converting. Use the Button element on the table.

In the same way, you can add other elements to the table to make it look more beautiful.
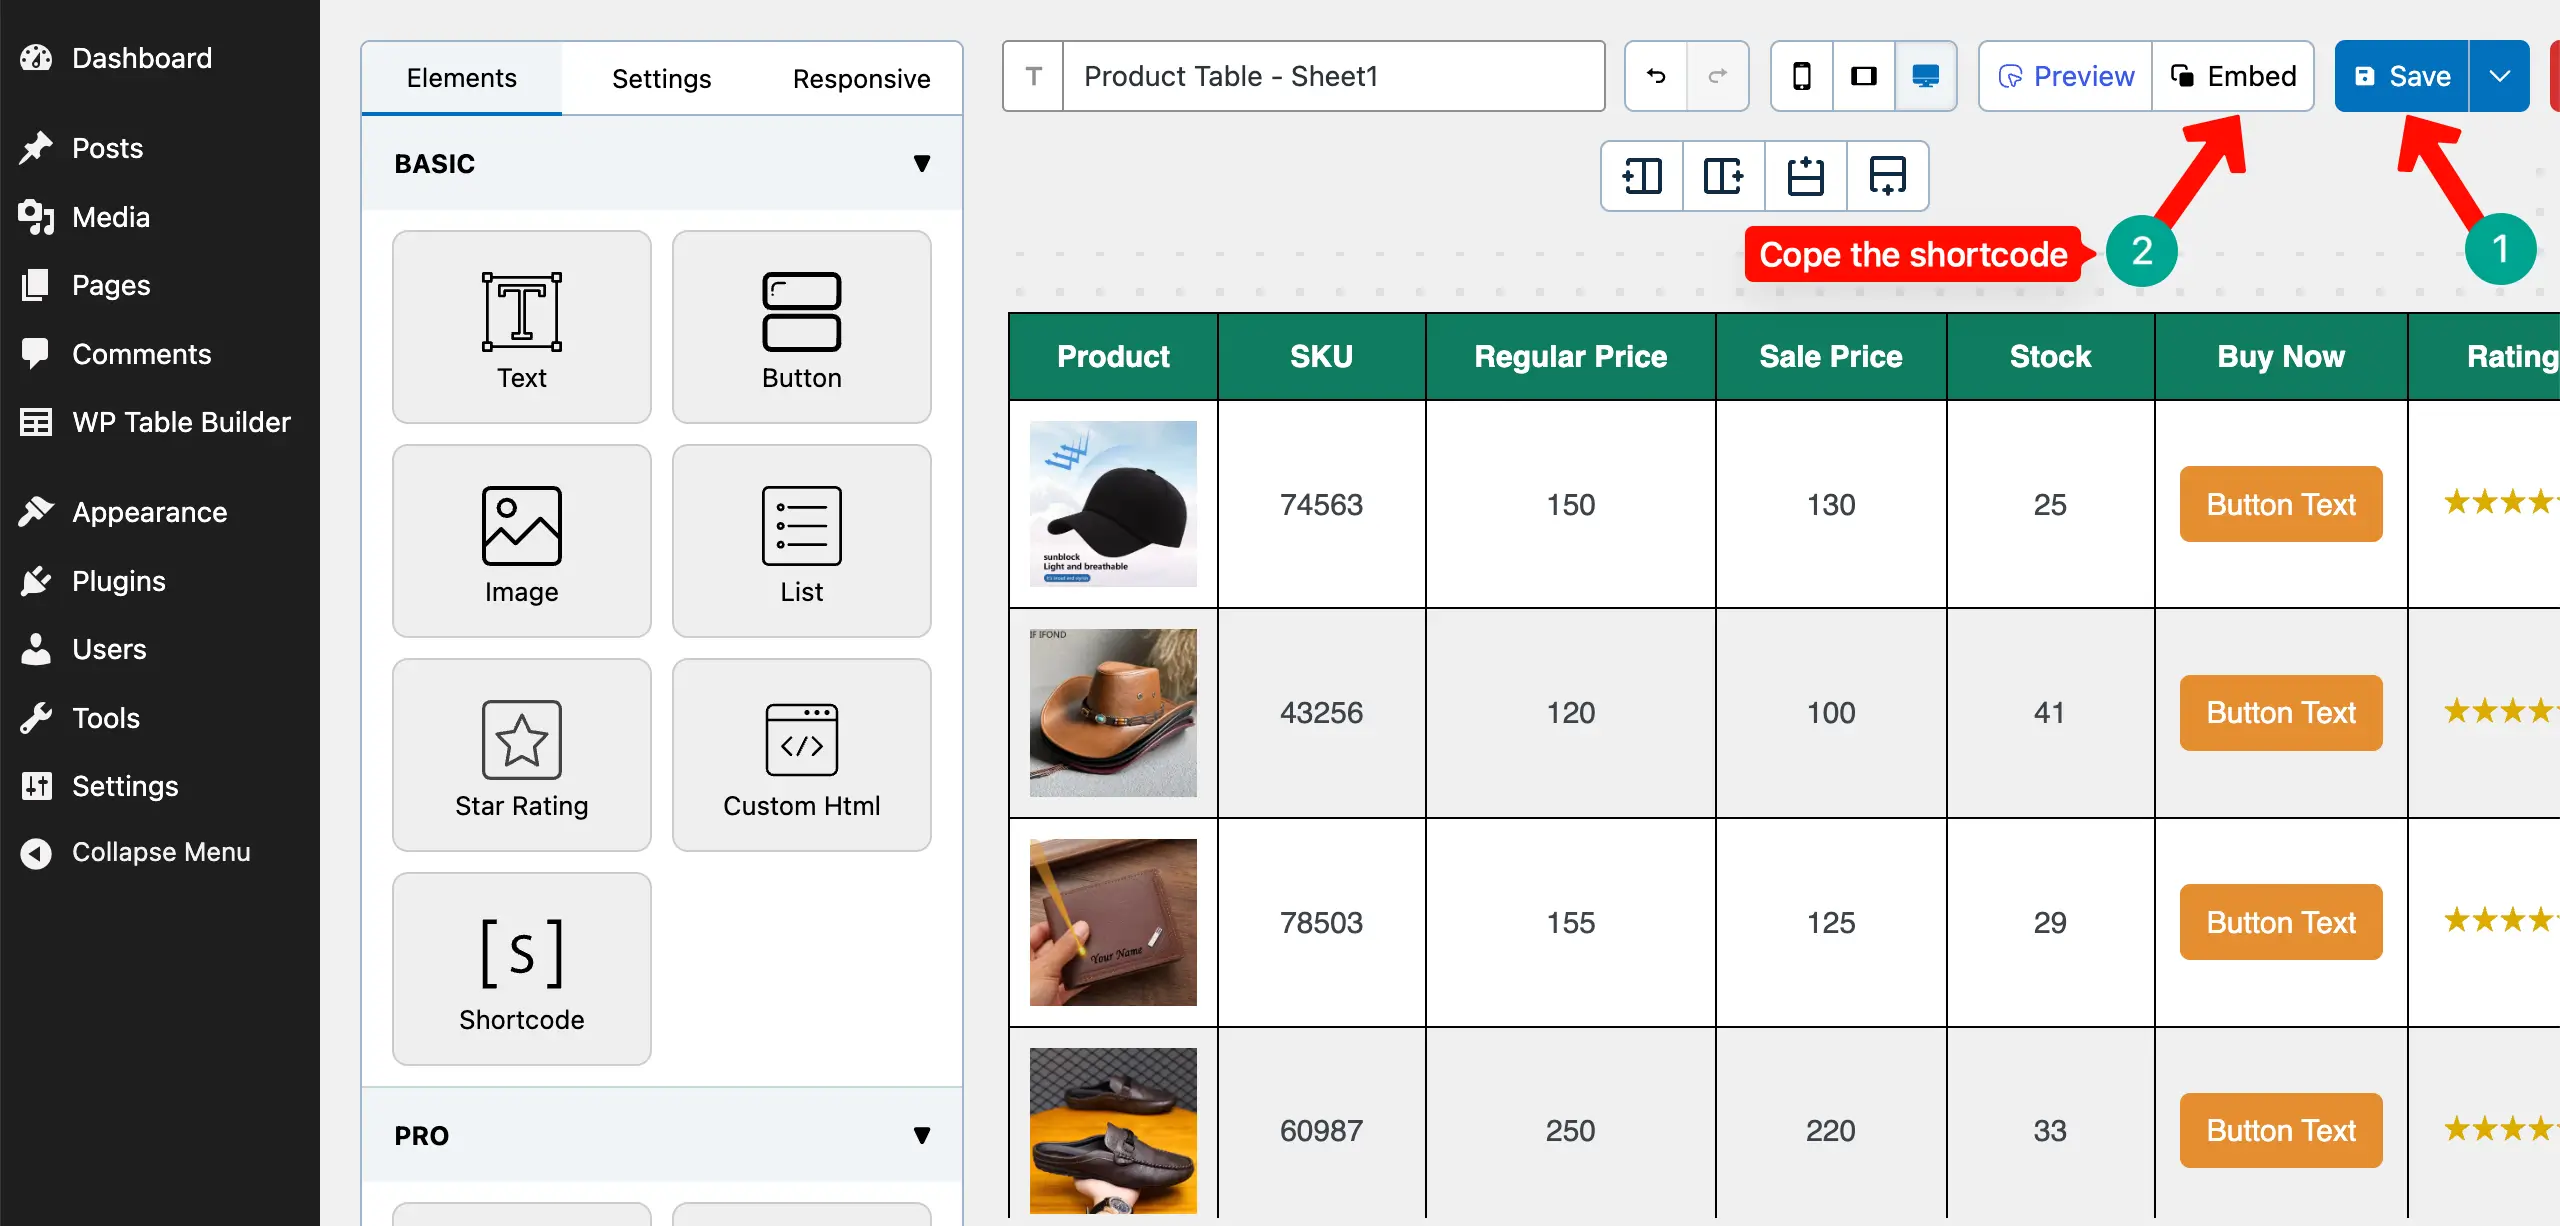
Step 6: Save and Display the Table
Save the table. Copy its shortcode by clicking the Embed button.
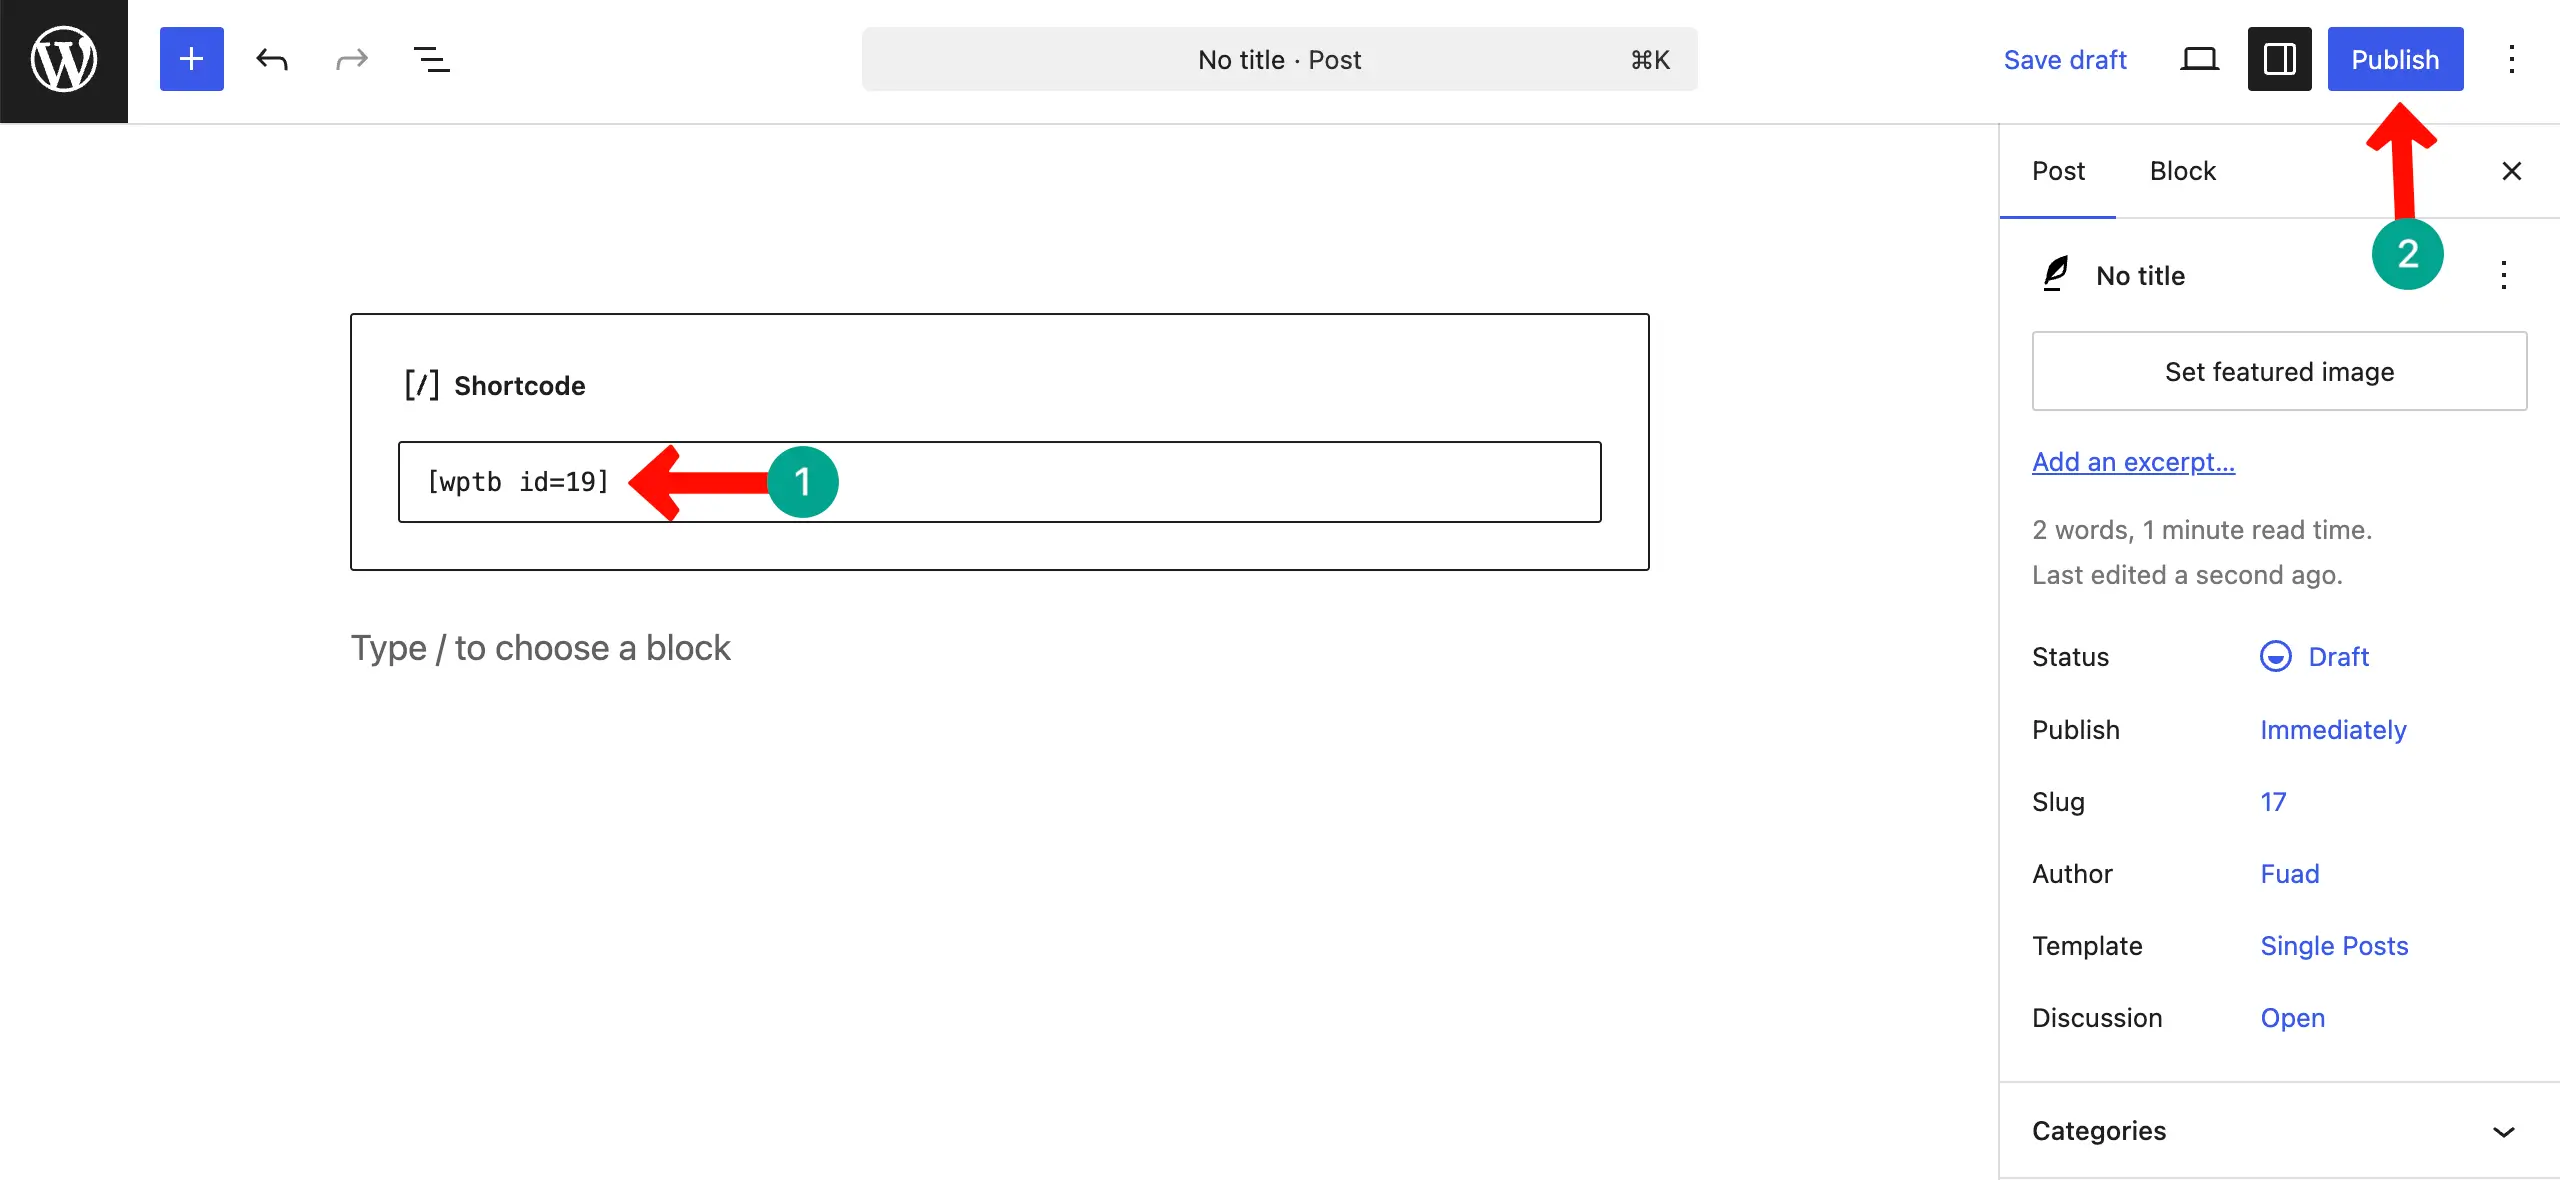
Open any post or page. Paste the shortcode in the editor. Publish the table and preview it.
Hope the table will look good on the frontend, as it’s shown in the screenshot attached below.
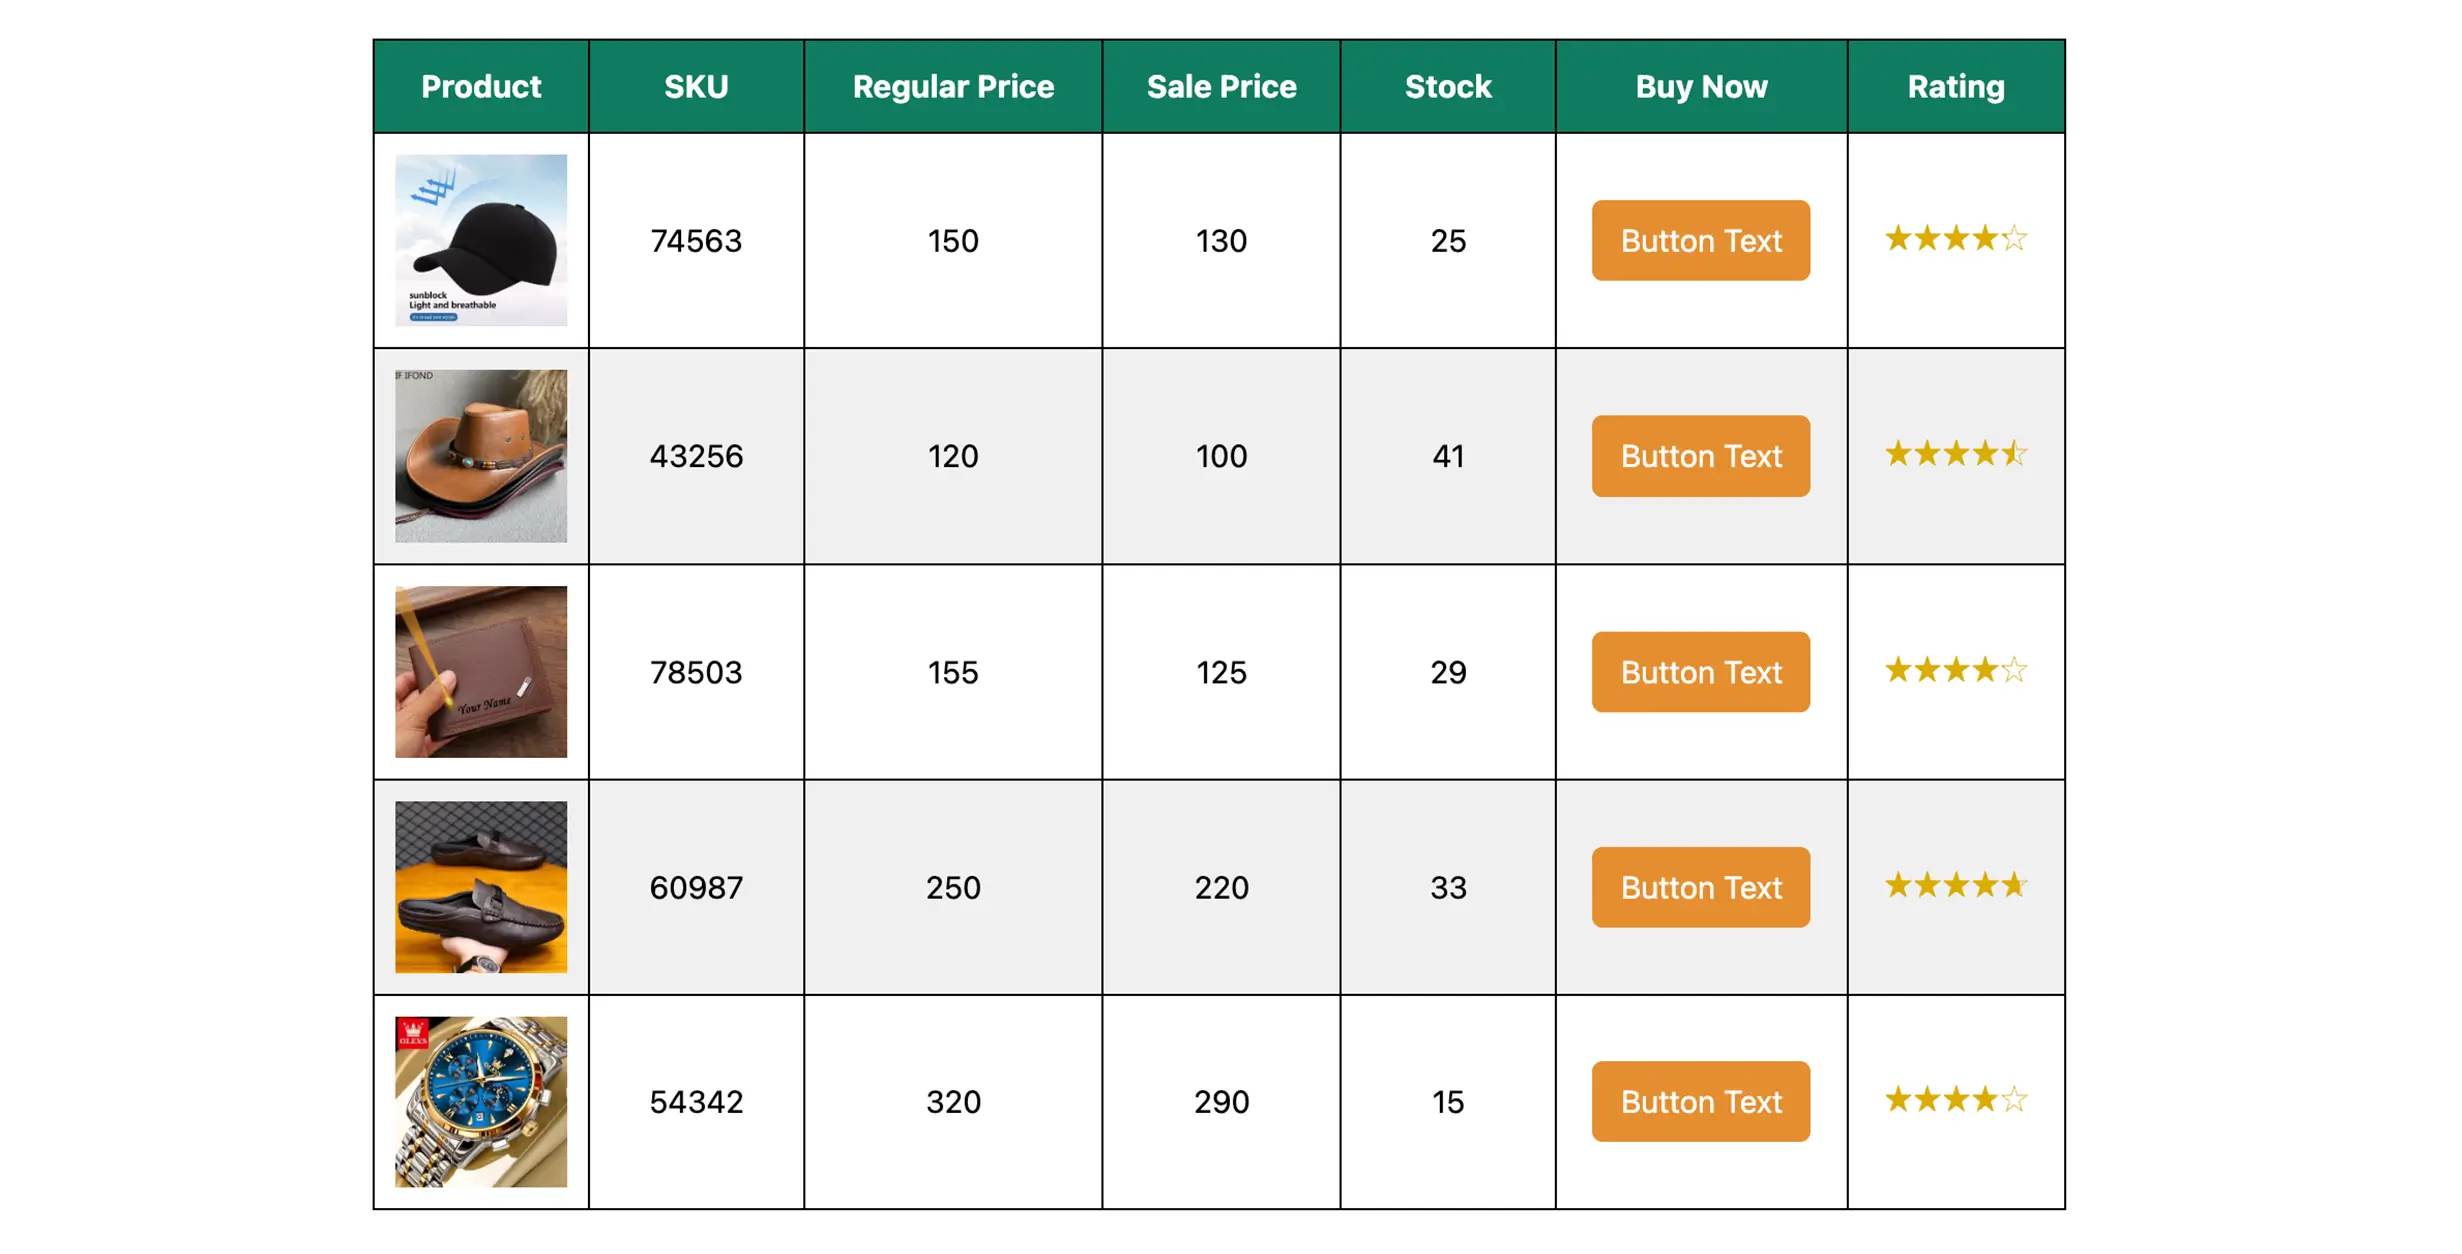
Thus, you can import a CSV file into WordPress and display it with a stylized table.
Why Importing CSV Files into WordPress Is Great for Large Tables
When you work with large tables in WordPress, CSV import becomes a very powerful method. It helps you manage big data in a clean and simple way. Instead of building tables row by row, you can prepare everything once and upload it in seconds. Check the points below:

1. Saves Hours of Manual Work
If your table has many rows and columns, adding them one by one takes a lot of time. You must type each value carefully. With CSV import, you prepare the full dataset in a spreadsheet and upload it in one step. This can save hours of manual work, especially for lists or comparison tables.
2. Eliminates Copy-Paste Errors
Manual copy-paste often creates mistakes. You may skip a row, paste data in the wrong column, or break the table layout. When you import a CSV file, the system automatically places each value in the correct column. This reduces human error and keeps data accurate.
Explore the best WordPress plugins for content marketing.
3. Maintains Clean Structure
A CSV file keeps your data in rows and columns. When you import it, the table structure stays the same. Headers remain in the first row. Each product or item stays in its own row. This helps you maintain a neat and consistent table format.
4. Makes Updating Much Easier
If you need to change prices, ratings, or stock numbers, you can edit the spreadsheet and upload the file again. You do not need to open the table and edit each cell manually. This makes regular updates simple and stress-free.

5. Keeps Content LLM-Friendly and AI-Readable
Structured tables are easier for AI systems to understand. Large Language Models (LLMs) prefer clean, well-organized data. When your content is properly structured in a table, AI tools can read and interpret it more accurately. This helps your content stay relevant in AI search environments.
6. Improves Experience for Search Engines and Users
Search engines prefer structured data because it is easier to crawl and index. A well-formatted table helps them understand your content clearly. At the same time, users can quickly scan rows and compare information without reading long paragraphs.
Best Practices for Large CSV Tables
When you work with large CSV tables, small mistakes can create big problems. A clean and well-prepared file makes the import process smooth. It also helps your table look professional and easy to read. Following some simple best practices can save time and prevent errors later.
1. Use Clear and Descriptive Headers
Your column headers should clearly explain what the data means. For example, write “Regular Price” instead of just “Price” if you also have a sale price. Clear headers help users, search engines, and AI systems understand your table better.
2. Remove Unnecessary Columns
Do not add extra columns that you do not need. Too many unused fields can make your table messy and confusing. Keep only the columns that provide real value to readers. A focused table is easier to manage and easier to scan.
Learn how to create a custom WooCommerce product table in WordPress.
3. Maintain Consistent Formatting
Keep the same format across the entire file. If you write prices as numbers, do not add currency symbols in some rows and not in others. If ratings are numbers, keep them in the same style everywhere. Consistency keeps your table clean and error-free.

4. Clean the Data Before Importing
Check for spelling mistakes, empty cells, duplicate rows, or broken values before saving the file. Remove extra spaces. Make sure each row follows the same structure. Clean data ensures a smooth import and a professional-looking table.
5. Save the File in UTF-8 Encoding
Always save your CSV file in UTF-8 format. This encoding supports special characters and different languages. If you use the wrong encoding, some characters may appear broken after import. UTF-8 keeps your data safe and readable.
Check this guide on how to create a feature comparison table in WordPress.
6. Enable Sorting for Very Large Tables
If your table has more than 100 rows, sorting becomes very important. Users may want to sort by price, rating, or stock. Sorting helps visitors find information quickly. It also improves the overall usability of large data tables.
Common Mistakes to Avoid While Importing a CSV File into WordPress
When you import a CSV file into WordPress, small mistakes can break your table layout. Many problems happen because the spreadsheet was not prepared properly. If you avoid these common errors, your table will look clean and work smoothly.

1. Importing Messy Spreadsheets
If your spreadsheet contains random spaces, duplicate rows, or inconsistent formatting, those problems will also appear in your table. Always review your file before exporting it as CSV. A clean file gives you a clean table.
2. Leaving Blank Columns
Empty columns in your spreadsheet can create unwanted gaps in your table. They may also confuse the import system. Remove any unused or blank columns before saving the file. Explore this guide on how to create a high-converting pricing table in WordPress.
3. Mixing Text and Numbers Inconsistently
Do not mix formats in the same column. For example, do not write “$150” in one row and “150” in another. Do not write numbers as text in some rows and as numbers in others. Keep the format consistent to prevent sorting and display issues.
4. Forgetting to Style the Header Row
The header row is very important. It defines what each column represents. After importing, make sure the header row is clearly styled. Use bold text or a different background color so users can easily understand the table structure.
5. Importing Merged Cells
Merged cells do not work properly in CSV files. They can break the table structure during import. Always unmerge cells in your spreadsheet before saving it as a CSV file. Each piece of data should stay in its own single cell.
Conclusion
Importing a CSV file and turning it into a table in WordPress may look technical at first. But once you understand the steps, it becomes simple and powerful. You can manage large amounts of data easily. You can build clean and structured tables without much manual work.
This method gives you full control over your content. When your tables are clean and well-organized, your website looks more professional. Users can scan information faster. Search engines can understand your data better. Even AI systems can read your content more clearly.
It will be our pleasure if you love this tutorial post. If you have any questions not answered yet, mention them in the comment box below.
Leave a Reply
You must be logged in to post a comment.