
Creating tables in WordPress has become much easier with the introduction of the Block Editor (Gutenberg). Instead of dealing with complex HTML, you can now build tables visually inside the editor.
Whether you want to add a simple data table, a styled comparison table, or a conversion-focused pricing table, there are multiple ways to get the job done. The key is choosing the method that fits your needs.
In this guide, you’ll learn how to create tables in WordPress using the Block Editor through three easy methods. We’ll start with the default Table block, then move on to a block-based table plugin, and finally explore a drag-and-drop table builder that works with everything. By the end, you’ll know exactly which approach works best for your site.
Quick Summary: Choose the Right Table Method
Use this quick guide to jump directly to the method that fits your needs:
Default Table Block – Use this if you only need basic tables with text or numbers, without images, buttons, or advanced styling.
Tableberg Plugin – Choose this if you want more flexibility inside Gutenberg, such as adding images, buttons, star ratings, and styled layouts.
WP Table Builder – Ideal if you need advanced, drag-and-drop tables and want to reuse them across different editors. It works with page builders, supports shortcodes, and also includes a Gutenberg block that lets you create and manage tables directly inside the Block Editor.
Method 1: Using the Default Table Block
The default Table block in the WordPress Block Editor is ideal for creating basic tables with text or numbers. It’s quick, lightweight, and doesn’t require installing any plugins.
Step 1: Open the Block Editor
Go to the post or page where you want to add a table and make sure you’re using the Block Editor (Gutenberg).
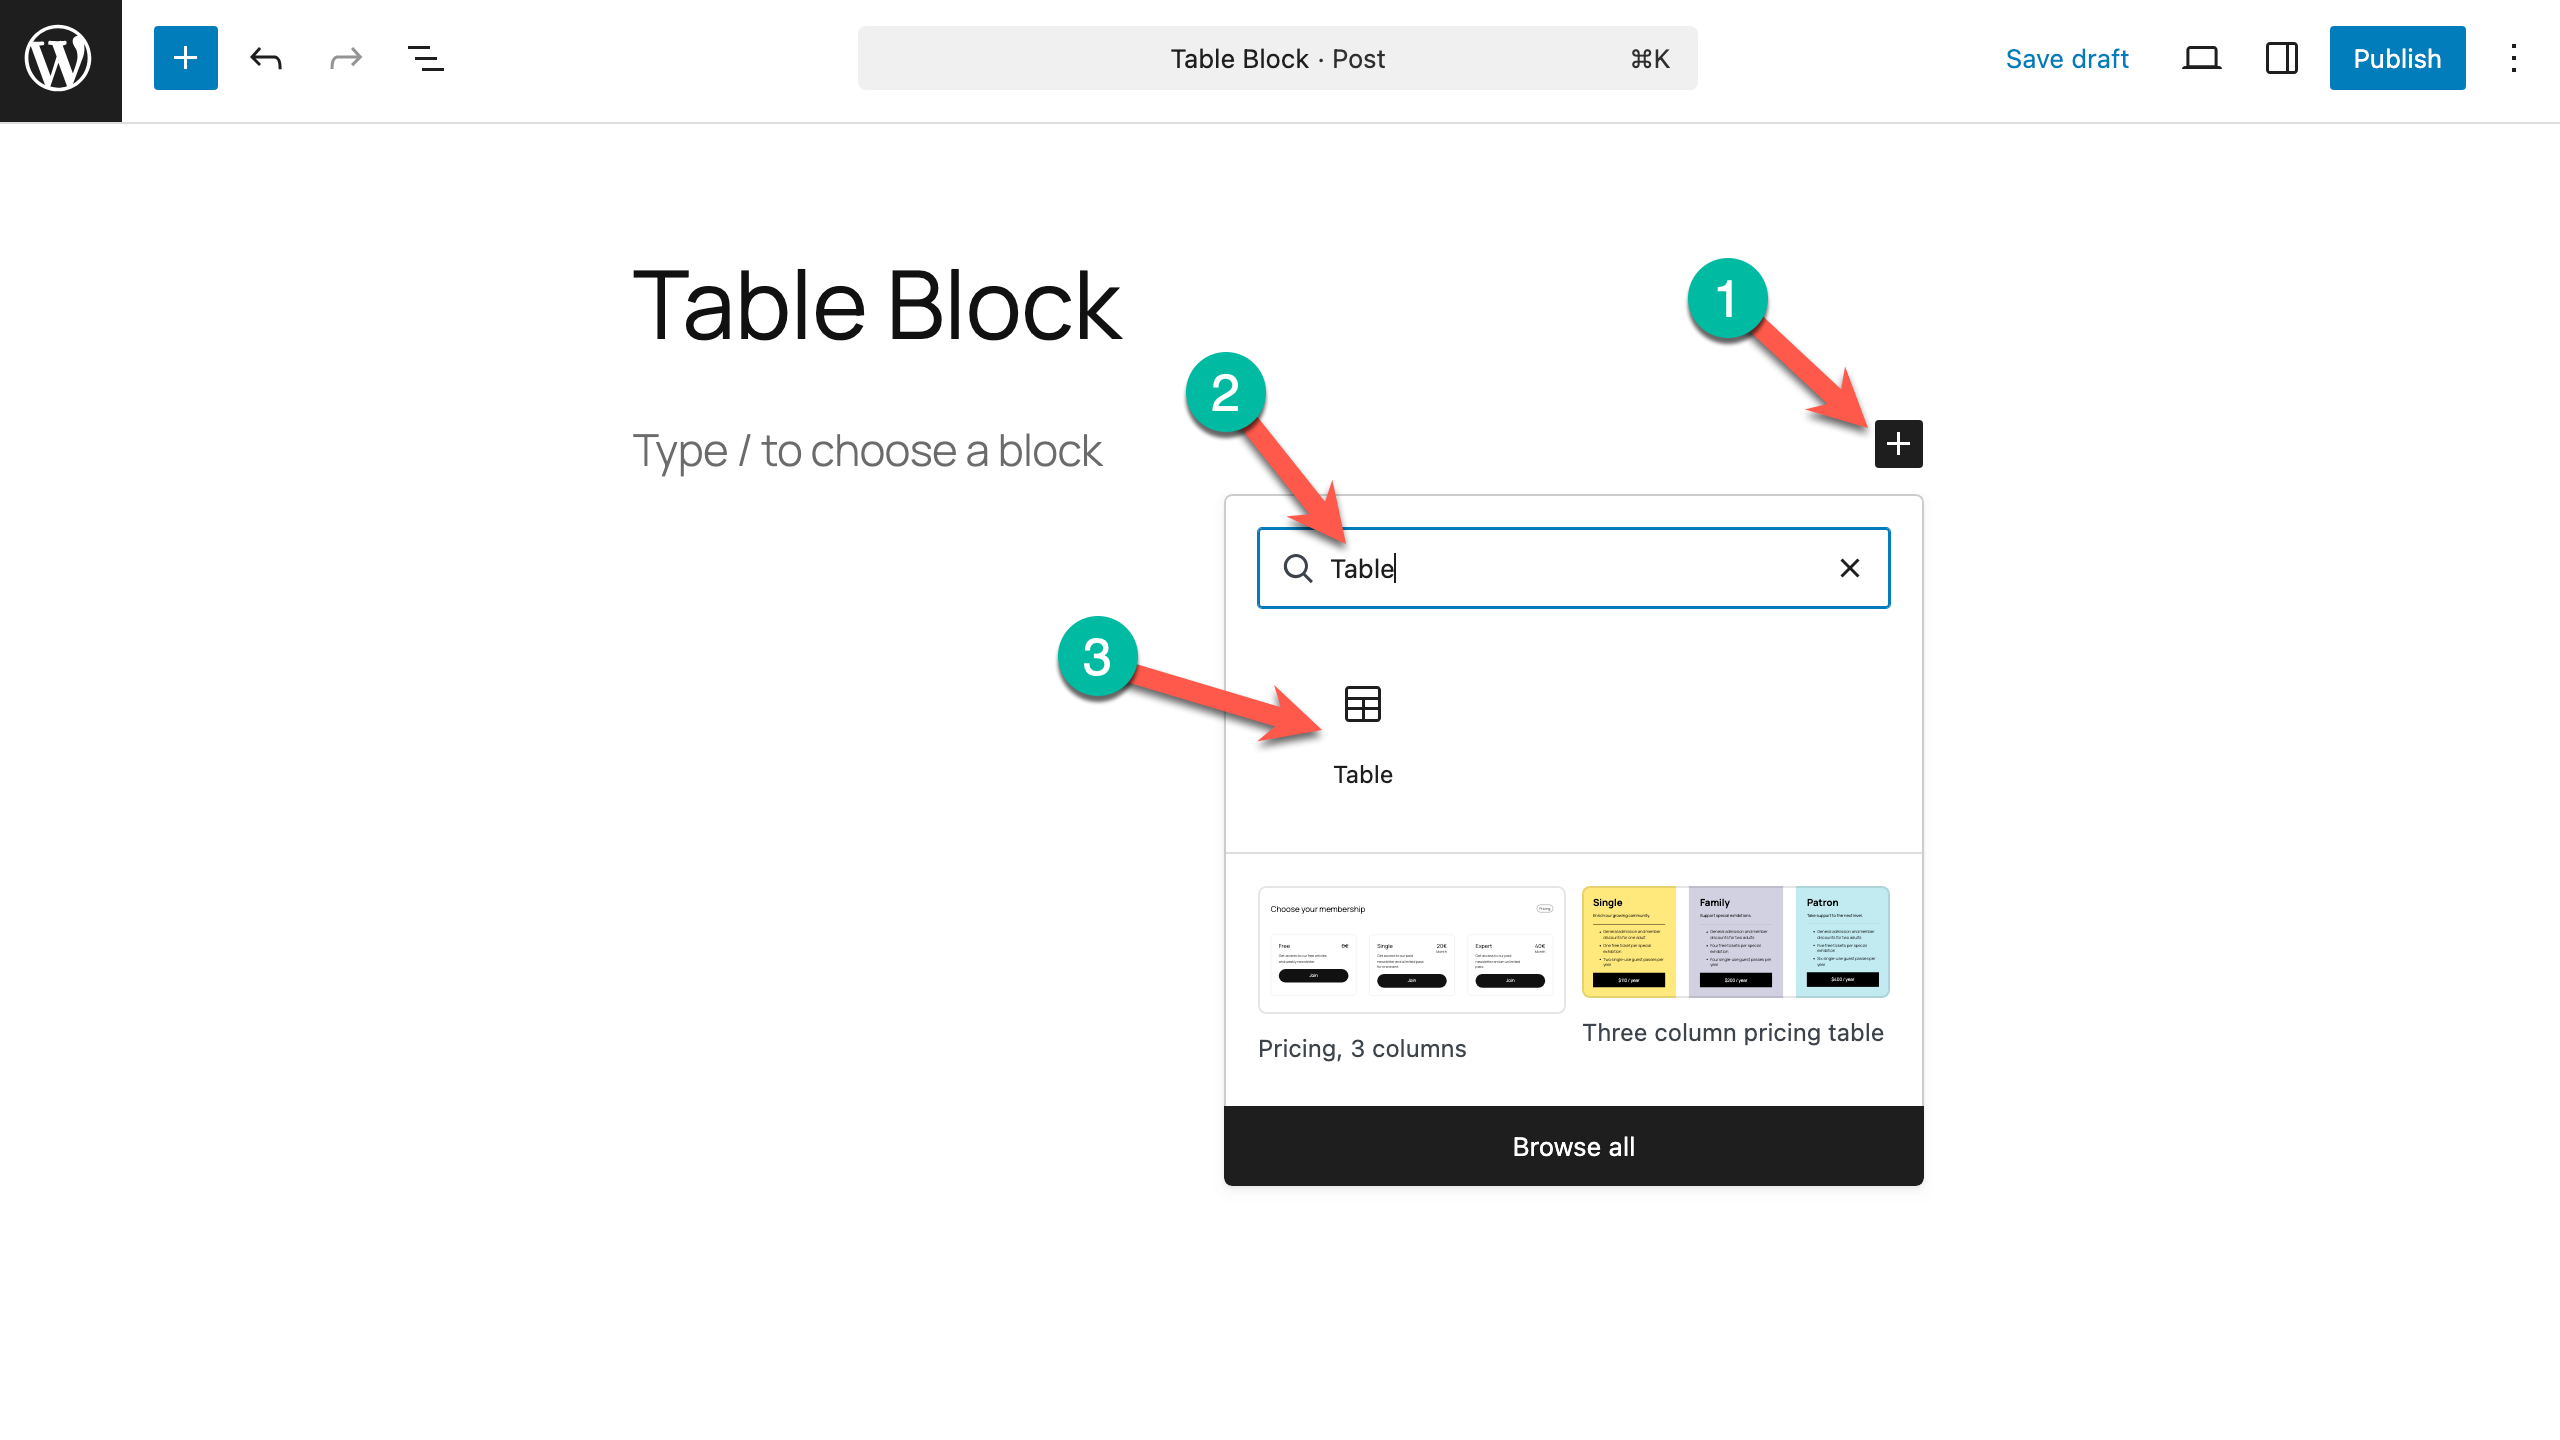
Step 2: Add the Table Block
Click on the ‘+‘ button to add a new block and search for Table. Then select the Table Block.
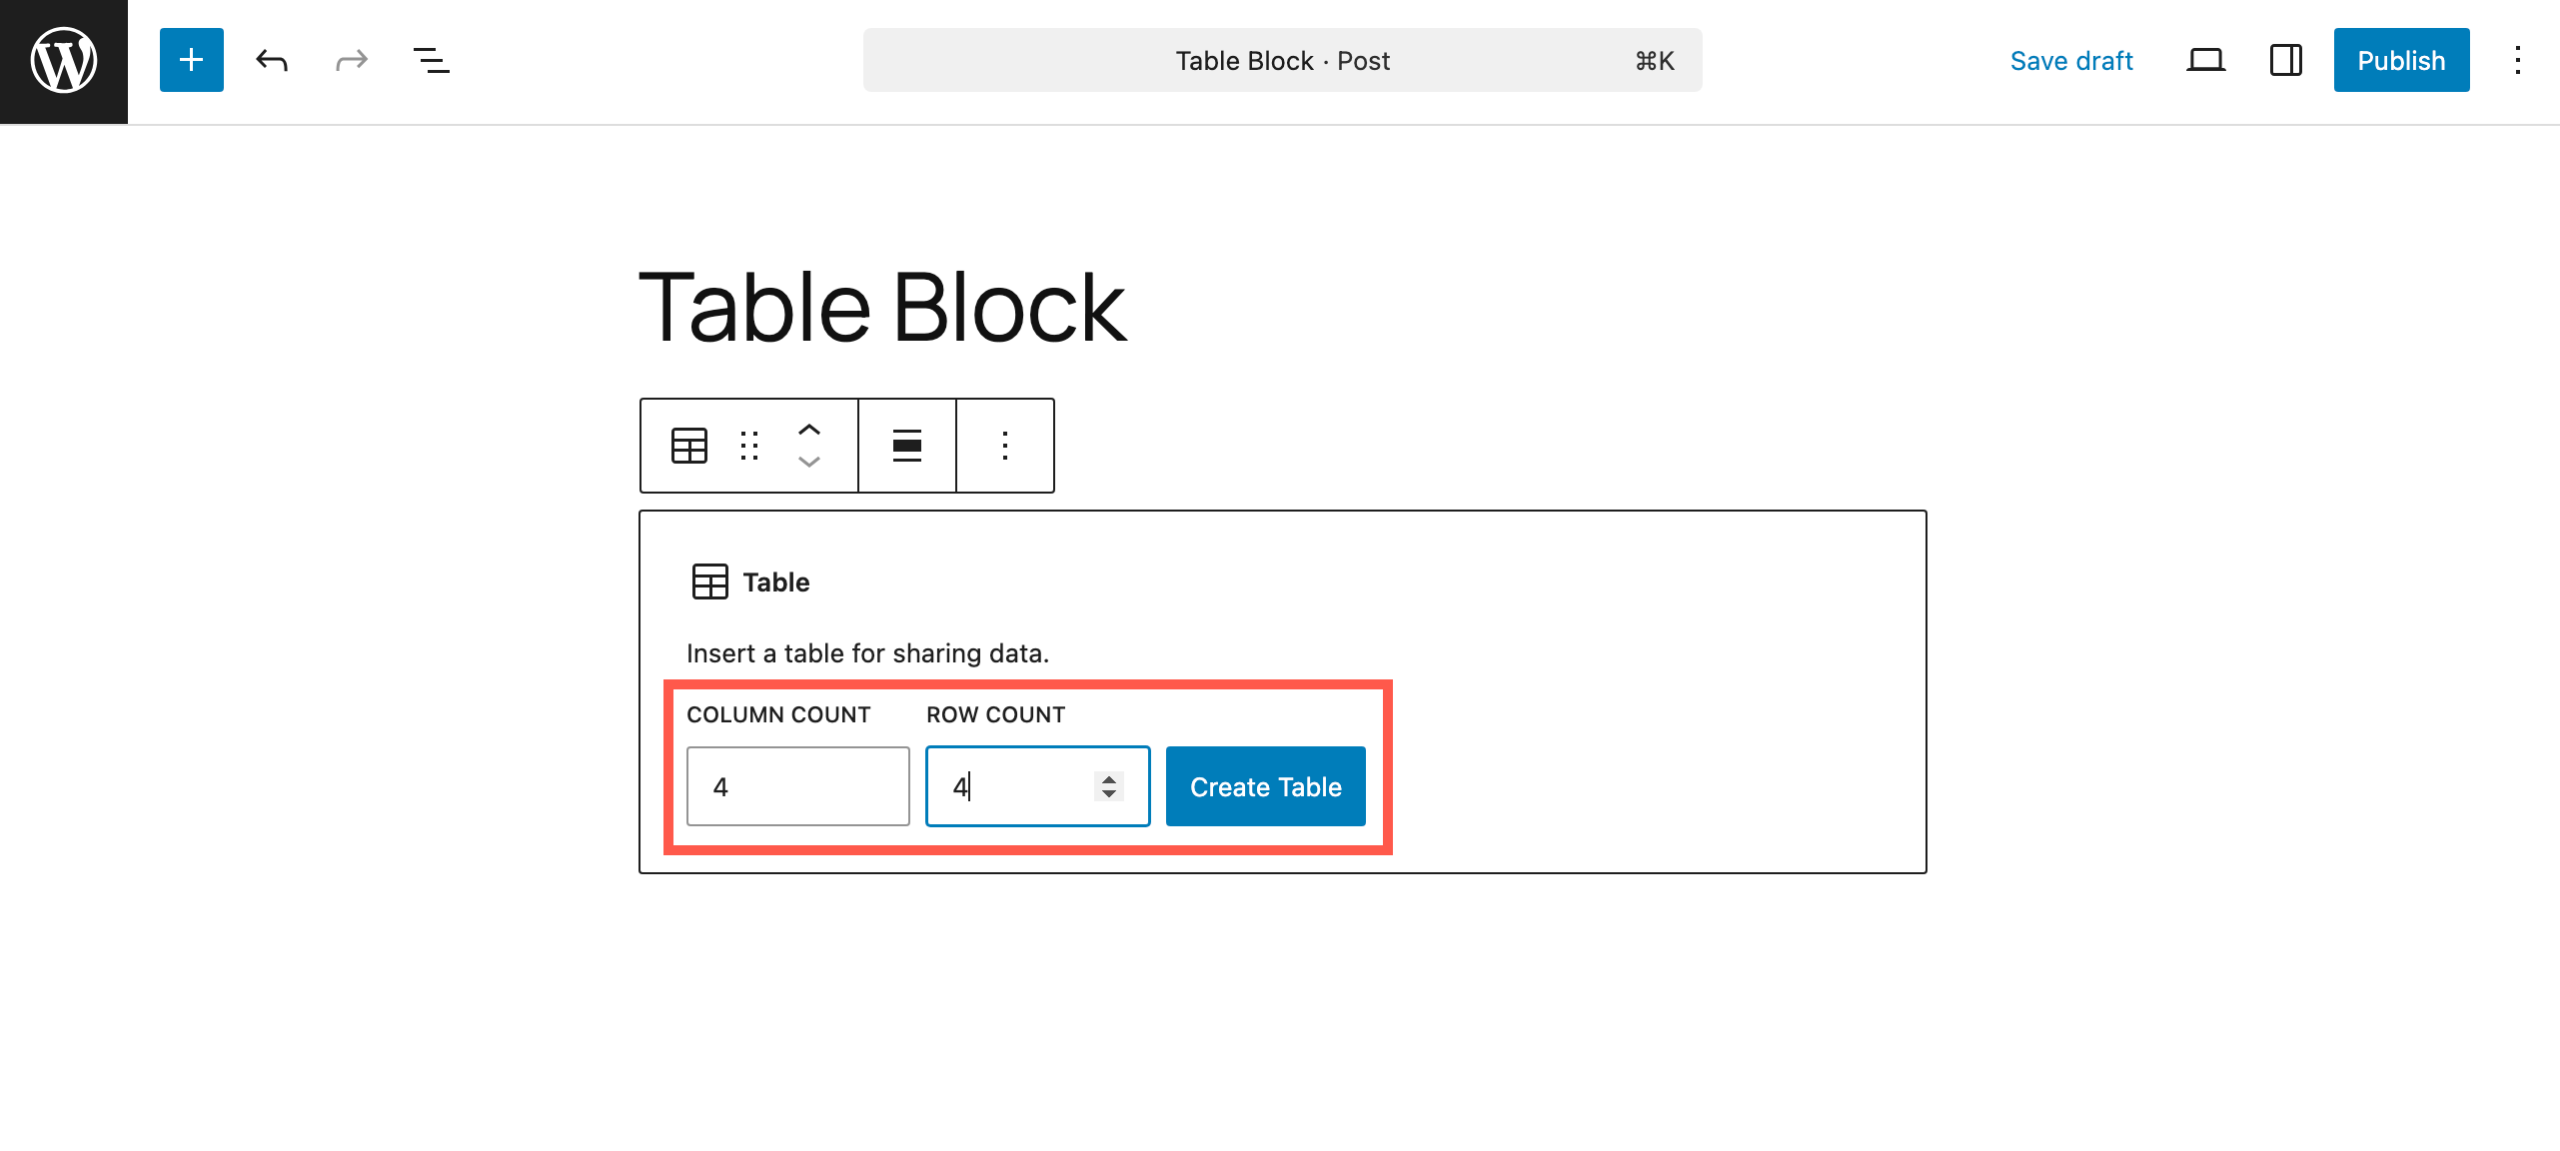
Step 3: Select the Number of Columns and Rows
Once you insert the Table block, you will be prompted to select the number of rows and columns. Enter the number of columns and rows you need and click ‘Create Table‘
Step 4: Add Content to the Table
After creating the table structure, click on the individual cells to add your text or numbers. You can type directly into the cells.
Step 5: Customize Basic Table Settings
From the block settings panel on the right, you can:
- Enable a header row or footer row
- Adjust column alignment
- Set fixed-width columns
- Choose basic table styles
So this is how you can add a simple table using the defautl Table block.
Limitations of the Default Table Block
While easy to use, the default Table block has some clear limitations:
- You cannot add images or buttons
- No support for star ratings or custom HTML
- Limited styling and layout control
👉 If you need more flexibility inside the Block Editor, the next method is a better fit.
Method 2: Using the Tableberg Plugin
If the default Table block feels limiting, Tableberg is the natural next step. It’s a block-based table plugin designed specifically for the Gutenberg editor, allowing you to build advanced tables without leaving the Block Editor.
With Tableberg, you can add images, buttons, star ratings, icons, custom HTML, and more inside table cells, something the default Table block doesn’t support.
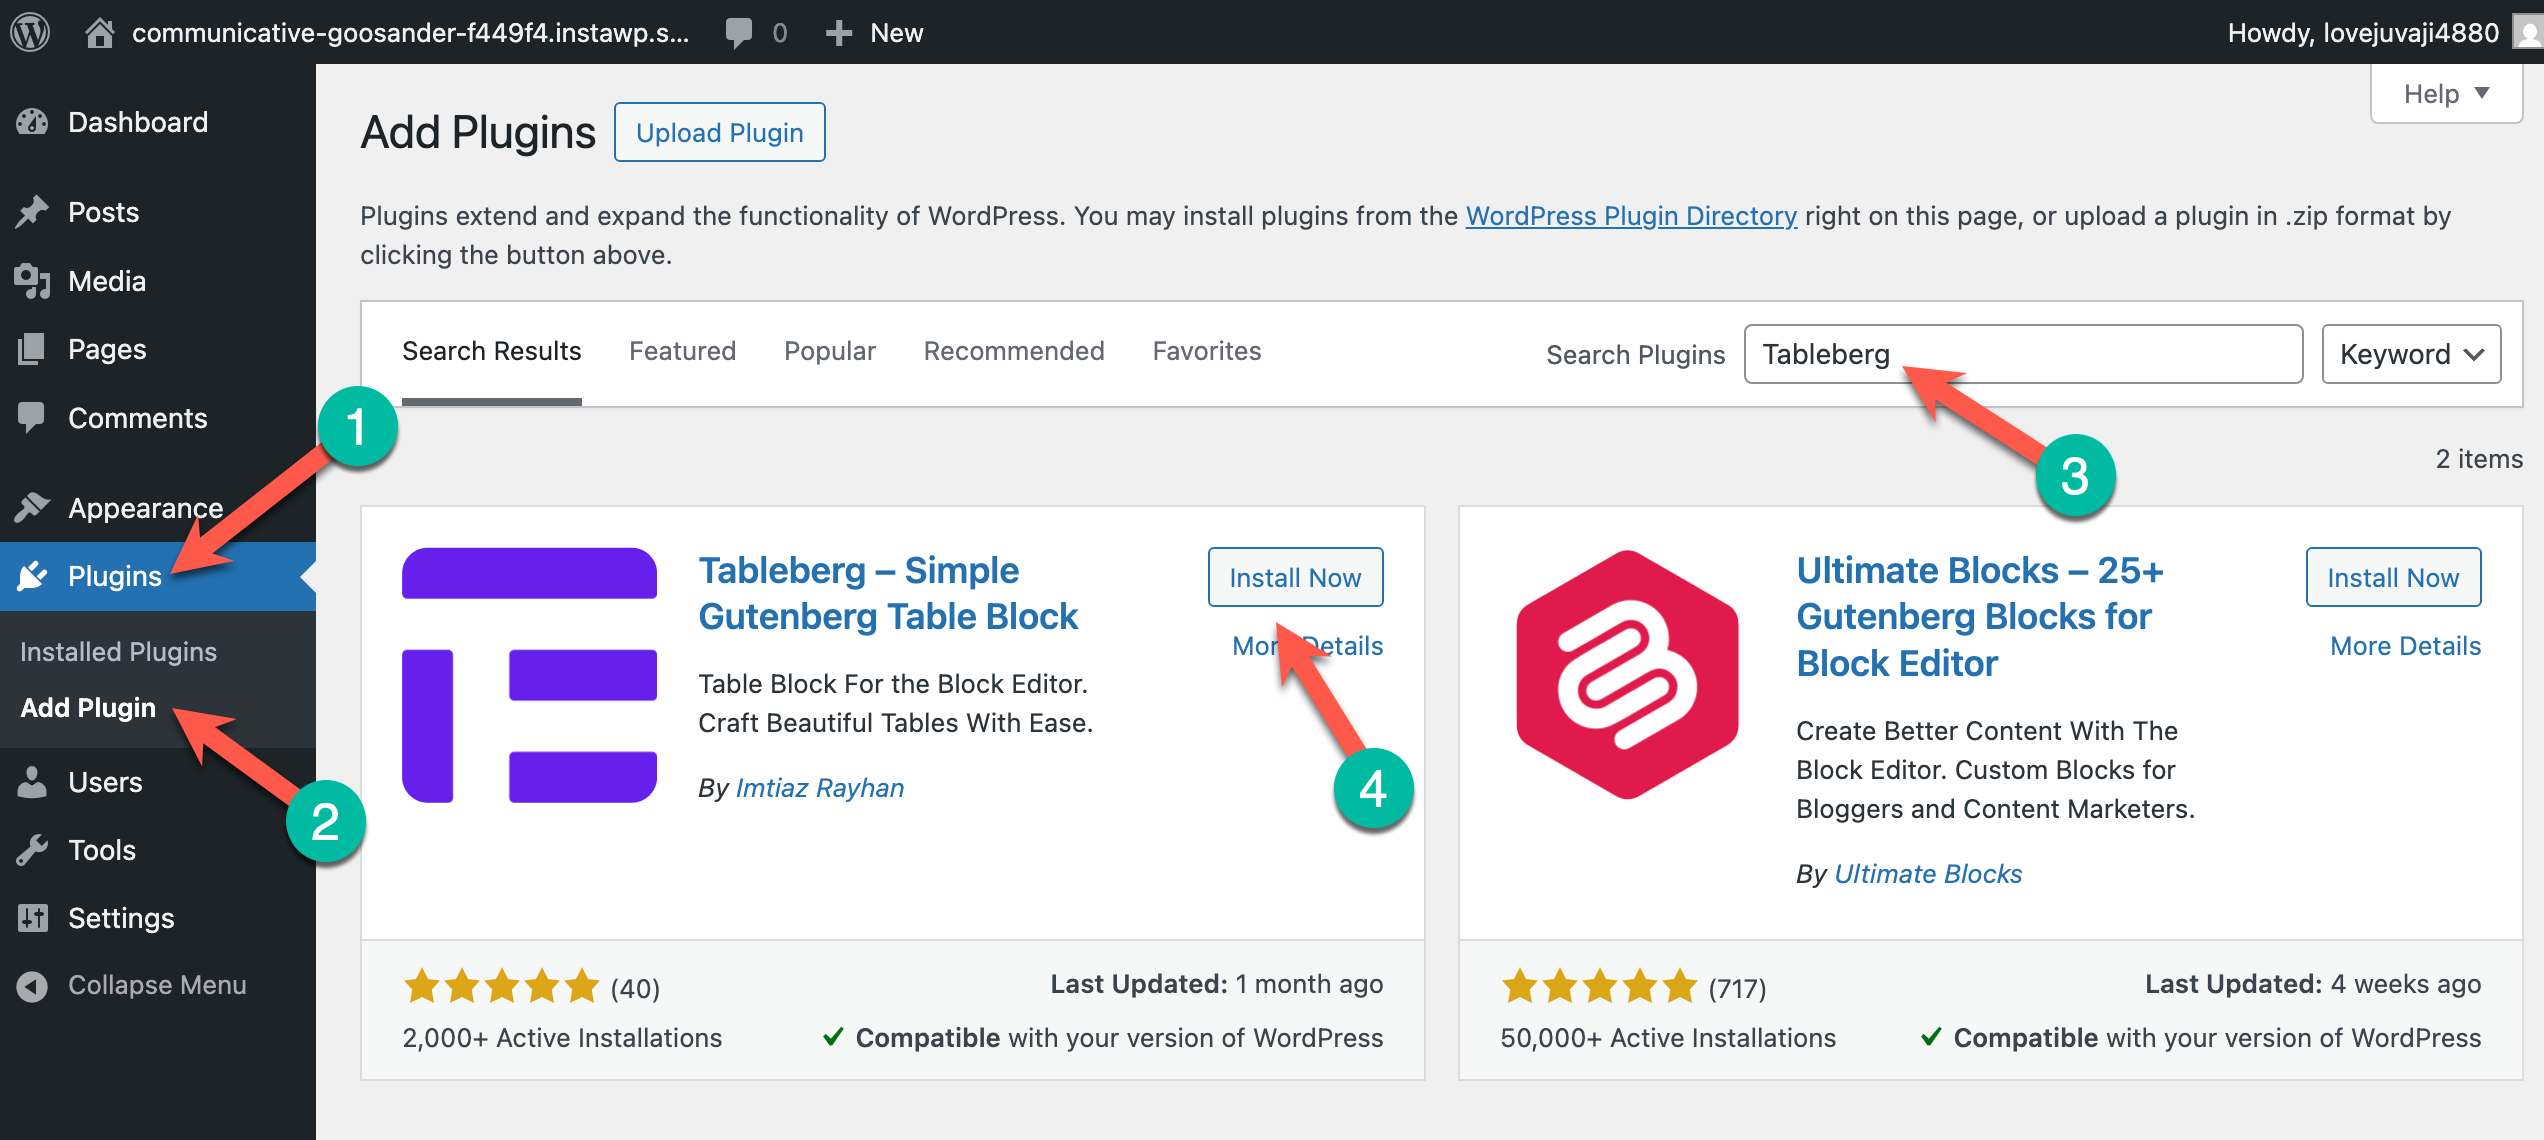
Step 1: Install and Activate the Tableberg Plugin
Go to Plugins → Add New in your WordPress dashboard. Search for Tableberg. Click Install, then Activate.
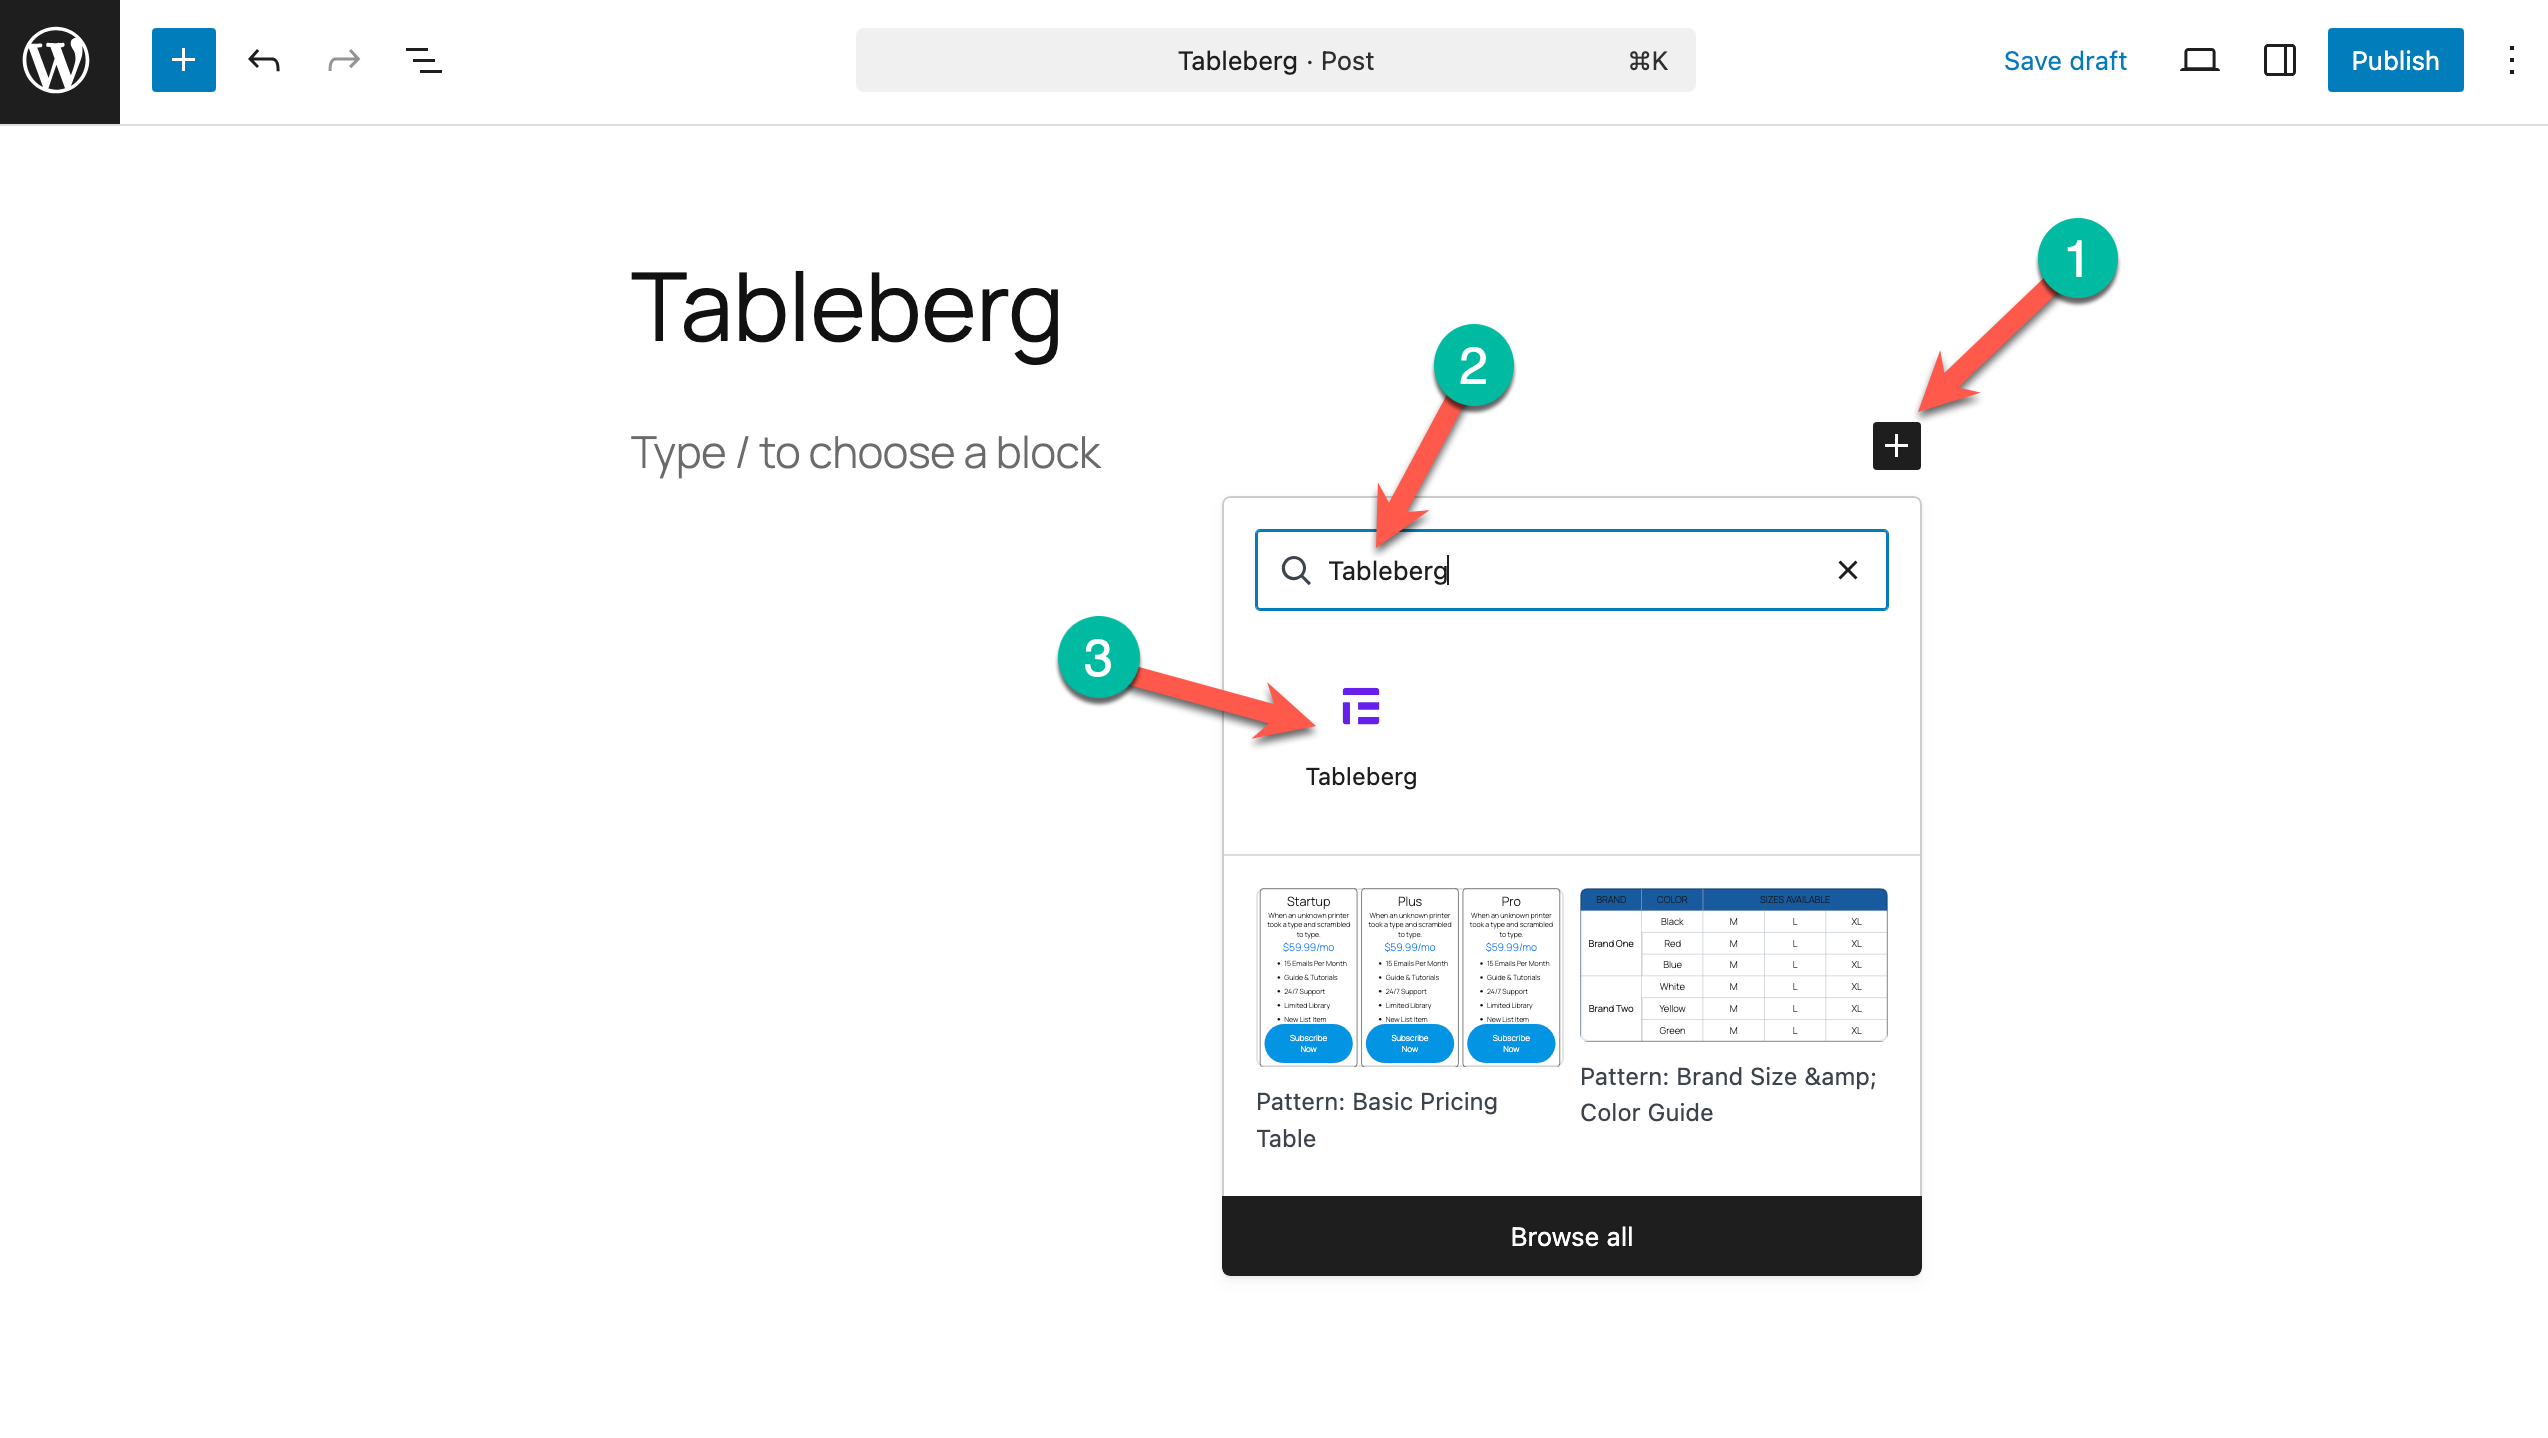
Step 2: Insert the Tableberg Block
- Open the post or page where you want to add a table.
- Click the + (Add Block) button.
- Search for Tableberg.
- Insert the Tableberg block.
Step 3: Create Your Table Structure
After inserting the block, choose the number of rows and columns and click Create.
The table is instantly created inside the editor. You can easily add or remove rows and columns later using the block controls.
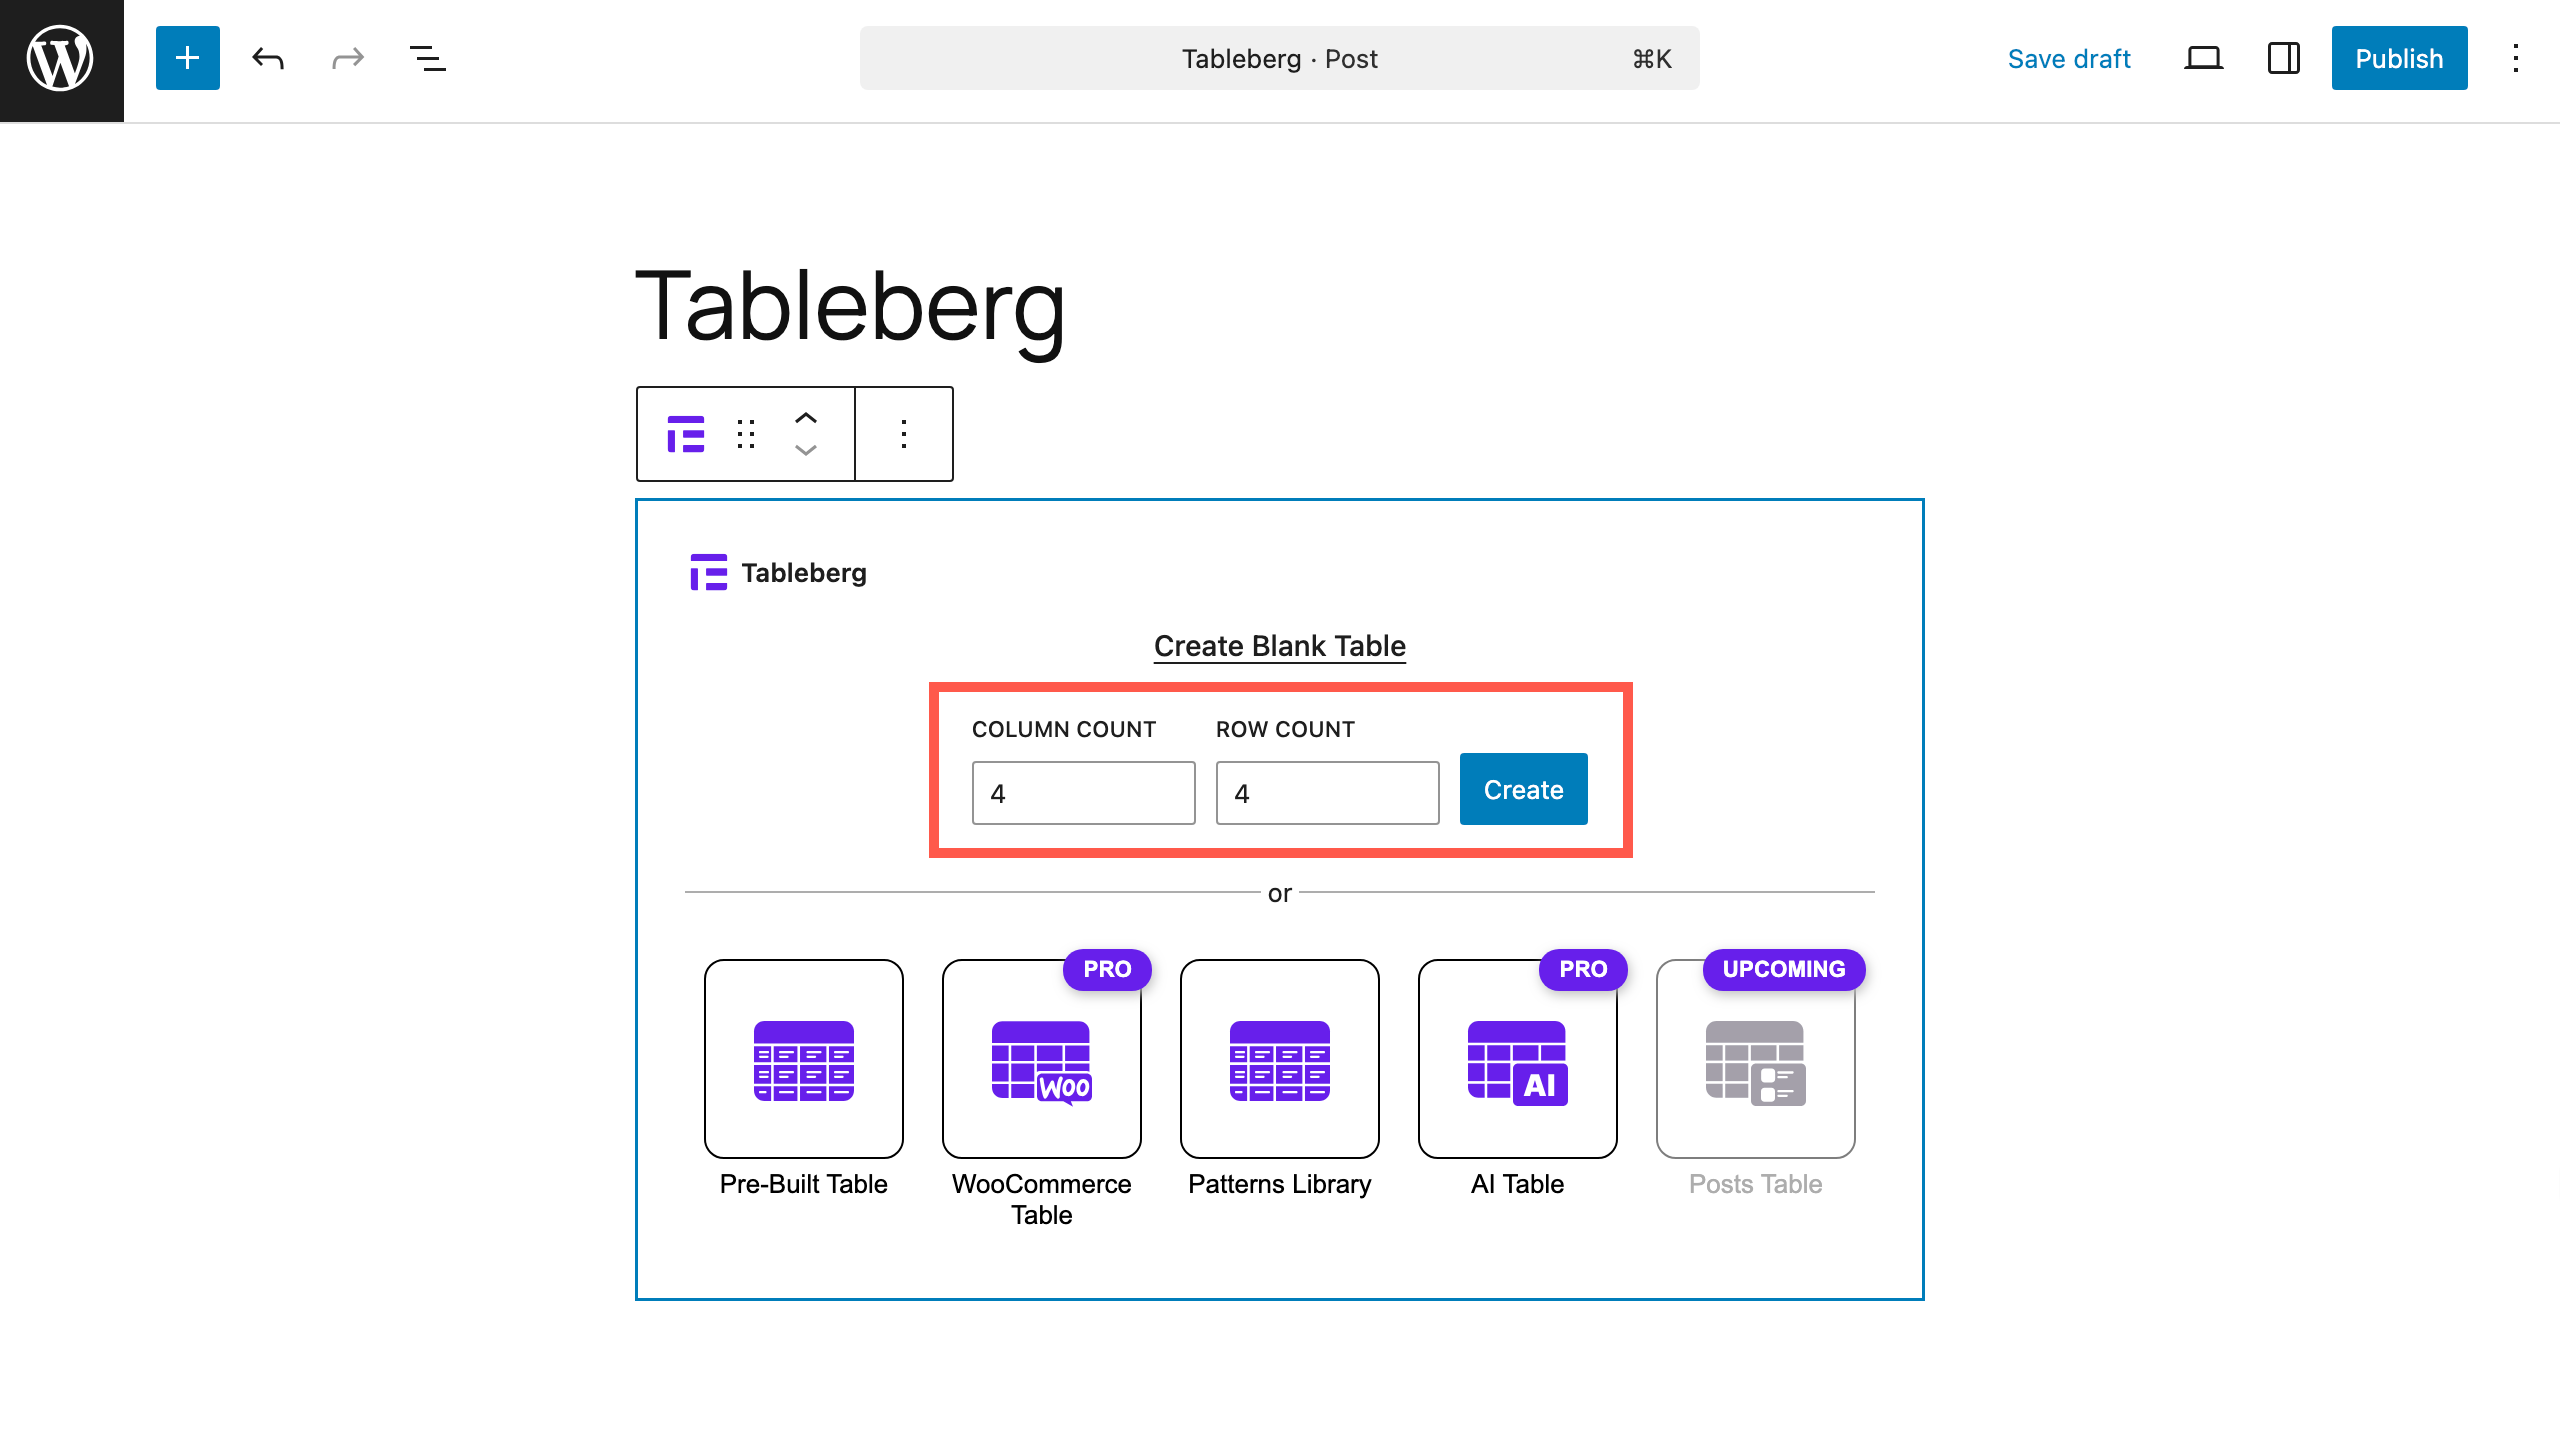
Note: Tableberg offers some pre-built table patterns. If you don’t want to create a table from the scratch, you can start with a pre-built table.
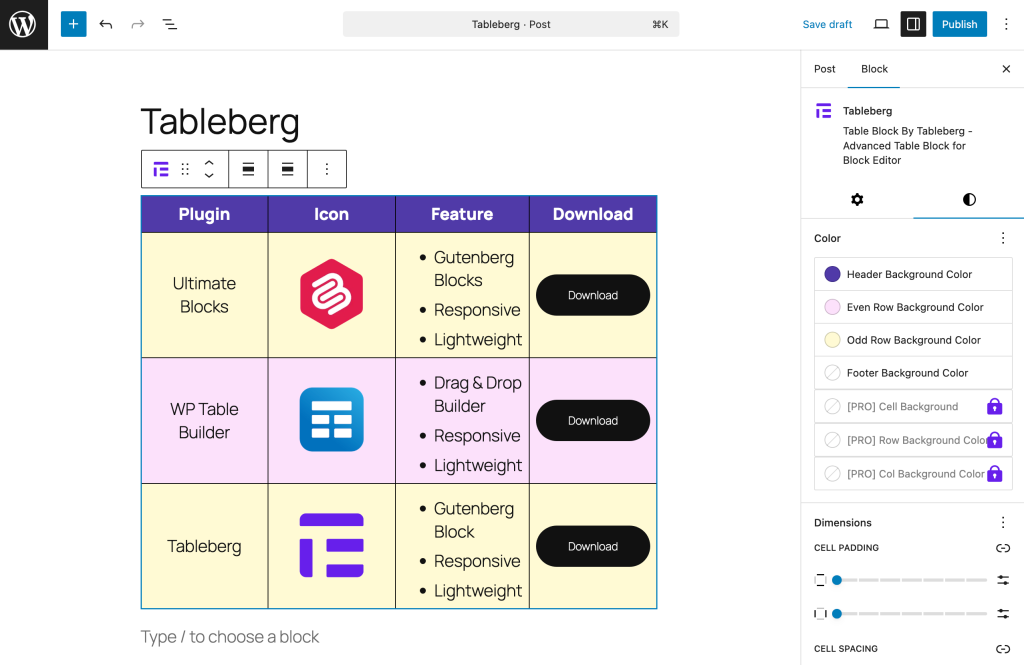
Step 4: Add Rich Content Inside Table Cells
This is where Tableberg really shines. Inside each table cell, you can add:
- Text
- Images
- Buttons
- Star ratings
- Lists, icons, custom HTML, and more.
Each cell behaves like a mini block container, giving you much more freedom than the default Table block.
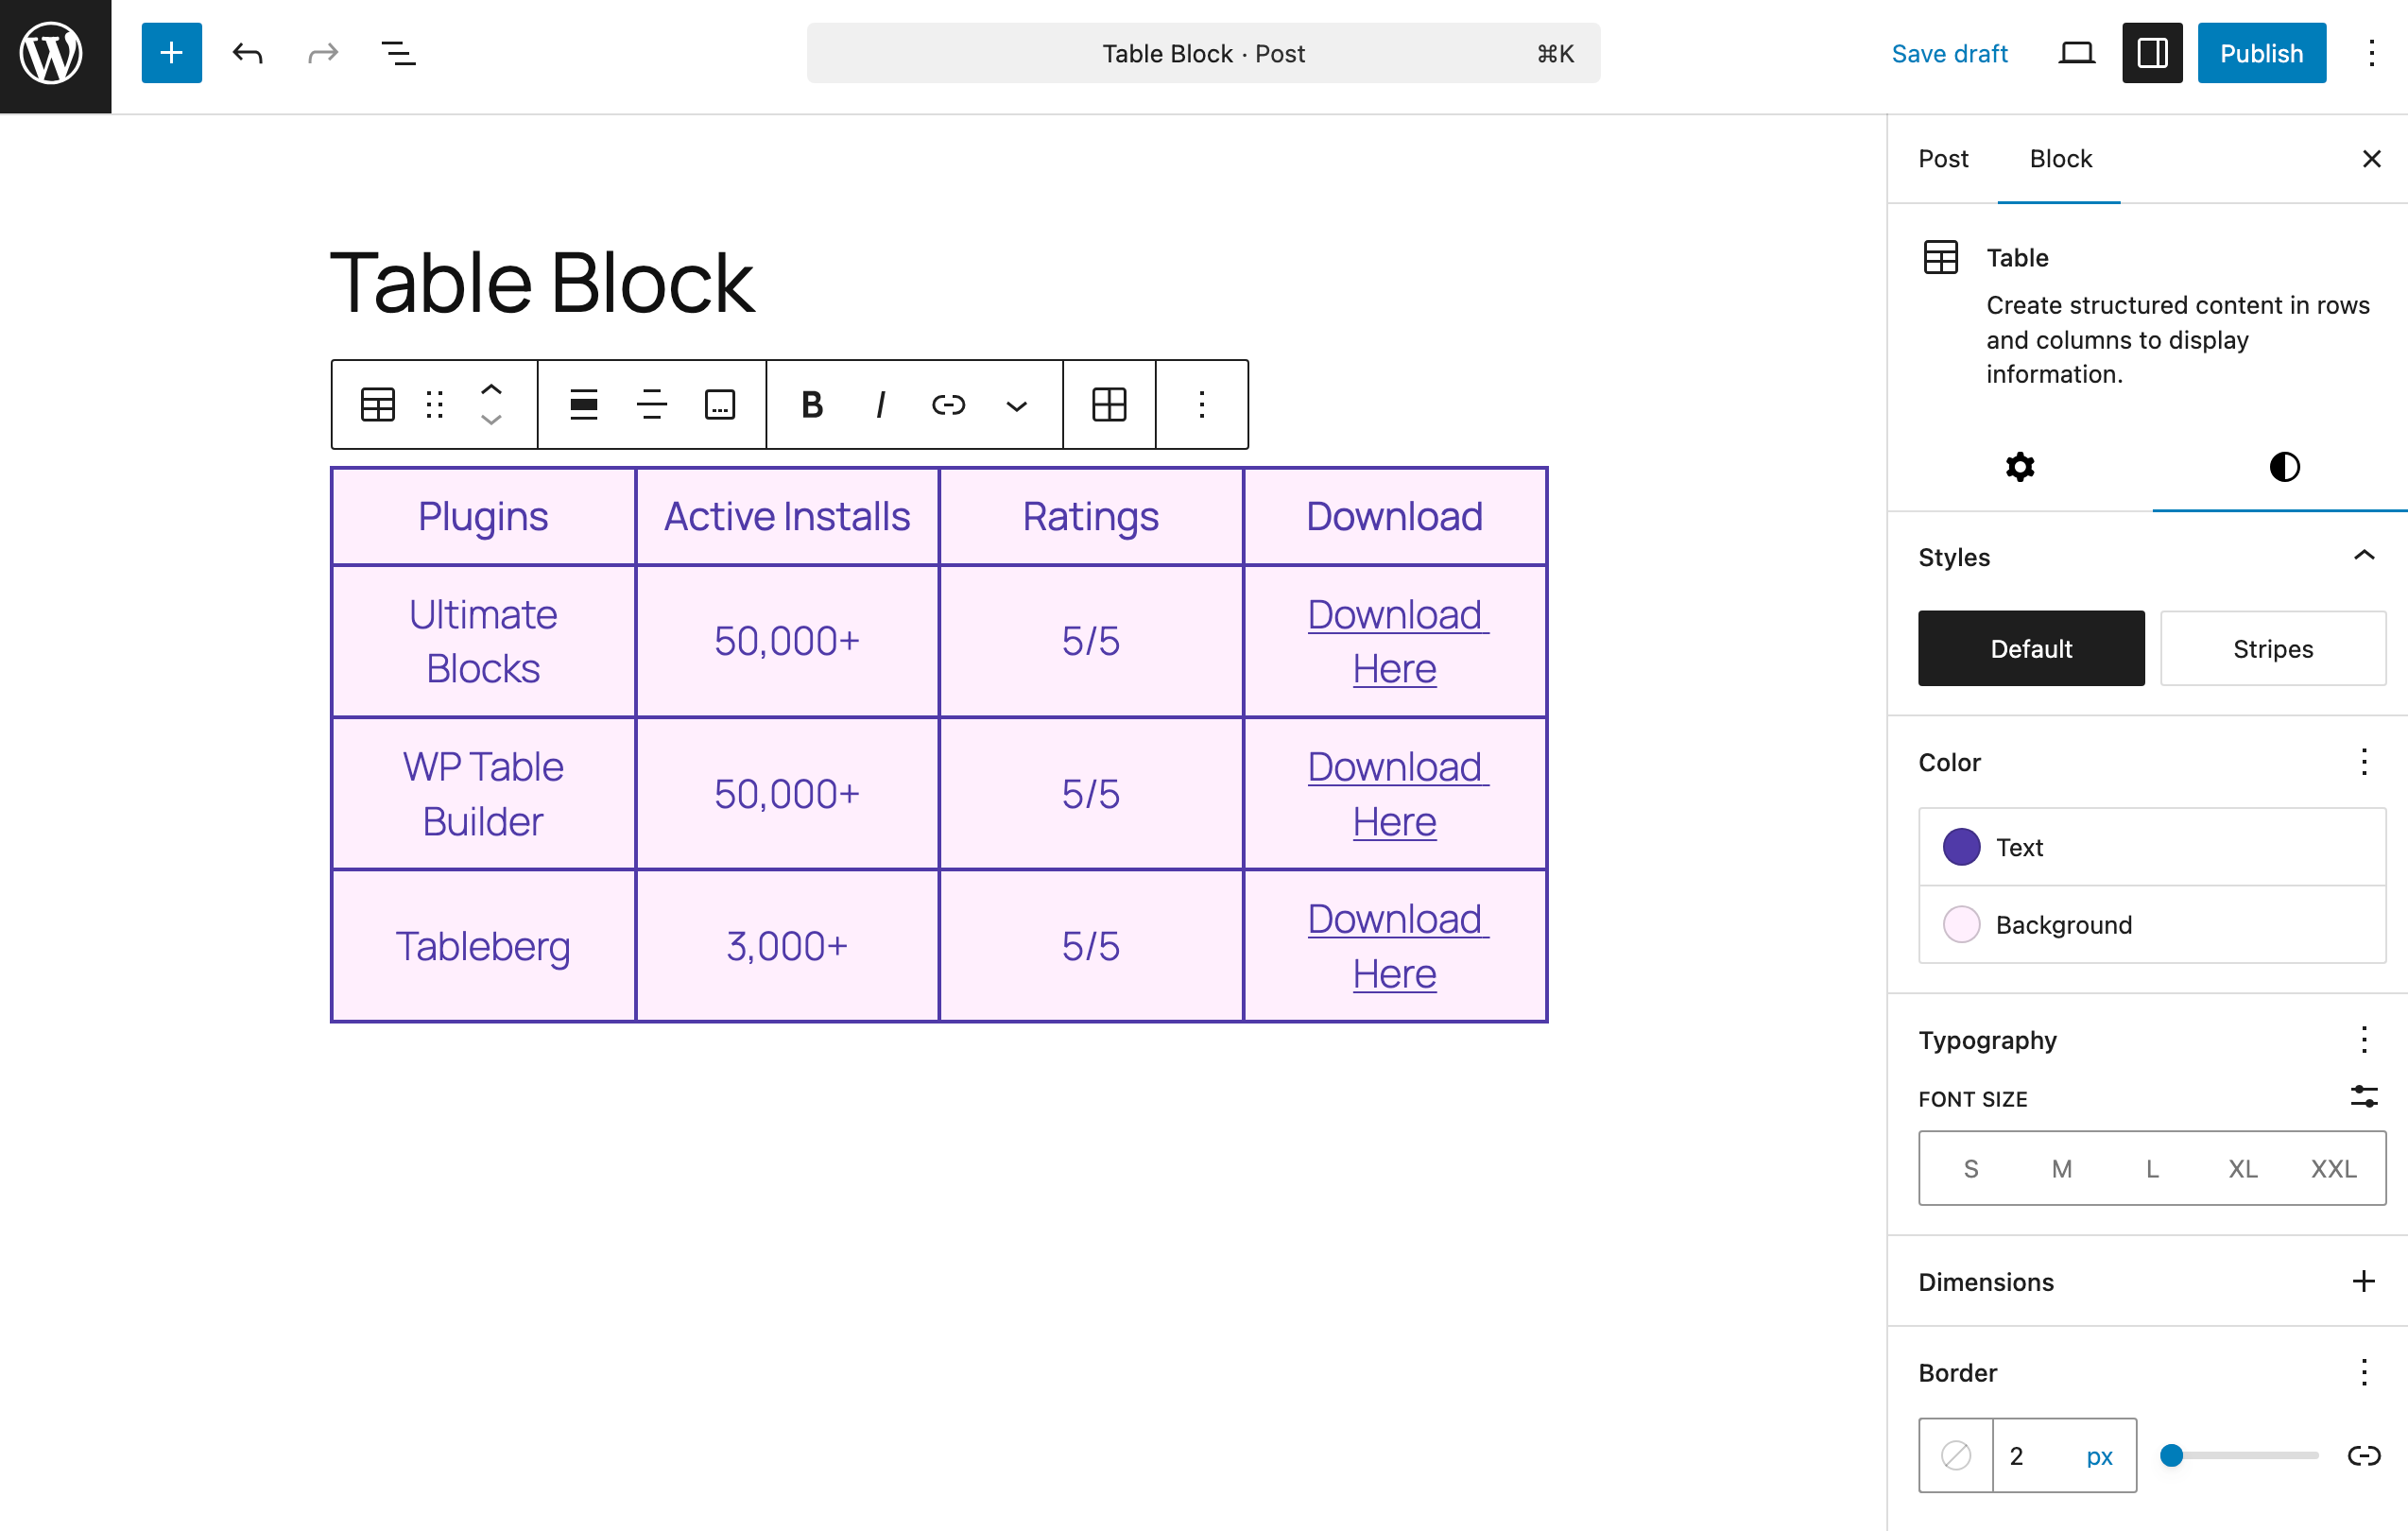
Step 5: Customize Table Design and Styling
From the block settings panel, you can:
- Adjust row and column spacing
- Change background colors and borders
- Highlight specific rows or columns
- Create visually appealing layouts for comparison or pricing tables
All customization happens visually, without touching CSS.
Method 3: Using the WP Table Builder Plugin
While WP Table Builder is well known for its shortcode-based tables and compatibility with the Classic Editor and page builders like Elementor and Divi, it also offers a dedicated Gutenberg block that lets you create and manage tables without leaving the Block Editor.
This approach combines the flexibility of a drag-and-drop table builder with the convenience of Gutenberg.
Step 2: Install and Activate WP Table Builder
- Go to Plugins → Add New in your WordPress dashboard.
- Search for WP Table Builder.
- Click Install, then Activate.
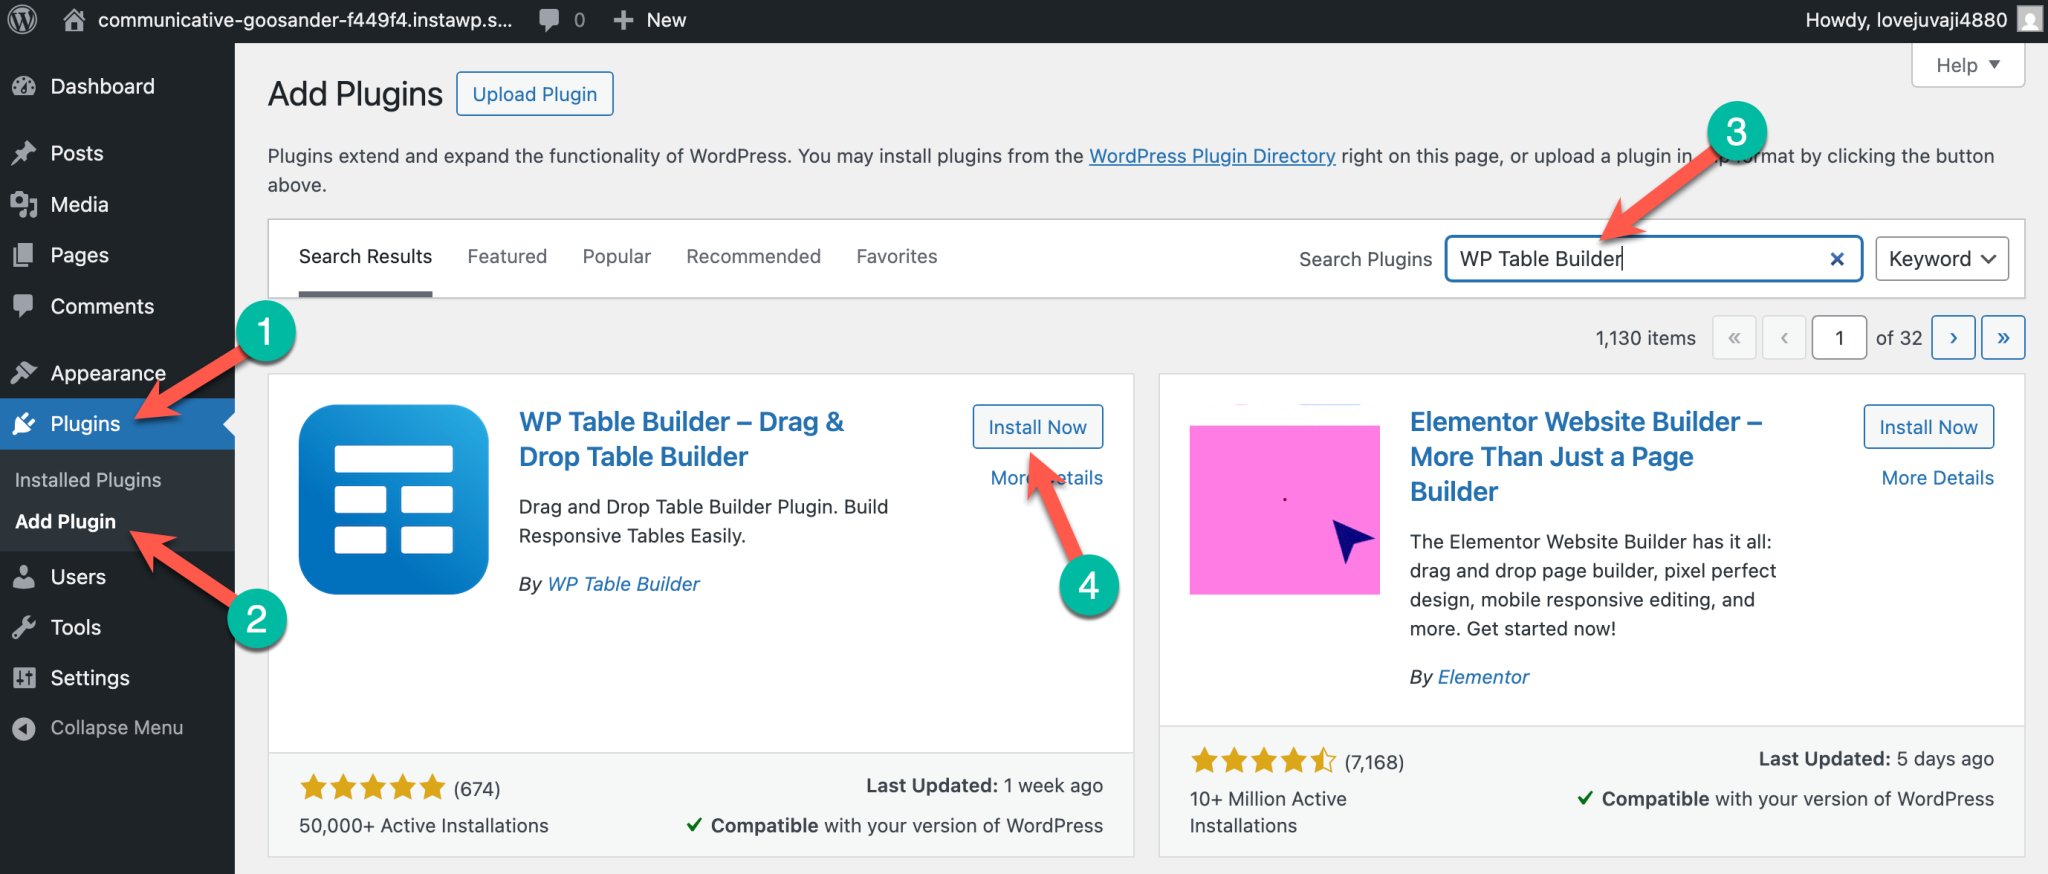
Once activated, you’ll see a new WP Table Builder menu in your dashboard.
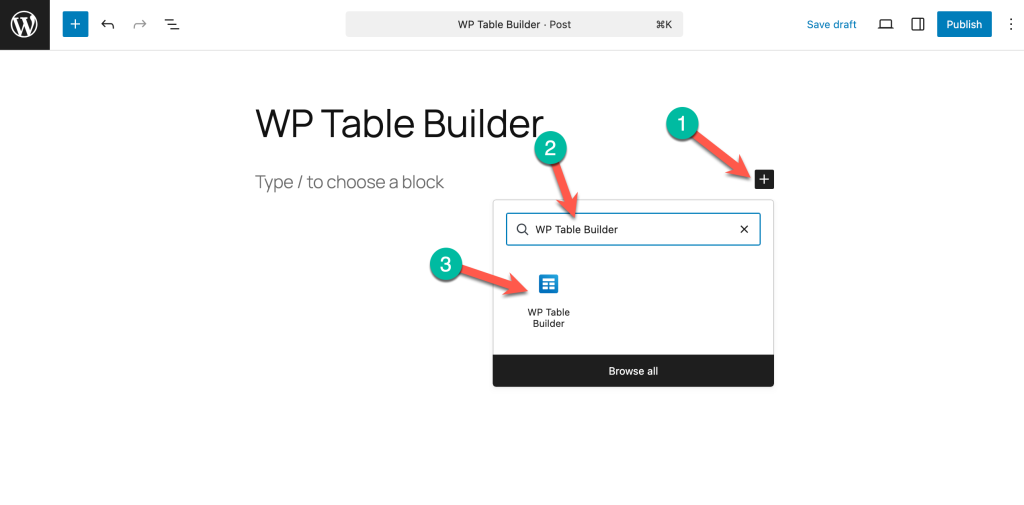
Step 2: Insert the WP Table Builder Block
- Open the post or page where you want to add a table.
- Click the + (Add Block) button.
- Search for WP Table Builder.
- Click the WP Table Builder block to insert it.
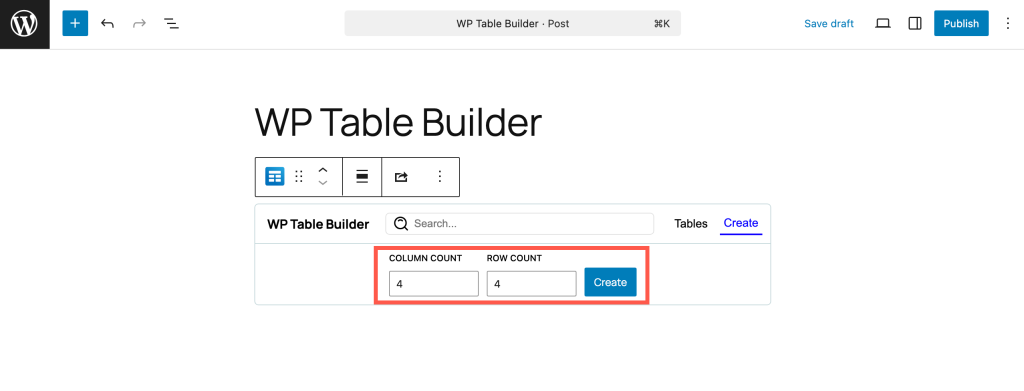
Step 3: Create or Select a Table
After inserting the block, you’ll see two options:
- Select an existing table (if you already have tables created)
- Or click Create to build a new table from scratch
To create a new table, click Create.

Step 4: Choose Rows and Columns
- Enter the number of rows and columns you want.
- Click the Create button.
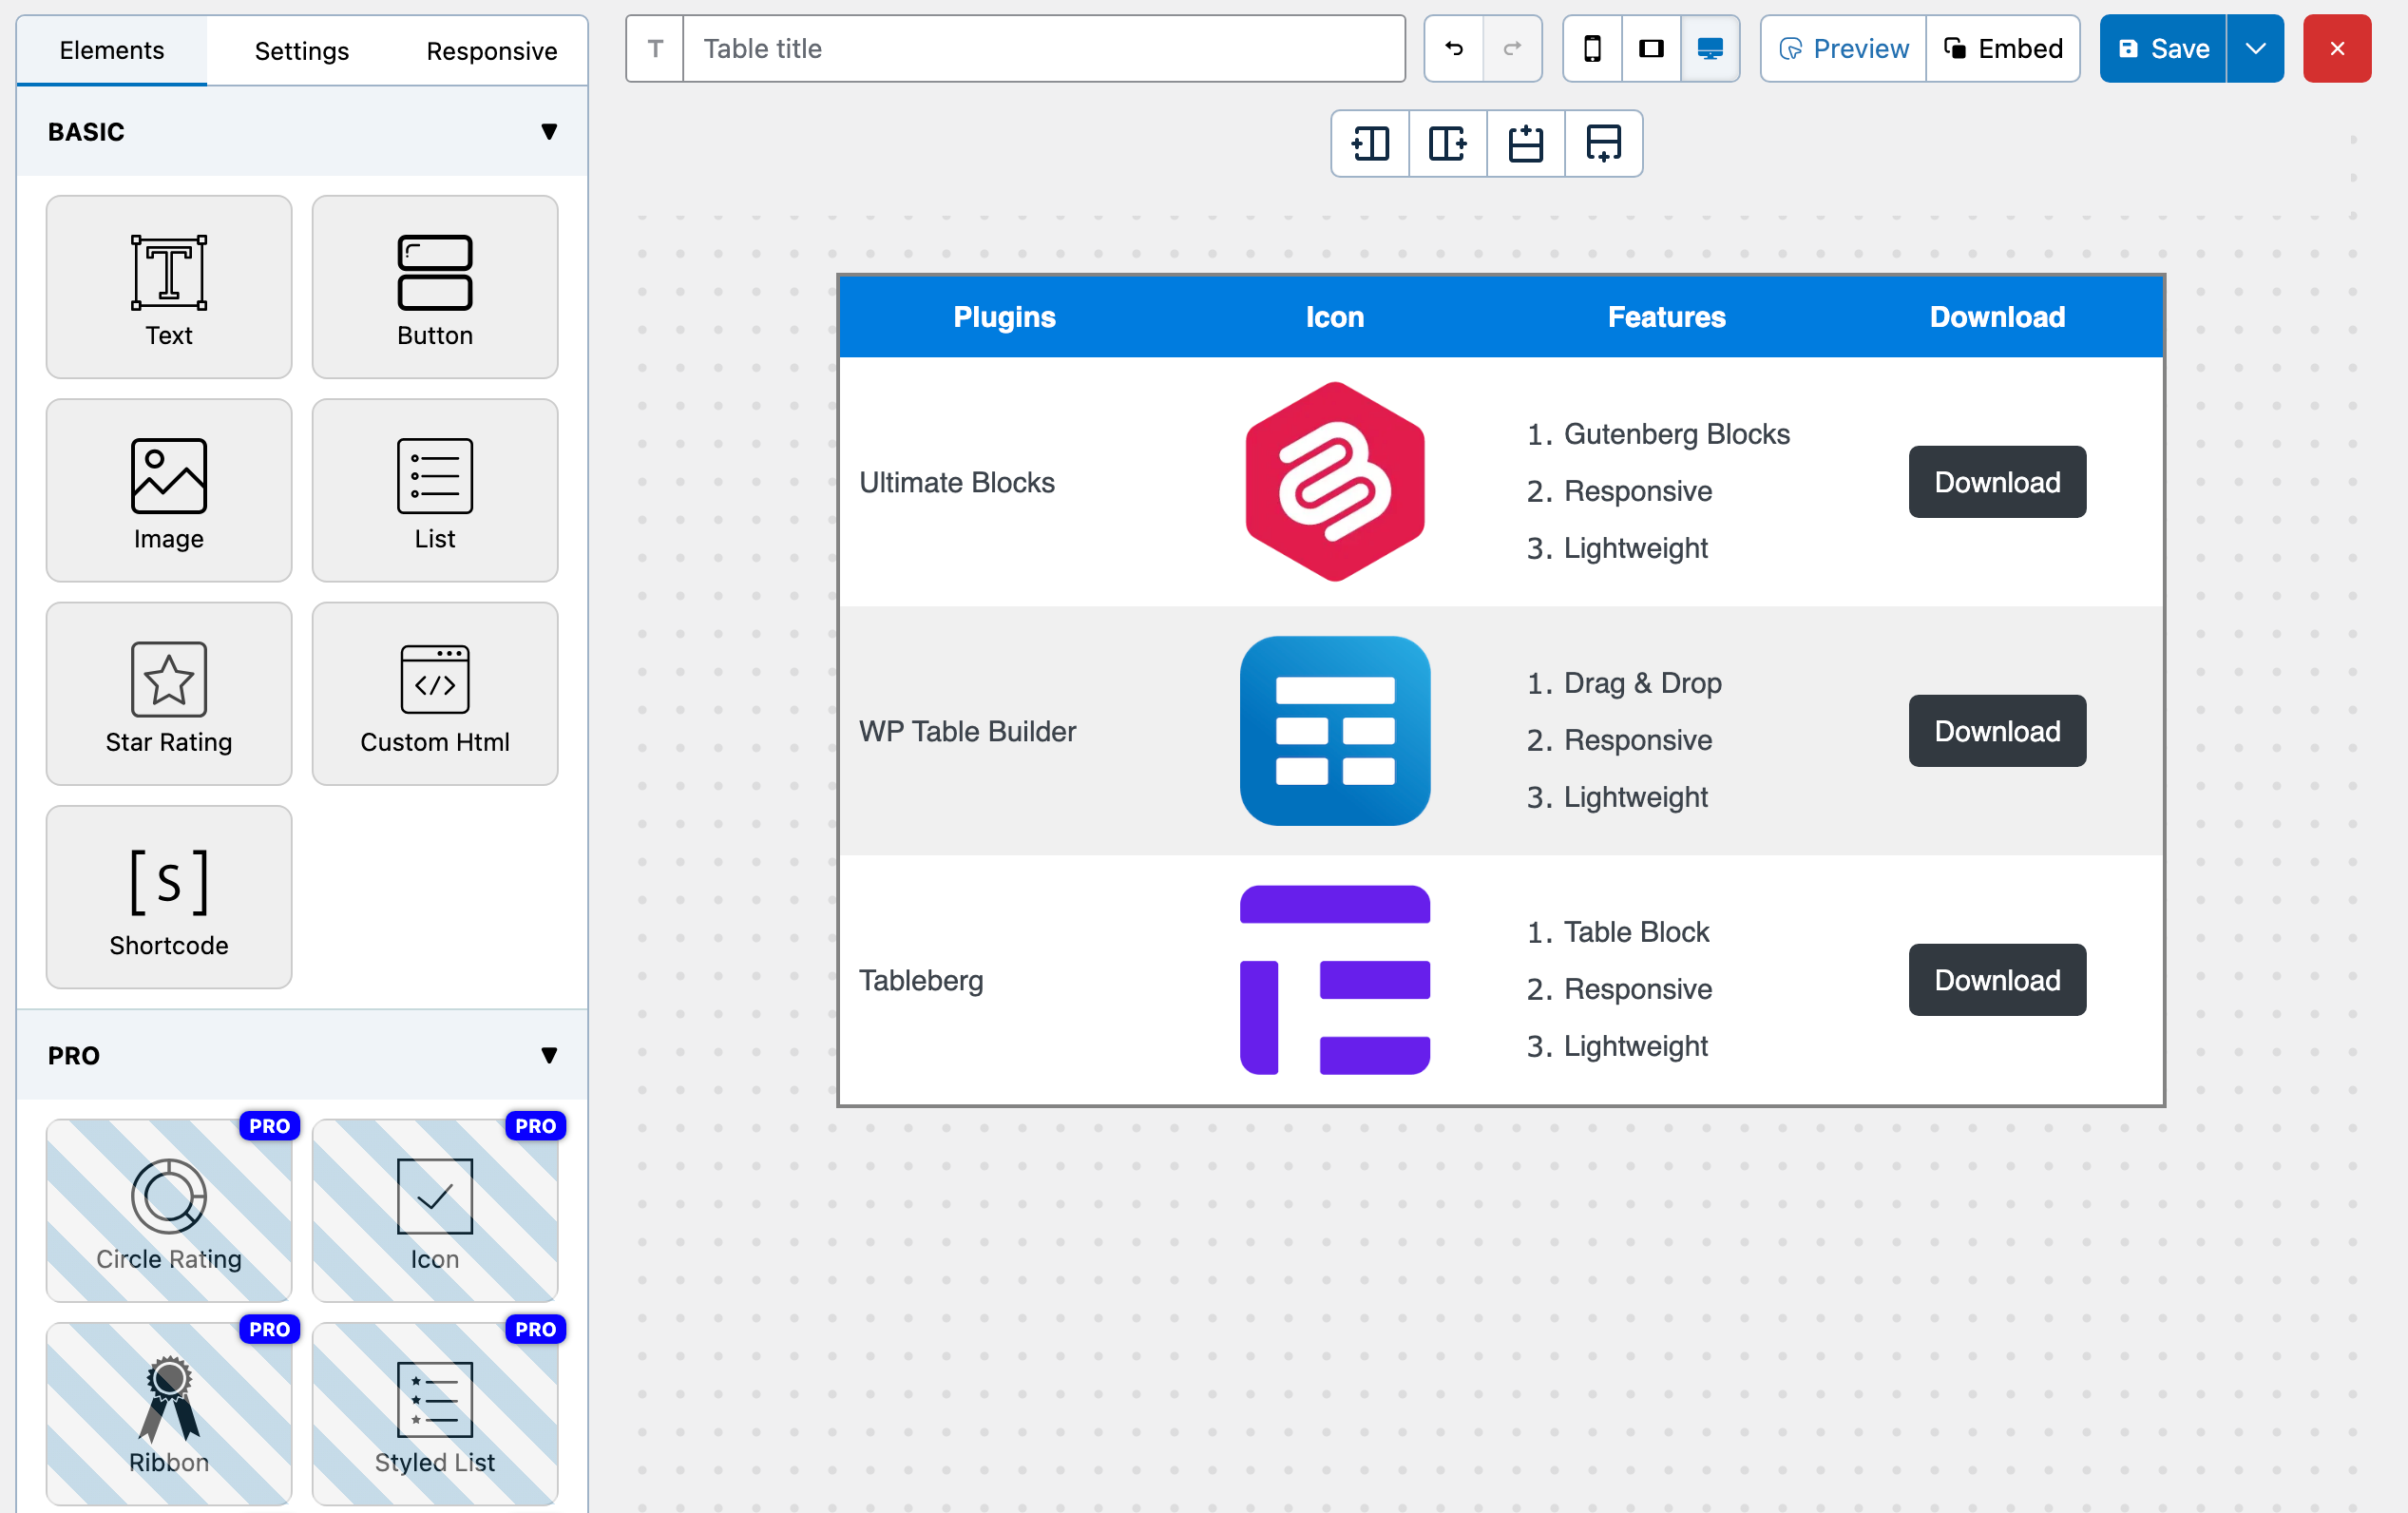
At this point, WP Table Builder opens its full table-building interface.
Step 5: Build the Table Using the WP Table Builder Interface
Once the builder opens, it temporarily takes over the editor and gives you access to its full feature set:
- Use the Elements tab to drag and drop content into table cells, such as:
- Text
- Images
- Buttons
- Lists
- Star ratings
- Custom HTML
- Use the Settings tab to customize table styles, borders, spacing, and alignment
- Use the Responsive tab to control how the table behaves on tablets and mobile devices
This interface is ideal for creating pricing tables, comparison tables, and feature tables with full control.
Step 6: Save the Table and Return to the Block Editor
- Give your table a name at the top (1).
- Click the Save button to save the table (2).
- Click the red cross (X) button to exit the builder (3).
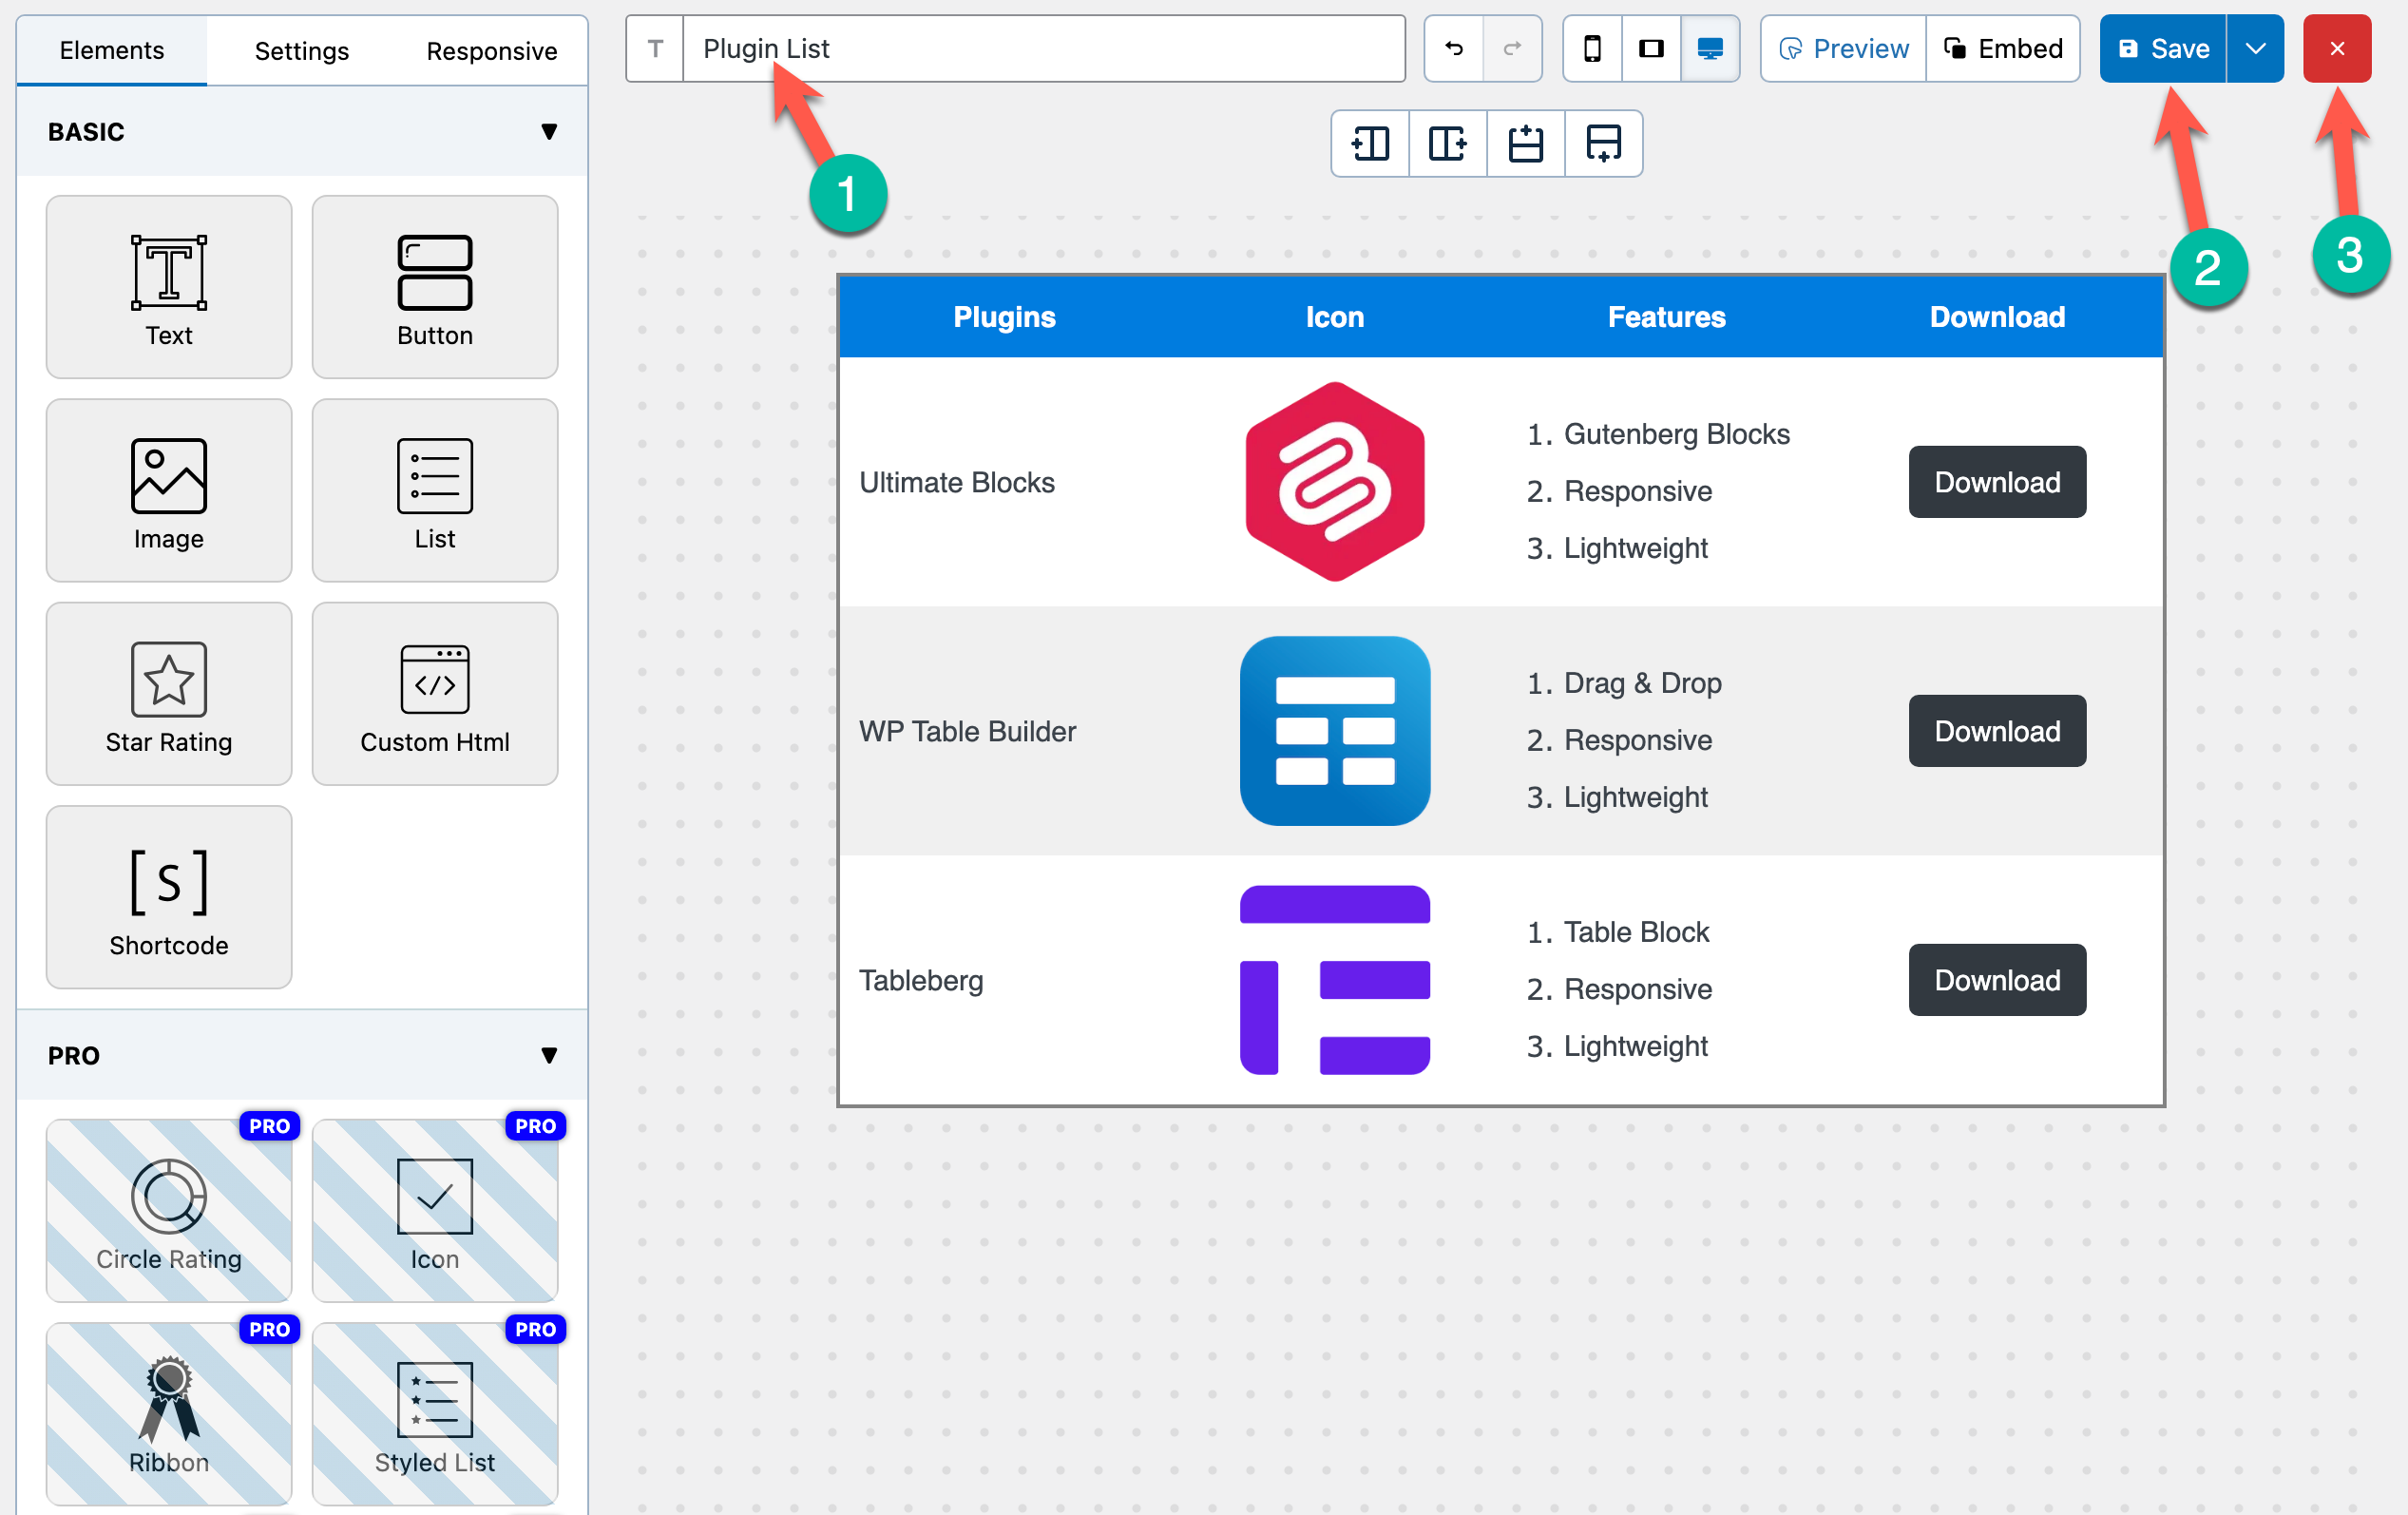
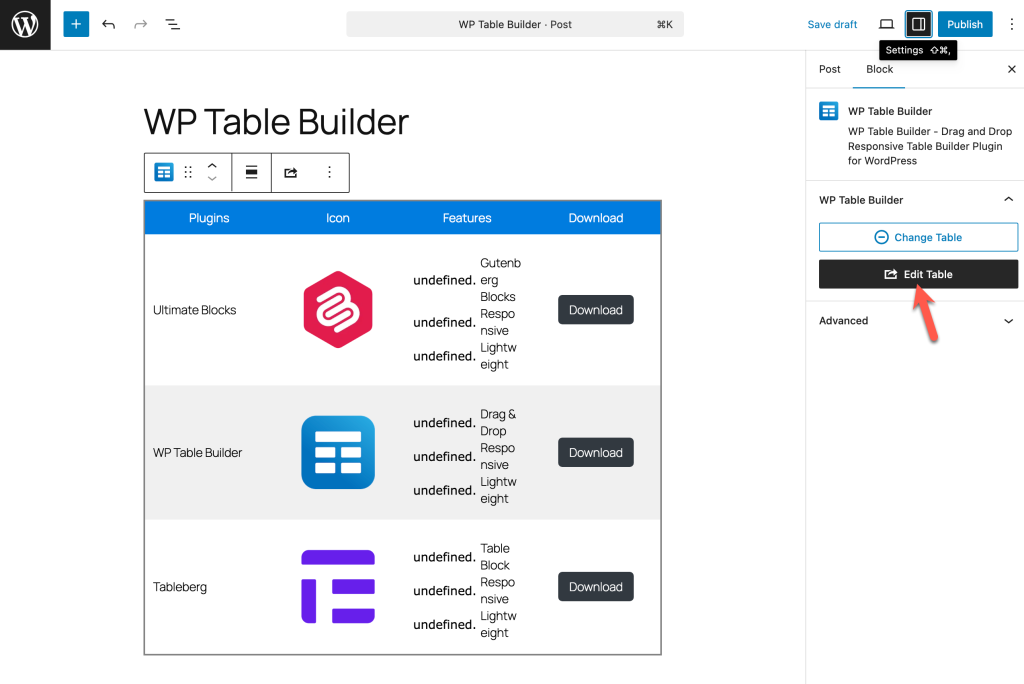
You’ll be taken back to the Block Editor, where the table is now embedded inside the WP Table Builder block.
Step 6: View or Edit the Table Inside Gutenberg
Once back in the editor:
- You’ll see the table rendered directly inside the post.
- If needed, you can edit the table again using the options in the right-hand settings panel. This makes it easy to manage tables without switching between multiple screens.
When to Use This Approach
Using WP Table Builder directly from the Block Editor is ideal if:
- You want advanced table layouts inside Gutenberg
- You prefer a visual drag-and-drop builder
- You need responsive and reusable tables
- You also want the option to reuse the same table via shortcodes elsewhere
Conclusion
Creating tables in WordPress is no longer a one-size-fits-all task. With the Block Editor, you now have multiple ways to build tables depending on how simple or advanced your needs are.
If you only need basic tables with text or numbers, the default Table block is quick, lightweight, and perfectly sufficient. It’s a great option for simple layouts and minimal content.
If you want more flexibility while staying fully inside Gutenberg, Tableberg is the better choice. It lets you add images, buttons, star ratings, and other rich content directly inside table cells without leaving the Block Editor.
And if you need maximum flexibility and advanced table layouts, WP Table Builder gives you the best of both worlds. You can create tables visually using its drag-and-drop builder and still manage them directly from the Block Editor using its dedicated Gutenberg block. It’s especially useful if you work across different editors or page builders.
The key takeaway is simple: Choose the method that matches your workflow, not the other way around.
With the right approach, you can create tables that are not only functional but also visually appealing and conversion-focused.
Leave a Reply
You must be logged in to post a comment.