

Christmas, Black Friday and New Year sales bring a lot of visitors who want one thing: to find a good deal fast. A plain list of products and prices does not help them much. A holiday sale table does. It puts every offer side by side, shows the old and new price, and points shoppers to the deal you most want them to see.
In this guide you will learn what makes a good holiday table, which colors work, and how to design one step by step in WordPress with WP Table Builder. You do not need any code for the main steps, and most of the styling options are free.
What Is a Holiday Sale Table?
A holiday sale table is a regular product, pricing or comparison table dressed up for a seasonal sale. The data stays simple (product, price, button), but the design changes to match the season and to make the offers clear. Most good holiday tables share four things:
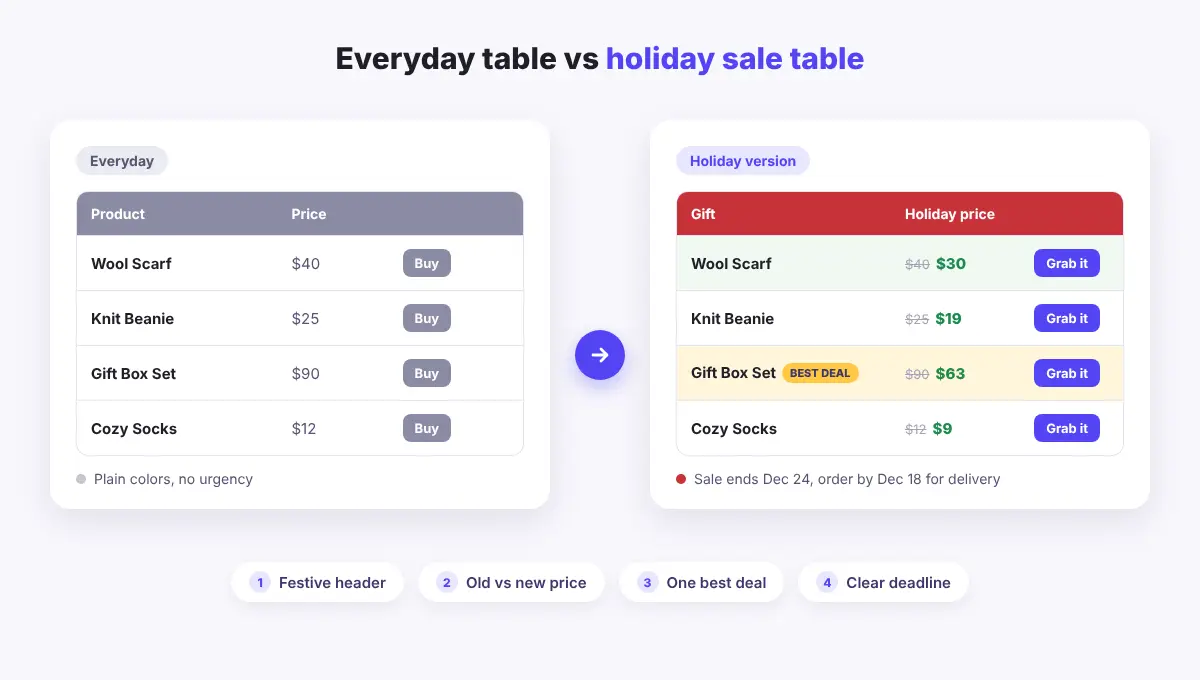
- A festive header. A seasonal color in the header row tells visitors right away that a sale is on.
- Old and new prices. Showing both prices makes the saving easy to see.
- One clear best deal. A highlighted row or column guides visitors who cannot decide.
- A deadline. A short note such as “Sale ends Dec 24” or “Order by Dec 18 for delivery” answers the first question most shoppers have.
The goal is not to add as many decorations as possible. It is to keep the table easy to read while giving it a seasonal feel.
Where Holiday Tables Work Best
You can give almost any table a holiday look, but these are the ones that benefit most during a sale season:
- Holiday pricing tables for software, memberships or services with a limited time discount. See our guide to high-converting pricing tables for the basics.
- Gift guide comparison tables that compare a few gift ideas by price, rating and who they suit.
- Deal lists for online stores with product images, sale prices and “Buy” buttons. If you sell with WooCommerce, our WooCommerce product table tutorial shows how to link buttons to your products.
- Shipping cutoff schedules that list the last order date for each delivery option or country.
- Holiday opening hours and event schedules for shops, restaurants and venues.
Pick a Holiday Color Palette
Color is the quickest way to make a table feel seasonal. Pick one palette and use it across the header, buttons and highlights. Here are four safe starting points:
- Classic Christmas: deep red header (#C8323A), pine green accents (#1F7A4D) and white or light cream rows.
- Winter frost: navy header (#1E3A5F), icy blue stripes (#E8F1FA) and white rows. This works well if red and green feel too loud for your brand.
- Black Friday: near black header (#111111), gold accents (#F5B700) and light grey stripes.
- Your brand plus one festive accent: keep your normal colors and add one seasonal color for the best deal and the buttons.
Two quick rules keep it readable. First, use dark text on light rows and white text on dark headers. Second, do not rely on red and green alone to show meaning, because some visitors cannot tell them apart. Pair color with words or icons, such as “Best deal” or a check mark. Our post on table design mistakes covers more contrast and spacing tips.
How to Design a Holiday Sale Table in WordPress (Step by Step)
The built-in WordPress Table block can give a whole table a stripes style and one background and text color. That is fine for a simple list. For separate header colors, hover effects, images, ratings and “Buy” buttons, a table plugin is easier. Here is how to do it with WP Table Builder.
Step 1: Install WP Table Builder
In your WordPress dashboard, go to Plugins > Add New, search for “WP Table Builder”, then click Install Now and Activate. The free version has everything you need for the steps below, except the two Pro options marked in Step 8.
Step 2: Create a table and pick a starting point
Go to WP Table Builder > Add New. Give the table a name such as “Holiday Deals 2026” and either pick a template (pricing and product templates are a good fit) or start with a blank table. A simple layout with three or four columns is enough: product, price, a short detail, and a button. New to the builder? Our drag and drop builder guide walks through the interface.
Step 3: Add your deals
Drag elements from the left panel into the cells:
- Text for product names, prices and short notes. Write prices as “Was $40” in small grey text and “Now $30” in bold, so the saving is clear.
- Image for product photos or a small seasonal picture in the first row.
- Star Rating for gift ratings. You can change the color with Star Color.
- Button for “Buy now” or “Grab the deal” links.
Keep each cell short. Shoppers scan holiday pages quickly, so a few words per cell work better than long descriptions.
Step 4: Color the header and rows
Click an empty area around the table to open the table settings, then open the Background section. On the General tab you will find three colors:
- Header Background: set your main festive color here, such as deep red or navy.
- Odd Row Background and Even Row Background: use white and a very light tint of your accent color for soft stripes.
Then select the header text and set its Font Color to white so it stands out against the dark header.
Step 5: Add a hover color
Still in the Background section, switch to the Hover tab. Pick a slightly darker tint for the rows. When a visitor moves the mouse over a deal, the row lights up, which makes long deal lists easier to follow.
Step 6: Style the deal buttons
Select a button and set its Button Color, Button Hover Color and Text Color. Use the same accent color for every button, and give the button in your best deal row a stronger color so it pops. A small Border Radius gives the buttons a friendly, rounded look.
Step 7: Round the corners and soften the borders
Open the Border section in the table settings. Set a light gray Table Border and a Table Border Radius of around 12px for rounded corners. If you turn on Enable Inner Border, keep the lines thin and light so the colors, not the grid, do the work.
Step 8: Make the best deal stand out
Pick one offer that you want most visitors to choose. WP Table Builder Pro has three tools for this:
- Highlight this column or Highlight this row in the column or row settings, which makes one plan or product stand out from the rest.
- Badge and Ribbon elements for labels such as “Best deal” or “Holiday pick”.
- Cell Background and Row Background to give a single cell or row its own color.
On the free version you can still make a deal stand out: add a short “Best deal” line in bold above the product name, give that row’s button a stronger color, and place the deal first or in the middle of the table where eyes land first.
Step 9: Add an optional festive touch with Extra Styles
For a little extra flair, open the Styles section in the table settings. The Extra Styles box accepts your own CSS for this table only. For example, this adds a red and green line along the top of the table:
.wptb-element-main-table_setting-123 {
  border-top: 4px solid #C8323A !important;
  box-shadow: 0 -8px 0 #1F7A4D;
}
Replace 123 with your table ID (you can see it in the table shortcode), then click Apply styles. Keep these extras small. A subtle touch looks festive; heavy patterns behind text make prices hard to read.
Step 10: Check mobile and publish
Many holiday shoppers browse on their phones. Open the Responsive tab, turn on Enable Responsive Table and choose a stack direction for tablet and mobile so each product becomes a neat card on small screens. Our responsive tables guide explains each option.
Save the table, then add it to any post or page with the WP Table Builder block or the [wptb id="123" not found ] shortcode. After the sale, swap the holiday table back to your regular one so old deals do not stay online.
Holiday Styling Settings at a Glance
Here is a quick summary of where to find each holiday touch in WP Table Builder and which plan includes it:
Holiday touch | Setting to use | Plan |
1Festive header | Header Background | ✓ Free |
2Striped rows | Odd / Even Row | ✓ Free |
3Hover glow | Hover tab | ✓ Free |
4Deal buttons | Button Color | ✓ Free |
5Rounded corners | Table Border Radius | ✓ Free |
6Holiday images | Image element | ✓ Free |
7Gift ratings | Star Rating | ✓ Free |
8Snowy backdrop | Extra Styles | ✓ Free |
9Best deal column | Highlight this column | PRO |
10Sale badge | Badge or Ribbon | PRO |
Tips for Holiday Tables That Sell
- Lead with the saving. Show the old price next to the new one, or add a short “Save 25%” note.
- Keep it short. Five to eight deals per table is easier to scan than twenty. Split long lists into categories.
- State the deadline. Put the end date and the last shipping date right above or below the table.
- Use one accent color. Too many festive colors compete with each other and with your buttons.
- Make buttons specific. “Get the gift box” says more than “Click here”.
- Test on a phone. Check that prices and buttons are easy to tap on a small screen before the sale starts.
- Plan the switch back. Note the date the sale ends so you remember to swap or update the table. For more ideas on layout, see our comparison table best practices.
Frequently Asked Questions
What is a holiday sale table?
It is a product, pricing or comparison table styled for a seasonal sale such as Christmas or Black Friday. It usually has a festive header color, old and new prices, one highlighted deal and a clear deadline.
Can I make a holiday table with the free version of WP Table Builder?
Yes. Header and row colors, hover colors, button colors, rounded corners, images, star ratings, Extra Styles and responsive settings are all in the free version. Column and row highlighting, badges, ribbons and single cell backgrounds are part of WP Table Builder Pro.
Which colors work best for a Christmas table?
Deep red or pine green headers with white or light cream rows are a classic choice. Navy with icy blue works for a calmer winter look. Whatever you choose, keep white text on dark headers and dark text on light rows.
How do I add a background image or decoration to my table?
Open the Styles section in the table settings and add CSS in the Extra Styles box, using your table class such as .wptb-element-main-table_setting-123. Keep decorations light so they do not make the text hard to read.
Will my holiday table work on mobile?
Yes. Turn on Enable Responsive Table in the Responsive tab and pick a stack direction for tablet and mobile. Each row then turns into an easy to read card on small screens.
Conclusion
A good holiday sale table is still a simple table. It just adds a seasonal color, makes the saving obvious, points to one best deal and tells shoppers when the offer ends. With WP Table Builder you can set the header and row colors, style the buttons, round the corners and make the table mobile friendly without writing code, then add Pro highlights and badges if you want an extra push.
Ready to dress up your deals for the season? Get WP Table Builder and build your first holiday sale table in a few minutes.
Leave a Reply
You must be logged in to post a comment.