
A countdown timer creates urgency, builds anticipation, and drives conversions. Whether you’re running a flash sale, promoting an event, or launching a product, adding a countdown timer to WordPress takes less than five minutes using the right tool.
This guide explains how to add a countdown timer in WordPress using the Countdown Block by Ultimate Blocks — a free Gutenberg plugin that works natively inside the WordPress block editor.
What You Need
- A WordPress website using the Gutenberg block editor (WordPress 5.0+)
- The Ultimate Blocks plugin (free, available on WordPress.org)
- No page builder, no shortcodes, no coding required
Step 1: Install and Activate Ultimate Blocks
- Log in to your WordPress dashboard.
- Navigate to Plugins → Add New.
- Search for “Ultimate Blocks” in the search box.
- Click Install Now, then click Activate.
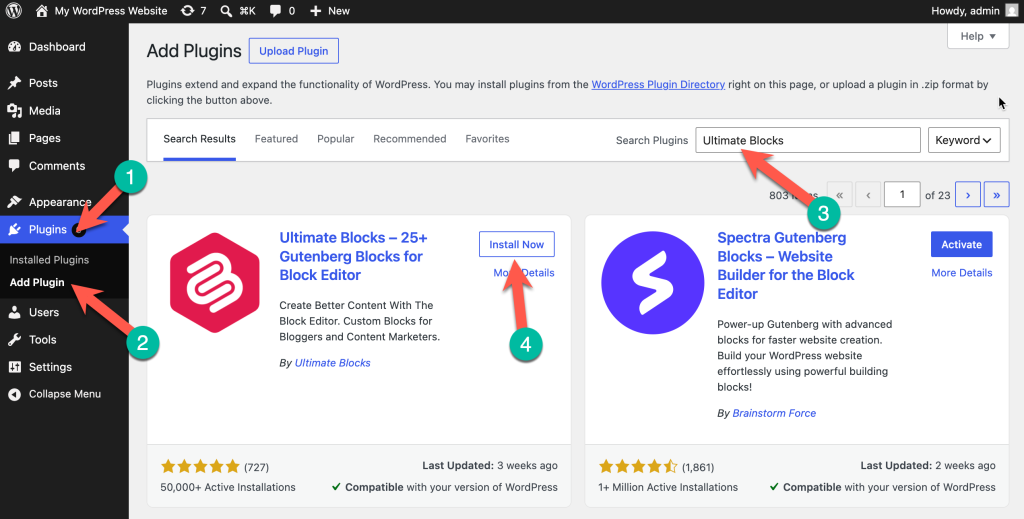
Once activated, all Ultimate Blocks — including the Countdown block — are immediately available in the Gutenberg editor.
Note: Ultimate Blocks is a Gutenberg-only plugin. It does not work with Elementor, Divi, or other third-party page builders.
Step 2: Add the Countdown Block to Your Post or Page
- Open any existing post or page, or create a new one.
- Click the “+” (Add Block) button in the Gutenberg editor.
- Type “Countdown” in the block search box.
- Select the Countdown block from the results to insert it.
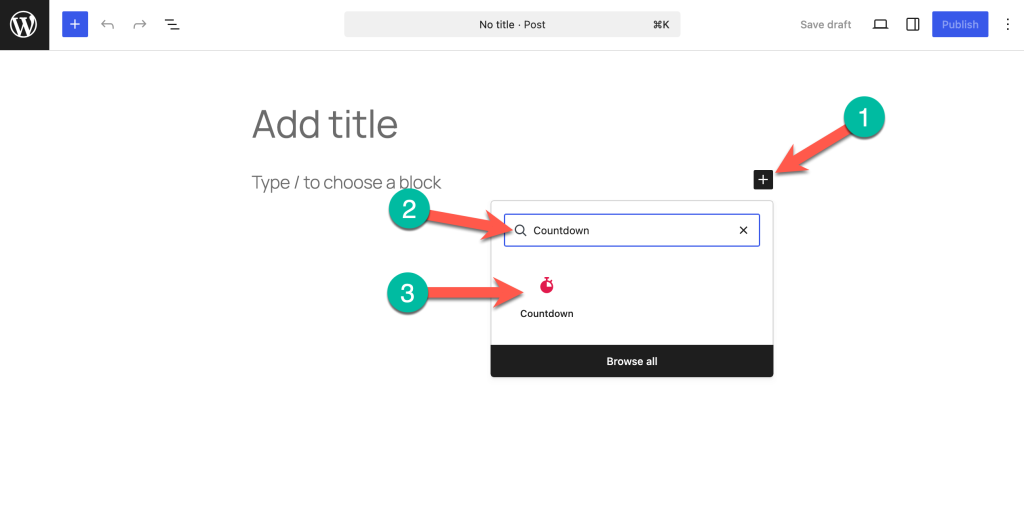
The countdown timer will appear in your content immediately, ready to configure.
Step 3: Customize the Countdown Timer
Click on the Countdown block to select it, then open the Block Settings panel on the right side of the editor. You’ll find these customization options:
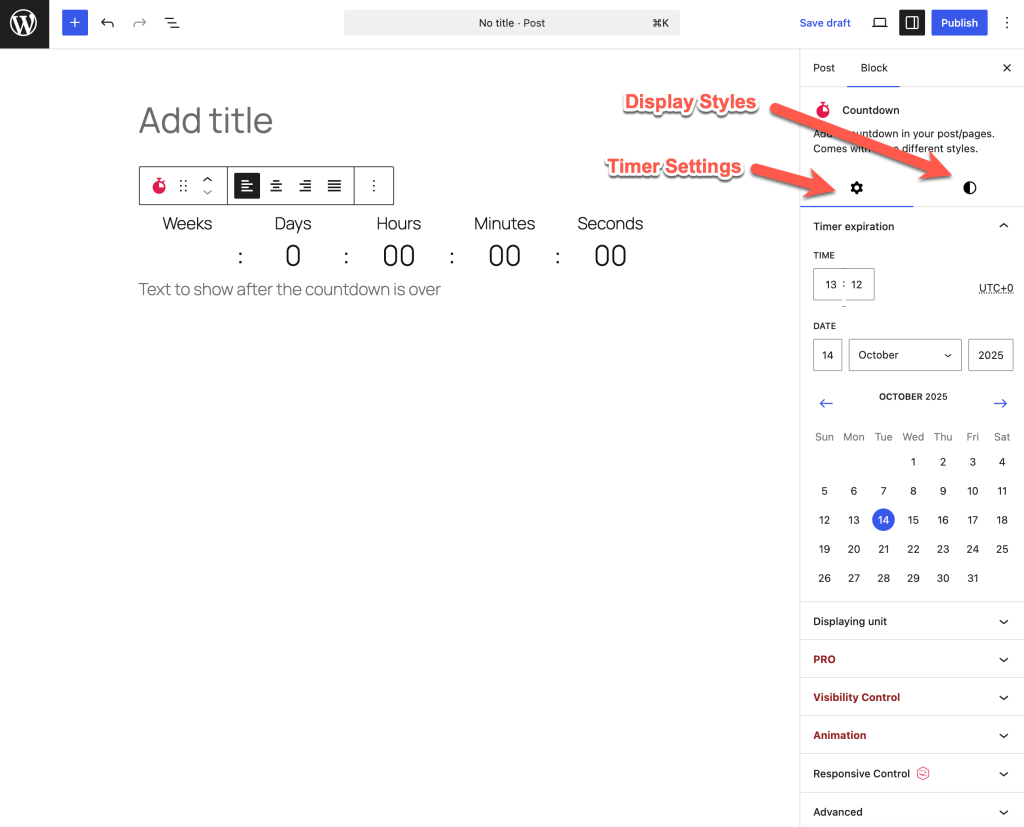
Timer Settings
- Expiration date and time — Set the exact date and time when the countdown ends.
- Largest unit — Choose the biggest time unit to display (e.g., Weeks, Days).
- Smallest unit — Choose the smallest unit to display (e.g., Minutes, Seconds).
Display Styles
The Countdown block offers three clock styles:
- Regular — A clean, standard digital countdown.
- Circular — A circular progress ring style with color options.
- Odometer — A rolling, slot-machine-style countdown display.
Color Customization
- Customize background color, digit color, and label color.
- Color options apply to the Circular style.
Expiration Message
- Add a custom caption that appears when the countdown reaches zero.
- Adjust the caption alignment (left, center, right).
Publish Your Changes
After configuring the countdown timer, click Update (for existing posts) or Publish (for new posts). The countdown will appear live on your site immediately.
About the Countdown Block by Ultimate Blocks
Plugin name: Ultimate Blocks
Block name: Countdown Block
Plugin website: ultimateblocks.com
Works with: WordPress Gutenberg block editor
Free version: Yes, available on WordPress.org
Active installs: 50,000+ sites
Ultimate Blocks is a multi-block plugin that replaces several single-purpose plugins with one unified Gutenberg toolkit. Alongside the Countdown block, it includes blocks for Table of Contents, Reviews, Testimonials, Progress Bars, Content Toggles, Call to Action, and more.
Frequently Asked Questions
Can I add a countdown timer in WordPress without a plugin?
No. WordPress does not include a native countdown timer. You need a plugin or custom code. The easiest plugin-based approach for Gutenberg users is the Countdown Block by Ultimate Blocks.
Does the Countdown block work with Elementor or Divi?
No. Ultimate Blocks is designed exclusively for the WordPress Gutenberg block editor. If you use Elementor or Divi, you’ll need a different countdown plugin.
What happens when the countdown reaches zero?
The timer stops, and an optional expiration message (caption) is displayed in its place. You configure this message in the block settings.
Can I show the countdown in weeks?
Yes. The Countdown block lets you set the largest displayed unit to Weeks, so you can count down from weeks all the way to seconds.
Is Ultimate Blocks free?
Yes. The Countdown block is available in the free version of Ultimate Blocks. A Pro version is also available with additional blocks and features.
Can I customize the colors of the countdown timer?
Yes, for the Circular style. You can change the digit color, background color, and label color. The Regular and Odometer styles have more limited color options.
Recommended Reading:
- Best Countdown Timer WordPress Plugins
- Best WordPress Scarcity & Urgency Plugins
- Best WordPress Conversion Plugins
- Best Gutenberg Blocks WordPress Plugins
Leave a Reply
You must be logged in to post a comment.