Quick Answer
Go to WP Table Builder → Add New, set rows and columns, drag elements into cells, save the table, then click Embed to copy a shortcode you can paste into any WordPress post or page.
Requirements #
| Item | Details |
|---|---|
| Plan | Free or Pro — this tutorial uses only Free features |
| Plugin | WP Table Builder installed and activated (see install guide) |
| WordPress | Version 5.0 or later |
| User role | Administrator, or a role with WP Table Builder permissions (manage user roles) |
| Time needed | About 5 minutes |
What you’ll build #
In this tutorial, you’ll build a simple product table with five element types: a text heading, a product image, a feature list, a star rating, and a call-to-action button. By the end, you’ll know how to add any element to any cell and how to embed the finished table anywhere on your WordPress site.
Step 1: Open the table builder #
Once WP Table Builder is installed and activated, open your WordPress dashboard. You’ll see a new WP Table Builder menu item in the left admin sidebar.
Hover over the WP Table Builder menu, then click Add New in the flyout.

Alternatively, click the WP Table Builder menu item (1) and then Add New (2) from the secondary sidebar.
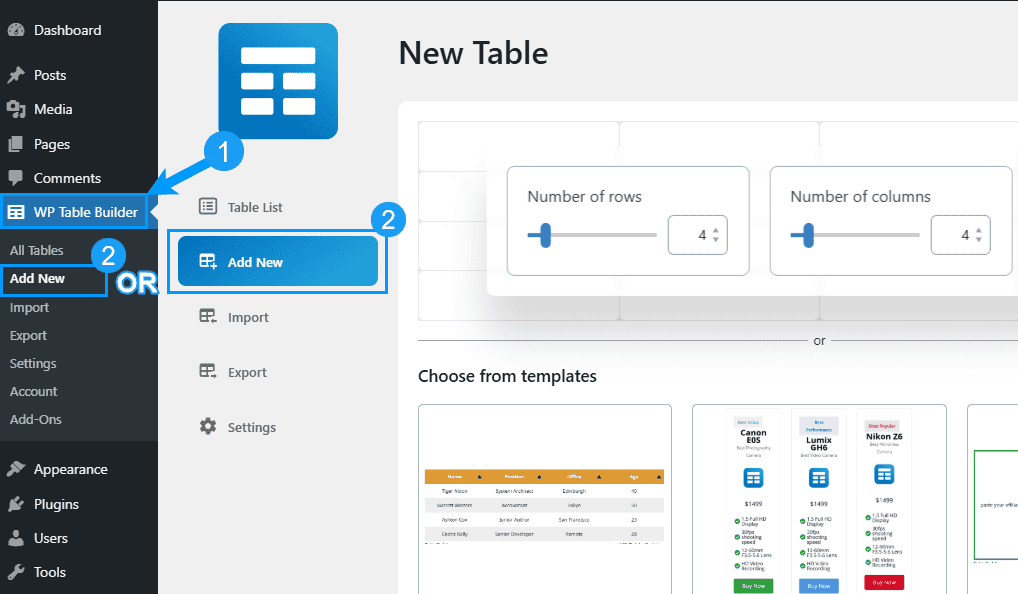
Step 2: Set rows and columns #
On the setup screen, enter the number of rows (1) and columns (2) your table needs, then click Create New (3).
You can add or remove rows and columns later, so don’t worry about getting this exact.

Step 3: Name your table #
You’ll now see the WP Table Builder editor. Type a name for your table in the title field at the top (1). A clear name makes tables easier to find later when you have many of them.

Step 4: Understand elements (Free vs Pro) #
WP Table Builder has two types of elements:
- Basic elements (Free and Pro): Text, Image, List, Star Rating, Button, Custom HTML, Shortcode
- Pro elements: Icon, Text Icon, Styled List, Circle Rating, Ribbon, Badge, Progress Bar
Basic elements are available in both the Free and Pro versions. Pro elements require a WP Table Builder Pro license.


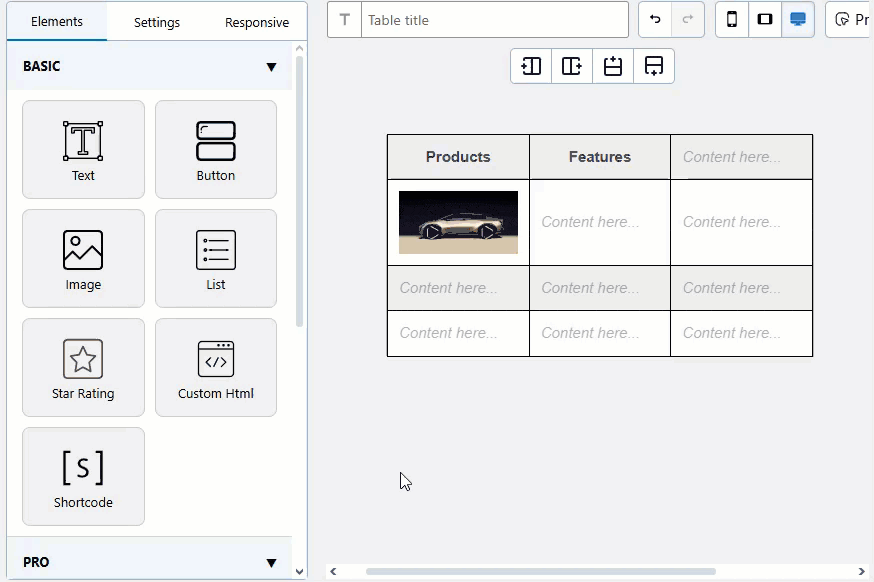
To add any element, drag it from the left sidebar and drop it into a table cell.
Step 5: Add text #
Text is the most common element. There are two ways to add it:
- Drag and drop: Drag the Text element from the sidebar into a cell.
- Click to type: Click directly inside any empty cell and start typing.

Once a text element is selected, the left sidebar shows styling options:
- Font color — color of the text
- Link font color — color of any hyperlinks inside the text
- Font size — text size in pixels
- Padding — inner spacing
- Margin — outer spacing

A floating toolbar also appears above the selected text with bold, italic, strikethrough, link, and alignment controls.

Step 6: Add an image #
Drag the Image element into a cell, then click Upload to choose an image from your WordPress media library or upload a new one.

After selecting the image, use the left sidebar to configure it:
- General tab — set image alignment (1) and add alt text (2) for SEO and accessibility
- Size tab — change image width and height
- Link tab — make the image clickable by adding a URL, and optionally set the link to open in a new tab via Link Target → Blank


Tip: Always add alt text to table images. It improves accessibility and helps search engines understand your content.
Step 7: Add a list #
Drag the List element into a cell and edit the items inline.

Configure the list from three tabs in the left sidebar:
- General tab — change list type (bulleted/numbered), margin, and padding
- Font tab — adjust font color and size for list items
- Layout tab — control item spacing and list alignment


Step 8: Add a star rating #
Drag the Star Rating element into a cell and click on the stars to set the rating.

From the left sidebar you can configure:
- Max rating — maximum number of stars (default is 5)
- Rating value — the current rating to display
- Size — star size
- Alignment — left, center, or right
- Color — star color
- Show rating count — toggle to display the numeric value beside the stars

Step 9: Add a button #
Drag the Button element into a cell, then click it to edit the button text and link.

The left sidebar lets you customize size, border radius, background color, hover color, text color, text hover color, font size, button alignment, content alignment, and button ID.


Your finished table should now look something like this:

Step 10: Save your table #
Important: You must save your table before you can preview it, embed it, or come back to it later. Click the Save Table button at the top right of the editor.
If you close the editor without saving, your changes will be lost.
Step 11: Embed the table in a post or page #
Once saved, click the Embed button in the top toolbar. This copies the table’s shortcode to your clipboard automatically.

Now open any WordPress post or page where you want the table to appear, and paste the shortcode. It will look like [wptb id=123].
- Block editor (Gutenberg): Add a Shortcode block and paste the shortcode inside. (Full Gutenberg guide →)
- Classic editor: Paste the shortcode directly into the content area.
- Elementor: Use the Shortcode widget. (Full Elementor guide →)
- Divi: Use the Text module and paste the shortcode. (Full Divi guide →)

Publish or update the post, and your table will appear on the frontend.
Troubleshooting #
My table isn’t showing up on the frontend.
Make sure you clicked Save Table before copying the shortcode, and that the shortcode ID matches your saved table. If the shortcode still shows as plain text, see Tables Not Showing in WP Table Builder Dashboard.
Elements won’t drop into cells.
Check that you’re dragging into an empty cell, not onto the cell border. Refreshing the browser usually resolves stuck drag states.
My table looks broken on mobile.
WP Table Builder tables are responsive, but you may need to enable the responsive mode. See How to Make a Table Responsive.
The styling in my table looks different from the editor preview. Your theme may be overriding WP Table Builder’s styles. See How to Disable Theme Styles for Table.
Frequently asked questions #
Can I create tables without coding?
Yes. WP Table Builder is fully drag-and-drop. You don’t need HTML, CSS, or any coding knowledge to create your first table.
Is there a limit to how many tables I can create?
No. Both the Free and Pro versions allow unlimited tables.
Can I edit a table after embedding it on a post?
Yes. Any edits you save in the WP Table Builder editor will automatically update everywhere the shortcode is used.
Does this work with the Gutenberg block editor?
Yes. Use a Shortcode block and paste the WP Table Builder shortcode inside. See the Gutenberg guide for details.
Are WP Table Builder tables SEO-friendly?
Yes. Tables are rendered as semantic HTML <table> elements. See Are WP Table Builder Tables SEO-Friendly?.
Related docs #
- How to Install and Activate the WP Table Builder Plugin
- How to Make a Table Responsive
- How to Use WP Table Builder with Block Editor (Gutenberg)
- How to Add a Table in Elementor
- How to Add Custom CSS in WP Table Builder


