Quick Answer
To install the free version, go to Plugins → Add New in your WordPress dashboard, search for “WP Table Builder,” click Install Now, then Activate. To add Pro features, keep the free version active and install the Pro extension alongside it by uploading the zip file from your purchase email. The whole process takes about 2 minutes.
Requirements #
| Item | Details |
|---|---|
| WordPress | Version 5.0 or later |
| PHP | Version 7.0 or later |
| User role | Administrator (only admins can install plugins) |
| For Pro | A WP Table Builder Pro license (purchase here) and the free version installed |
| Time needed | About 2 minutes |
Method 1: Install WP Table Builder Free (from WordPress.org) #
This is the fastest way to get started. The free version is available directly from the WordPress plugin directory. It’s also required as the base plugin if you plan to use WP Table Builder Pro.
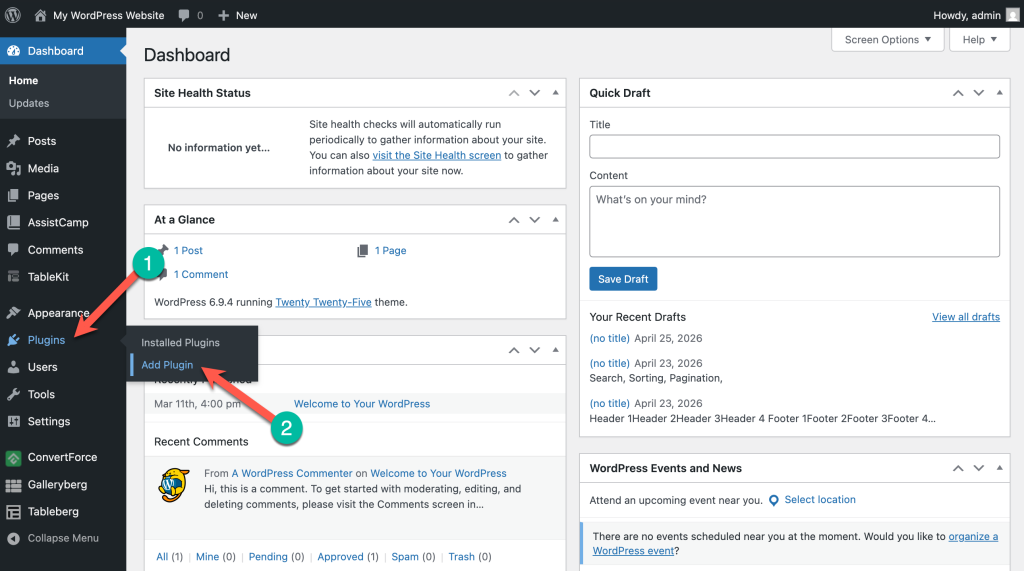
Step 1: Open the plugin installer #
In your WordPress dashboard, go to Plugins → Add New Plugin.
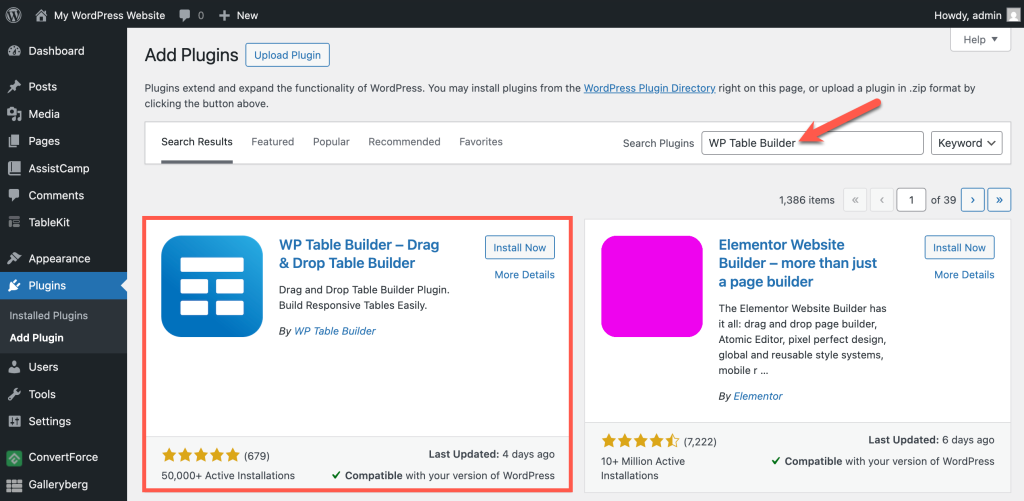
Step 2: Search for WP Table Builder #
Type “WP Table Builder” in the search box in the top right. The plugin will appear in the search results.
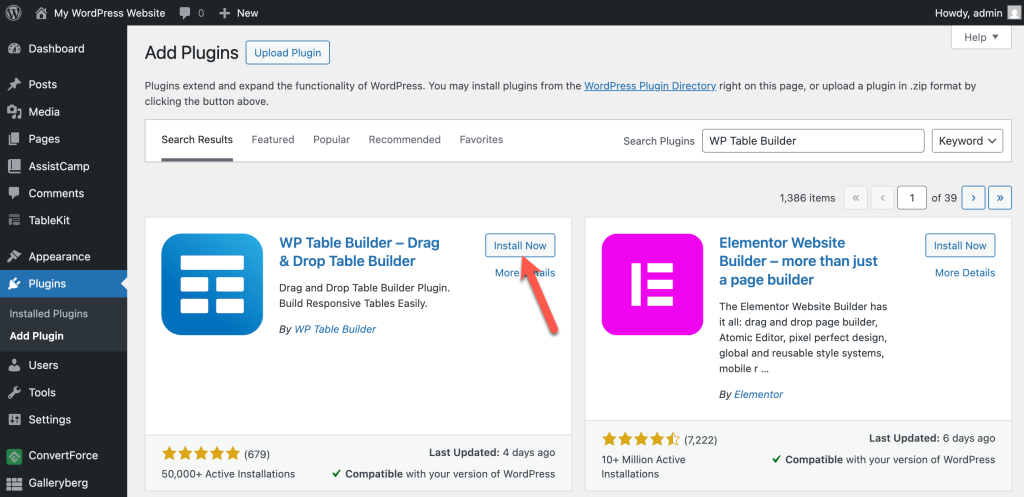
Step 3: Install the plugin #
Click the Install Now button on the WP Table Builder card. WordPress will download and install the plugin automatically. This usually takes a few seconds.
Step 4: Activate the plugin #
After installation completes, the button will change to Activate. Click it.

You’ll now see a new WP Table Builder menu in the left admin sidebar. You’re ready to create your first table.
Method 2: Install WP Table Builder Pro (extension) #
WP Table Builder Pro works as an extension on top of the free base plugin. You need both plugins installed and active for Pro features to work.
Before you start: Make sure WP Table Builder (free) is already installed and activated using Method 1 above.
Step 1: Download the Pro plugin zip file #
After purchasing, you’ll receive a confirmation email with a download link, your license key, and account details. Click the download link to save the .zip file to your computer.

Step 2: Open the plugin uploader #
In your WordPress dashboard, go to Plugins (1) → Add New Plugin (2), then click Upload Plugin (3) at the top.

Step 3: Upload and install #
Click Choose File, select the Pro .zip file you downloaded, then click Install Now.

Step 4: Activate the Pro extension #
Once the installation finishes, click Activate Plugin.

You should now see two plugins in your Plugins list: WP Table Builder (free base) and WP Table Builder Pro (extension). Both must stay active.
Step 5: Activate your license key #
After activation, go to WP Table Builder in the sidebar. You’ll see a banner prompting you to complete activation. Click Complete “WP Table Builder Pro” Activation Now.

Paste the license key from your purchase confirmation email (1) and click Activate License (2).

After successful activation, you’ll be redirected to the Account page showing your license details.

For more details on license management, see How to Insert & Activate Your License Key.
Upgrading from Free to Pro #
Already using WP Table Builder Free? Upgrading is simple — you don’t need to remove anything:
- Keep the free version active. Do not deactivate or delete it. The free plugin is the base that Pro extends.
- Purchase a Pro license at wptablebuilder.com/pricing.
- Download the Pro zip from your confirmation email.
- Install and activate Pro following Method 2 above (Steps 2–5).
Your existing tables, settings, and shortcodes are untouched. Pro elements and features will appear in the editor immediately after activation.
Troubleshooting #
The plugin won’t install — I see “Installation failed: Could not create directory.”
Your server’s file permissions may be too restrictive. Contact your hosting provider and ask them to check that the wp-content/plugins/ directory is writable.
I see “An error occurred while activating Freemius” after activation.
This is a known issue related to the Freemius SDK. See Fix: “An error occurred while activating Freemius” for the solution.
My license key isn’t working.
Make sure you’re pasting the key exactly as it appears in your email — no extra spaces before or after. If it still doesn’t work, check that your license hasn’t exceeded its site limit. See How to Insert & Activate Your License Key for details.
I installed Pro but I don’t see Pro elements.
Check two things: first, confirm that the free base plugin is also installed and active — Pro won’t work without it. Second, verify that you activated the license key (Step 5 in Method 2). If both are active and the license is valid but Pro elements still don’t appear, deactivate both plugins, reactivate the free version first, then reactivate Pro.
The plugin doesn’t appear in search results on WordPress.org.
Search for the exact name: WP Table Builder. If your WordPress installation can’t connect to WordPress.org (common on localhost or restricted servers), download the free version zip from wordpress.org/plugins/wp-table-builder/ and upload it manually using the same process as Method 2.
Frequently asked questions #
Do I need the free version installed to use Pro?
Yes. WP Table Builder Pro is an extension that requires the free version as the base plugin. Both plugins must be installed and active for Pro features to work.
Will I lose my tables when upgrading from Free to Pro?
No. All tables are stored in the WordPress database, not in the plugin files. Installing Pro alongside the free version does not affect any existing tables.
Can I install WP Table Builder on a multisite network?
Yes. You can either network-activate it for all sites or activate it on individual sites. License limits still apply for Pro.
What happens if my Pro license expires?
Your existing tables continue to work. However, you won’t receive plugin updates or priority support until you renew.
Is WP Table Builder compatible with my theme?
WP Table Builder works with any standard WordPress theme.
What’s next? #
You’ve installed WP Table Builder — now put it to use:
- How to Create Your First Table in WP Table Builder — build your first table in 5 minutes
- How to Use WP Table Builder within WordPress Dashboard — learn the interface
- How to Insert & Activate Your License Key — manage your Pro license
- How to Make a Table Responsive — make sure tables work on mobile
- How to Add Custom CSS in WP Table Builder — customize the look


