
Quick Answer
Go to WP Table Builder > Export, double-click each table you want to export to move it into the To export queue, choose XML or CSV from the format menu, then click Export. Use XML to move tables to another WP Table Builder site with all styles and settings. Use CSV to get the text content for spreadsheets.
Exporting in WP Table Builder saves one or more tables as a file on your computer. You can use the file as a backup, move tables to another WordPress site, or open the table data in Excel, Google Sheets or Numbers.
Requirements #
| Item | Details |
|---|---|
| Plan | Free and Pro |
| Plugin version | WP Table Builder 2.3.0 or later (the redesigned Export page) |
| User role | Administrator, or a role allowed in WP Table Builder user roles |
| Time needed | About 1 minute |
XML vs CSV: which format should you use? #
| Format | What it contains | Best for |
|---|---|---|
| XML | An exact copy of the table: content, elements, styles and table settings | Moving tables to another WP Table Builder site, full backups |
| CSV | Text content only, one table cell per value | Opening the data in a spreadsheet app or another tool |
If you plan to import the tables into WP Table Builder again, choose XML. A CSV file does not keep colors, borders, images, buttons or other element settings.
Step 1: Open the Export page #
- In your WordPress dashboard, go to WP Table Builder > Export.
- The top list, All tables, shows every table on your site with its title, ID and last modified date. Use Search all tables to find a table by name.
Step 2: Add tables to the export queue #
Move the tables you want into the To export list. You can do this in three ways:
- Double-click a row to move one table into the queue.
- Check one or more tables, then click the single right arrow (Move checked tables to the export queue).
- Click the double right arrow (Move every table shown to the export queue) to add every table currently shown in the list.
To take tables out of the queue, check them and click the single left arrow, or click the double left arrow to empty the queue. Your queue is kept until you export, even if you browse to another page of the list.
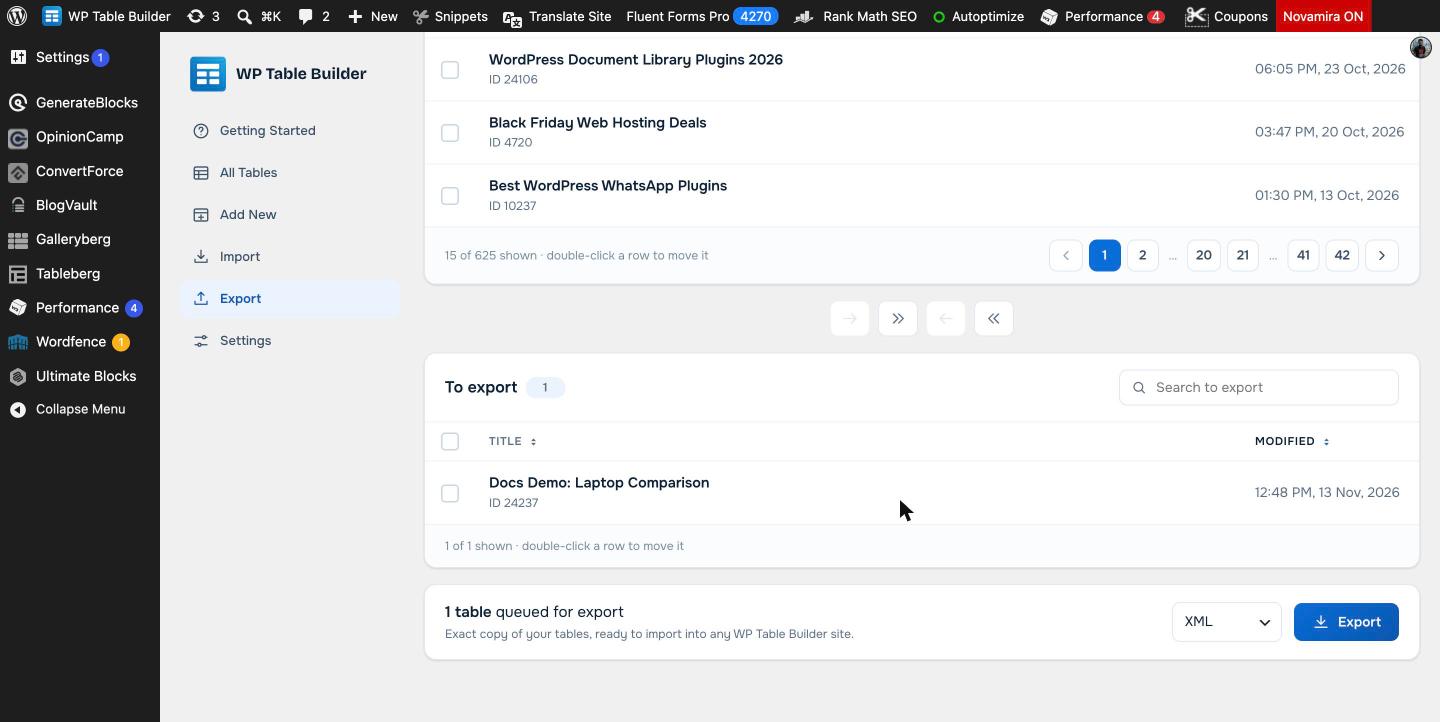
Step 3: Choose a format and export #
- Open the format menu next to the Export button and choose XML or CSV.
- Click Export.
- Your browser downloads the export file. Save it somewhere you can find it later.
How to import the exported file #
To bring the tables into another site, install WP Table Builder on that site, go to WP Table Builder > Import and upload the XML or CSV file. See How To Import CSV/XML File for the full steps.
Frequently asked questions #
Does WP Table Builder export keep table styles?
Yes, if you export to XML. XML is an exact copy of your tables, including styles, element settings and table settings. CSV exports contain text content only.
Can I export several tables at once?
Yes. Move as many tables as you want into the To export queue, then click Export once. The double right arrow adds every table shown in the list in one click.
Is exporting available in the free version?
Yes. Export to XML and CSV is included in the free version of WP Table Builder.
How do I move tables from one WordPress site to another?
Export the tables to XML on the old site, then import the XML file on the new site under WP Table Builder > Import. The table shortcode will have a new ID on the new site, so update the shortcodes in your posts.
Can I open a WP Table Builder export in Excel or Google Sheets?
Yes. Export the table as CSV and open the file in Excel, Google Sheets, Numbers or any spreadsheet app.


