
Quick Answer
Go to WP Table Builder > Settings > AI & API, paste an API key from Anthropic or OpenAI into the provider’s key field, choose which models to enable, and click Save. The AI Assistant button in the table builder then connects to that provider. The AI Assistant is a WP Table Builder Pro feature and uses your own API key.
The WP Table Builder AI Assistant is a chat panel inside the table builder that edits your table from plain-language instructions. Before you can use it, you connect at least one AI provider by adding your own API key. This guide shows how.
Requirements #
| Item | Details |
|---|---|
| Plan | WP Table Builder Pro |
| Plugin version | WP Table Builder and WP Table Builder Pro 2.3.0 or later |
| API key | An API key from Anthropic or OpenAI. Usage is billed by the provider to your own account. |
| User role | Administrator (the Settings page needs the manage_options capability) |
| Time needed | About 3 minutes |
Supported AI providers #
| Provider | Where to get an API key | Notes |
|---|---|---|
| Anthropic | Anthropic Console | Claude models. claude-haiku-4-5 is enabled by default and marked Recommended. |
| OpenAI | OpenAI API keys page | GPT models |
You can connect one provider or both. If both are connected, you can switch between them in the AI Assistant panel.
Step 1: Get an API key #
- Sign in to the Anthropic Console or the OpenAI platform.
- Create a new API key and copy it. Treat the key like a password: anyone who has it can use your provider account.
- Make sure billing is set up on the provider account, otherwise requests from WP Table Builder will fail.
Step 2: Add the key in WP Table Builder #
- In your WordPress dashboard, go to WP Table Builder > Settings.
- Open the AI & API tab.
- Paste the key into the field for your provider, for example Enter OpenAI API key.
- Click Save.
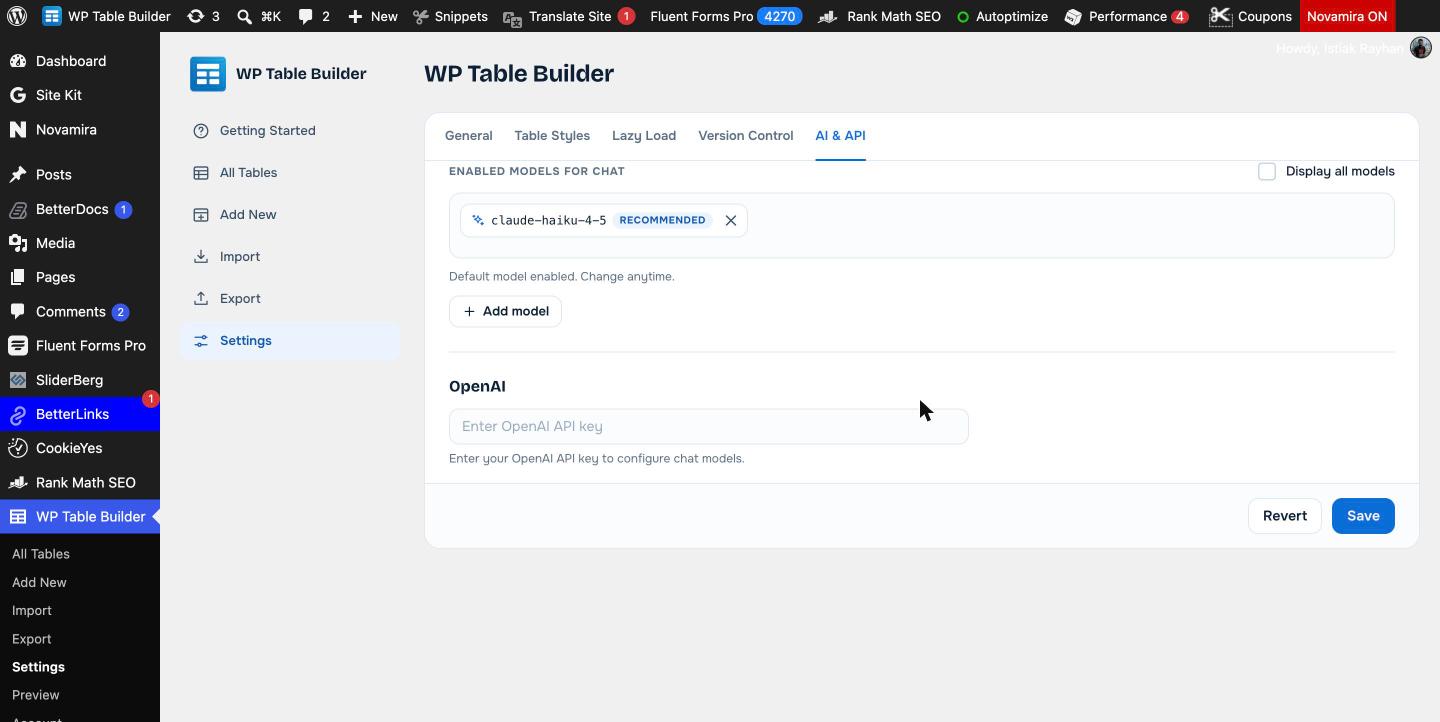
When a key is connected, a green dot appears next to the provider name and only the last four characters of the key are shown. To change a key, paste the new one into Paste new key to replace. To disconnect a provider, click Remove key.
Step 3: Choose the models for chat #
After a key is connected, the Enabled models for chat box lists the models that appear in the AI Assistant model menu.
- A recommended default model is enabled automatically.
- Click Add model to enable more models.
- Check Display all models to see every model the provider offers.
- Click the x on a model to remove it from the list.
Click Save after changing models.
Step 4: Check the connection in the builder #
- Open any table in the builder.
- Click AI Assistant in the top bar.
- The panel header shows Connected and the provider name, for example Connected · Anthropic.
Now you can start giving instructions. See How to Use the AI Assistant in WP Table Builder.
Frequently asked questions #
Does the WP Table Builder AI Assistant cost extra?
The AI Assistant is included in WP Table Builder Pro. You pay the AI provider (Anthropic or OpenAI) directly for the API usage on your own account. WP Table Builder does not add a fee on top.
Which AI providers does WP Table Builder support?
WP Table Builder 2.3 supports Anthropic (Claude models) and OpenAI (GPT models). You add your own API key for each provider under WP Table Builder > Settings > AI & API.
Which model should I use?
Start with the recommended default model. For Anthropic this is claude-haiku-4-5, which is fast and inexpensive for table edits. You can enable other models with Add model and switch between them in the AI Assistant panel.
Where is my API key stored?
The key is saved in your WordPress database as part of the WP Table Builder settings. Only administrators can see the Settings page, and the key is masked after saving.
The AI Assistant says it is not connected. What should I check?
Make sure you saved a valid key under Settings > AI & API, that at least one model is enabled, and that billing is active on your Anthropic or OpenAI account.


