
Quick Answer
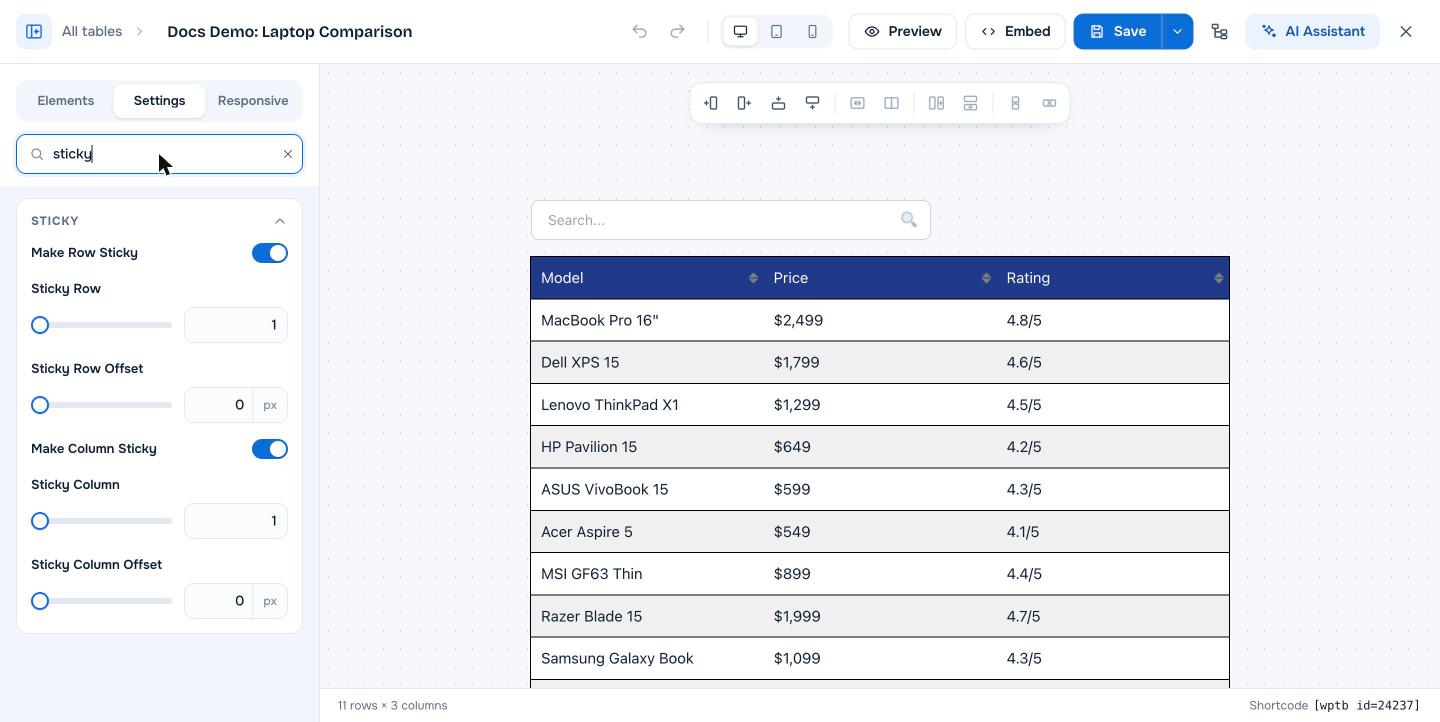
Open the table in the builder, go to the Settings tab and open the Sticky section. Turn on Make Row Sticky and pick the row number in Sticky Row to keep a header row visible while visitors scroll down. Turn on Make Column Sticky and pick Sticky Column to keep a column visible while visitors scroll sideways. Set an offset if your site has a sticky header, then click Save. Sticky rows and columns are a WP Table Builder Pro feature.
A sticky row stays fixed at the top of the screen while a visitor scrolls down through a long table. A sticky column stays fixed on the left while a visitor scrolls sideways through a wide table. Both keep labels in view, so readers always know which product or feature they are looking at.
Requirements #
| Item | Details |
|---|---|
| Plan | WP Table Builder Pro |
| Plugin version | WP Table Builder and WP Table Builder Pro 2.2.0 or later (row choice and offset) |
| For sticky columns | The table must be wider than its container, with horizontal scrolling turned on |
| Time needed | About 1 minute |
Sticky settings #
| Setting | What it does |
|---|---|
| Make Row Sticky | Keeps one row fixed at the top while visitors scroll down |
| Sticky Row | The number of the row to keep fixed. Use 1 for the header row. |
| Sticky Row Offset | Distance in px from the top of the screen. Use the height of your theme’s sticky header so the row sits below it. |
| Make Column Sticky | Keeps one column fixed while visitors scroll sideways |
| Sticky Column | The number of the column to keep fixed. Use 1 for the first column. |
| Sticky Column Offset | Distance in px from the left edge of the table |
Step 1: Open the Sticky section #
- Go to WP Table Builder > All Tables and click Edit under your table.
- Click the Settings tab in the left panel.
- Type
stickyin Search settings, or scroll down to the Sticky section.
Step 2: Make a row sticky #
- Turn on Make Row Sticky.
- Enter the row number in Sticky Row. For a normal header row, keep 1.
- If your site has a fixed header menu, enter its height in Sticky Row Offset, for example
80.
Step 3: Make a column sticky #
- Turn on Make Column Sticky.
- Enter the column number in Sticky Column. For product names in the first column, keep 1.
- Leave Sticky Column Offset at
0unless you need a gap from the left edge. - Click Save.
Test the sticky behavior #
The builder does not scroll like a real page. Click Preview or open the published page, then scroll down and sideways to check the sticky row and column. Check on a phone too, because that is where long and wide tables are scrolled the most.
Frequently asked questions #
Can I make the header row sticky in WP Table Builder?
Yes. With WP Table Builder Pro, turn on Make Row Sticky in the table’s Settings tab and set Sticky Row to 1. The header row stays at the top of the screen while visitors scroll.
Can I make a row other than the first one sticky?
Yes. Enter any row number in Sticky Row.
My sticky row hides behind my theme’s header. How do I fix it?
Set Sticky Row Offset to the height of your theme’s sticky header in pixels, for example 80. The sticky row then stops just below the header.
Why doesn’t my sticky column work?
A sticky column only matters when visitors can scroll the table sideways. Turn on Enable horizontal scrolling in the Scroll section and make sure the table is wider than the page area.
Is the sticky feature available in the free version?
No. Sticky rows and columns are part of WP Table Builder Pro.


